Chiselを使って、独自の回路を作成しテストしてみよう。前回はチュートリアルを実行してみただけだったが、次は独自の回路を作成してみる。
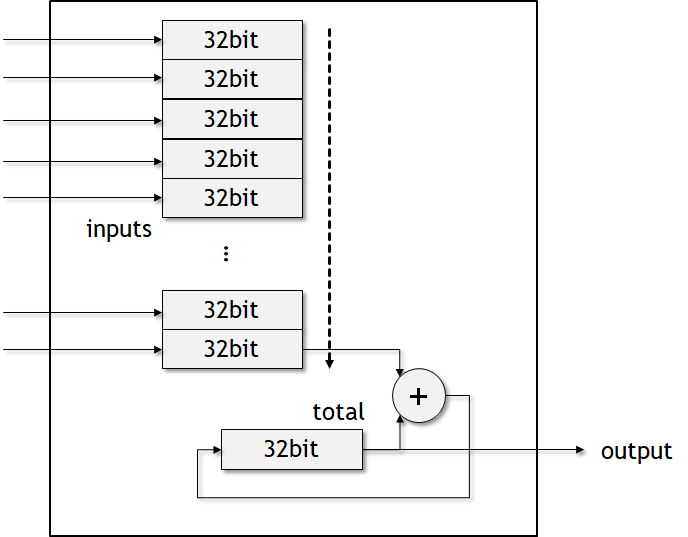
作ってみるのは、16個の32ビット整数を受け取り、その16要素をすべて加算し総和を求めるプログラムだ。 ツリー上に作っていけばより高速なのだが、今回は簡単化のため1要素ずつ加算していき、16サイクルかけて総和を求める構成にしてみた。以下のような回路になることを想定している。

計算が始まるとひとつずつレジスタの要素をシフトしていき、先頭のレジスタの値を加算していく。これだけなら、超単純だ。
reduction.scala プログラムの作成
Chiselで以下のようなプログラムを記述した。
package example

import chisel3._

class reduction extends Module {
  val io = IO(new Bundle {
    val start = Input(Bool())
    val a  = Vec(16, Input(UInt(32.W)))
    val z  = Output(UInt(32.W))
  })

  val reg_a = Reg (Vec(16, UInt(32.W)))
  val reg_z = Reg (UInt(32.W))

  reg_z := reg_z + reg_a(0)
  for (idx <- 0 until 15)
    reg_a(idx) := reg_a(idx+1)
  reg_a(15) := 0.U

  when (io.start) { reg_a := io.a; reg_z := 0.U }

  io.z := reg_z
}
大体見ればわかると思う。入力は32ビットUIntが16個並んだベクトル、出力は32ビットのUIntだ。
まず、io.startがアサートされると、入力値をとりあえずreg_aに取り込む。
次に1サイクルごとに、reg_a(idx) := reg_a(idx+1) とするとことで、レジスタの要素を1つずつずらしていく。そして、レジスタの先頭の値と、現在の総和の値reg_zを加算していくというわけだ (reg_z := reg_z + reg_a(0)) 。
これを、前回紹介したchisel-templateプロジェクトの、./src/main/scala/example/ に保存した。ファイル名はreduction.scalaとした。
reduction回路のテストプログラム作成
このreduction回路をテストするためのプログラムを書こう。
前回と同様に、chisel-templateリポジトリの./src/test/scala/example/test/に、テストプログラムを作成した。ファイル名は reductionUnitTest.scala とした。
import chisel3.iotesters.{ChiselFlatSpec, Driver, PeekPokeTester}
import chisel3._
import example.reduction

class reductionUnitTester(c: reduction) extends PeekPokeTester(c) {
  private val reduction = c

  for(i <- 1 to 2 by 1) {
    val A = new Array[Int](16)
    for (idx <- 0 until 16) {
      poke(reduction.io.a(idx), idx)
      A(idx) = idx
    }

    poke(reduction.io.start, 1)
    step (1)
    poke(reduction.io.start, 0)

    step (16)

    val total = A.sum

    expect(reduction.io.z, total)
  }
}

class reductionTester extends ChiselFlatSpec {
  private val backendNames = Array[String]("firrtl", "verilator")
  for ( backendName <- backendNames ) {
    "reduction" should s"calculate proper greatest common denominator (with $backendName)" in {
      Driver(() => new reduction, backendName) {
        c => new reductionUnitTester(c)
      } should be (true)
    }
  }
}
とりあえず今回のテストでは、reduction回路の入力値は、順に0,1,…,15とした。これなら簡単だ。これはpokeの繰り返しで実現していることが分かる。
次に、io.start信号を1サイクルだけアサートして、計算をスタートさせる。そのとき、計算には16サイクルかかるので、step(16)として計算が終了するまで待っている。
    poke(reduction.io.start, 1)
    step (1)
    poke(reduction.io.start, 0)

    step (16)
最後に、Scalaで計算した予測値との比較をする。予測値は、単純に配列の中身を加算するだけなので、val total = A.sumで終わりだ。scala便利。
sbt testを実行するとGCDと同様にテストが開始される。
[info] [1.303] RAN 34 CYCLES PASSED
[info] reductionTester:
[info] reduction
[info] - should calculate proper greatest common denominator (with firrtl)
[info] reduction
[info] - should calculate proper greatest common denominator (with verilator)
Enabling waves..
Exit Code: 0
生成されたVerilogファイルを確認してみよう。./test_run_dir/example.test.reductionTester739090423/reduction.vに格納されている。
wc ./test_run_dir/example.test.reductionTester739090423/reduction.v
 272  819 6656 ./test_run_dir/example.test.reductionTester739090423/reduction.v
とりあえず長いVerilogファイルが生成されている。あと、さすが機械生成されただけあって、非常に読みにくい。