FPGA開発日記

カテゴリ別記事インデックス https://msyksphinz.github.io/github_pages , English Version https://fpgadevdiary.hatenadiary.com/

LLVMのバックエンドを作るための第一歩 (53. RV64 / RV32両方のサポート格闘中2)

f:id:msyksphinz:20190425001356p:plain

RV64の64ビットモードでLLVMアセンブラを生成できるように格闘している。とりあえずサンプルプログラムとして以下を用意した。

  • xlen64_func.cpp
int64_t func()
{
  int64_t a0 = 10;
  int64_t a1 = 20;
  int64_t ans = a0 + a1;

  return ans;
}

いろいろ奮闘して、やっと分かったのはlib/Target/MYRISCVX/MYRISCVXSEISelLowering.cppレジスタ定義を変えてやらなければならなかったこと。 以下を変更していないせいで常にレジスタが32ビットだった。

  • lib/Target/MYRISCVX/MYRISCVXSEISelLowering.cpp
diff --git a/lib/Target/MYRISCVX/MYRISCVXSEISelLowering.cpp b/lib/Target/MYRISCVX/MYRISCVXSEISelLowering.cpp
index 36dff05c5ea..877f234dc32 100644
--- a/lib/Target/MYRISCVX/MYRISCVXSEISelLowering.cpp
+++ b/lib/Target/MYRISCVX/MYRISCVXSEISelLowering.cpp
@@ -38,7 +38,7 @@ MYRISCVXSETargetLowering::MYRISCVXSETargetLowering(const MYRISCVXTargetMachine &
     : MYRISCVXTargetLowering(TM, STI) {
   //@MYRISCVXSETargetLowering body {
   // Set up the register classes
-  addRegisterClass(MVT::i32, &MYRISCVX::GPRRegClass);
+  addRegisterClass(MVT::i64, &MYRISCVX::GPRRegClass);
   addRegisterClass(MVT::f32, &MYRISCVX::FPR_SRegClass);
   addRegisterClass(MVT::f64, &MYRISCVX::FPR_DRegClass);

これで、どうにかこうにかRV64の命令が生成できるようになった。

        addi    x2, x2, -24
        .cfi_def_cfa_offset 24
        addi    x10, zero, 10
        sw      x10, 16(x2)
        addi    x10, zero, 20
        sw      x10, 8(x2)
        ld      x10, 16(x2)
        ld      x11, 8(x2)
        add     x10, x10, x11
        sw      x10, 0(x2)
        ld      x10, 0(x2)
        addi    x2, x2, 24
        ret

LLVMのバックエンドを作るための第一歩 (53. RV64 / RV32両方のサポート格闘中)

f:id:msyksphinz:20190425001356p:plain

RV64の64ビットモードでLLVMアセンブラを生成できるように格闘している。とりあえずサンプルプログラムとして以下を用意した。

  • xlen64_func.cpp
#include <stdint.h>

int64_t func()
{
  return 0x100;
}

要点としては、0x100の戻り値をint64_tのデータ型で返せるか、というところだ。引数渡しのCalling Conventionまで一気にサポートすると大変なのでまずは一歩ずつ進める。

これをClangで処理してIRを出力すると以下のようなIRが作られる。

; Function Attrs: noinline nounwind optnone uwtable
define dso_local i64 @_Z4funcv() #0 {
entry:
  ret i64 16
}

さらに、llcのSelectionDAGによって以下のようなノードが生成された。

Enabling fast-isel
Creating constant: t1: i64 = Constant<16>
Creating constant: t2: i32 = Constant<1>
Creating constant: t3: i32 = Constant<0>
Creating constant: t4: i32 = Constant<16>
Creating new node: t6: ch,glue = CopyToReg t0, Register:i32 $v0, Constant:i32<0>
Creating new node: t8: ch,glue = CopyToReg t6, Register:i32 $v1, Constant:i32<16>, t6:1
Creating new node: t9: ch = MipsISD::Ret t8, Register:i32 $v0, Register:i32 $v1, t8:1

うーん?このConstant<1>とかConstant<0>はどこで使うんだ?実際、私のMYRISCVXの実装では、Constantが処理できなくて落ちてしまう。実際、この定数<1>は不要なはずだが...

Enabling fast-isel
Creating constant: t1: i64 = Constant<16>
Creating constant: t2: i32 = Constant<1>
Creating constant: t3: i32 = Constant<0>
Creating constant: t4: i32 = Constant<16>
Return operand #1 has unhandled type i32
UNREACHABLE executed at /home/masayuki/others/llvm/llvm-myriscvx90/lib/CodeGen/CallingConvLower.cpp:130!

これはよく見てみるとMIPSでも同じような不要なノードが作成されている。何故だろう?

AWSインスタンスをPythonで操作するためのboto3に入門する

https://i0.wp.com/python.gotrained.com/wp-content/uploads/2019/02/boto3.png?fit=300%2C300&ssl=1

私は普段はLLVMのビルドをローカルマシンを使って行っている。私のローカルラップトップPCはSurface Laptop2なので、LLVMデバッグモードでビルドするのにはかなり骨が折れる(実際、ビルド中は何もできない)。

しかしサーバを購入するのはもったいないし、それだけのために電気代が増えてしまうのもなんだか悔しいので、ビルドの時だけ強力なサーバを立ち上げるクラウドのような方式が欲しいと思った。

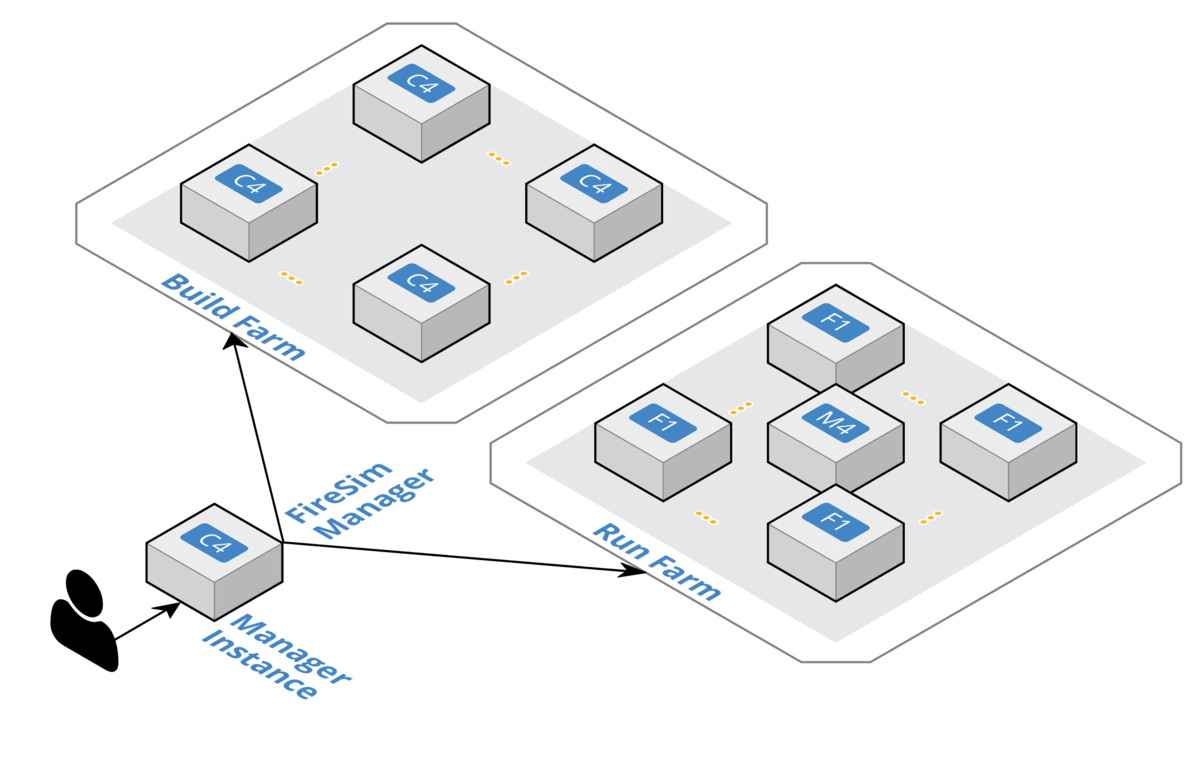
そこで、AWSをクライアントから管理するためのツールであるboto3を使ってみることにした。実際に、RISC-VのAWSシミュレーションツールであるFireSimはBoto3を使用している。

f:id:msyksphinz:20190405012417p:plain

まずは入門から。参考にしたのは以下のQiitaの記事。とても分かりやすい。

qiita.com

S3バケットへのアクセステスト

まずはS3からデータを取得するための方法について入門する。API Keyなどは事前に取得しているものを使用した。

#!/usr/bin/python3

import boto3

print("boto3.client calling...")

s3 = boto3.client('s3',
                  aws_access_key_id='アクセスキーIDを指定する',
                  aws_secret_access_key='シークレットアクセスキーを指定する',
                  region_name='ap-northeast-1'
)

print("Getting client...")

# Getting Packet List
print("Getting packet list...")
print(s3.list_buckets())
print("Getting object...")
obj = s3.get_object(Bucket='llvm-bucket', Key='llvm.spec.in')
print(obj)
print(obj['Body'].read())

ここまでで、S3のバケットにアクセスして、ファイルを取得して中身を表示するコードの完成だ。とっても簡単。

boto3.client calling...
Getting client...
Getting packet list...
...
Getting object...
{'ResponseMetadata': {'RequestId': 'AD0CCF1B1AA44BD2', 'HostId': 'VngFXFeDJ2WZLXhzM2Yij3rT1D1wuM2YSmoXBqIgVQxkFHxPC+pd4ykG+wq0JdCQNACkdwTcVrs=', 'HTTPStatusCode': 200, 'HTTPHeaders': {'x-amz-id-2': 'VngFXFeDJ2WZLXhzM2Yij3rT1D1wuM2YSmoXBqIgVQxkFHxPC+pd4ykG+wq0JdCQNACkdwTcVrs=', 'x-amz-request-id': 'AD0CCF1B1AA44BD2', 'date': 'Sat, 17 Aug 2019 05:06:19 GMT', 'last-modified': 'Fri, 08 Mar 2019 18:22:06 GMT', 'etag': '"c1e0345abd088bbdd35a312318f0ce68"', 'accept-ranges': 'bytes', 'content-type': 'binary/octet-stream', 'content-length': '1866', 'server': 'AmazonS3'}, 'RetryAttempts': 0}, 'AcceptRanges': 'bytes', 'LastModified': datetime.datetime(2019, 3, 8, 18, 22, 6, tzinfo=tzutc()), 'ContentLength': 1866, 'ETag': '"c1e0345abd088bbdd35a312318f0ce68"', 'ContentType': 'binary/octet-stream', 'Metadata': {}, 'Body': <botocore.response.StreamingBody object at 0x7f62ef6b8390>}
b'Name: @PACKAGE_NAME@\nVersion: @PACKAGE_VERSION@\nRelease: 0\nSummary: LLVM (An Optimizing Compiler Infrastructure)\nLicense: University of Illinois/NCSA Open Source License\nVendor: None (open source)\nGroup: Development/Compilers\nURL: http://llvm..org/\nSource: http://llvm.org/releases/@PACKAGE_VERSION@/@PACKAGE_NAME@-@PACKAGE_VERSION@.tar.gz\nBuildRoot: %{_tmppath}/%{name}-root\nRequires: /sbin/ldconfig\nBuildRequires: gcc >= 3.4\n\n%description\nLLVM is a compiler infrastructure designed for compile-time, link-time, runtime,\nand idle-time optimization of programs from arbitrary programming languages.\nLLVM is written in C++ and has been developed since 2000 at the University of\nIllinois and Apple. It currently supports compilation of C and C++ programs, \nusing front-ends derived from GCC 4.0.1. A new front-end for the C family of\nlanguages is in development. The compiler infrastructure\nincludes mirror sets of programming tools as well as libraries with equivalent\nfunctionality.\n\n%prep\n%setup -q -n @PACKAGE_NAME@-@PACKAGE_VERSION@\n\n%build\n./configure \\\n--prefix=%{_prefix} \\\n--bindir=%{_bindir} \\\n--datadir=%{_datadir} \\\n--includedir=%{_includedir} \\\n--libdir=%{_libdir} \\\n--enable-optimized \\\n--enable-assertions \nmake tools-only\n\n%install\nrm -rf %{buildroot}\nmake install DESTDIR=%{buildroot}\n\n%clean\nrm -rf %{buildroot}\n\n%post -p /sbin/ldconfig\n\n%postun -p /sbin/ldconfig\n\n%files\n%defattr(-, root, root)\n%doc CREDITS.TXT LICENSE.TXT README.txt docs/*.{html,css,gif,jpg} docs/CommandGuide\n%{_bindir}/*\n%{_libdir}/*.o\n%{_libdir}/*.a\n%{_libdir}/*.so\n%{_includedir}/llvm\n\n%changelog\n* Fri Aug 04 2006 Reid Spencer\n- Updates for release 1.8\n* Fri Apr 07 2006 Reid Spencer\n- Make the build be optimized+assertions\n* Fri May 13 2005 Reid Spencer\n- Minor adjustments for the 1.5 release\n* Mon Feb 09 2003 Brian R. Gaeke\n- Initial working version of RPM spec file.\n\n\n'

EC2の立ち上げと終了のテスト

次に、EC2を立ち上げて終了したいと思う。ec2 resourceを使えば良さそうだ。デフォルトではm1.smallインスタンスが立ち上がる。これは必要に応じて変える。

print("Launching EC2..")
ec2_resouce = boto3.resource('ec2')
instances = ec2_resouce.create_instances(ImageId='ami-0a2de1c3b415889d2', MaxCount=1, MinCount=1)
print(instances)
instance = instances[0]
print("Waiting EC2 Launch ...")
instance.wait_until_running()
print("EC2 Launch Finished ...")

print(instance.network_interfaces_attribute)
instance.terminate()

print("Waiting EC2 Terminate ...")
instance.wait_until_terminated()
print("EC2 Terminate Finished ...")

立ち上がって終了した。EC2の立ち上がりは30秒くらいかな?まあまあ使い物になるかも。 マネージコンソールを見ても、m1.smallインスタンスが立ち上がってはTerminateされていることが分かる。成功だ。

f:id:msyksphinz:20190817144743p:plain
boto3によるEC2インスタンス立ち上げの様子
Launching EC2..
[ec2.Instance(id='i-07835e8a75c47d675')]
Waiting EC2 Launch ...
EC2 Launch Finished ...
[{'Attachment': {'AttachTime': datetime.datetime(2019, 8, 17, 5, 6, 19, tzinfo=tzutc()), 'AttachmentId': 'eni-attach-094cc8843f6f7fe75', 'DeleteOnTermination': True, 'DeviceIndex': 0, 'Status': 'attaching'}, 'Description': '', 'Groups': [{'GroupName': 'default', 'GroupId': 'sg-7ca07519'}], 'Ipv6Addresses': [], 'MacAddress': '06:3c:0e:c7:ee:12', 'NetworkInterfaceId': 'eni-0a96a95c5be175cfe', 'OwnerId': '405410199528', 'PrivateDnsName': 'ip-172-31-7-114.ap-northeast-1.compute.internal', 'PrivateIpAddress': '172.31.7.114', 'PrivateIpAddresses': [{'Primary': True, 'PrivateDnsName': 'ip-172-31-7-114.ap-northeast-1.compute.internal', 'PrivateIpAddress': '172.31.7.114'}], 'SourceDestCheck': True, 'Status': 'in-use', 'SubnetId': 'subnet-71d12c06', 'VpcId': 'vpc-4a7d8e2f', 'InterfaceType': 'interface'}]
Waiting EC2 Terminate ...
EC2 Terminate Finished ...

FireSimはどのようにしてEC2を操作しているのか

例えば、ビルドファームではVivadoに回路デザインを流し込むために、マネージインスタンスからデザインの情報をビルド用のインスタンスに渡しているはずだ。このあたりの処理はどのようにして行われているのだろうか。

github.com

このあたりかな?

github.com

aws_bulildあたりが、aws-fpgaプロジェクトのコピーとか、立ち上げを実際に行っている様子だ。このあたりを見ていけば良さそうだ。

Chiselで部分代入を実現するためのいくつかのテクニック

https://cdn-ak.f.st-hatena.com/images/fotolife/m/msyksphinz/20170830/20170830023047.png

Chiselでは、以下のようなビット列の一部に対する部分代入が許されない。 ハードウェア記述言語としてみると非常に不便だが、もともとChiselがソフトウェア記述言語Scalaがベースであるということを考えると何となく想像がつく。

val res = Wire(UInt(32.W))
res(idx) := true.B

ではこれ以外に部分代入を実現する方法は無いのか?

  • bitSetを使う

bitSetはある信号の特定の1ビットを0/1に設定して結果を返す。特定の1ビットのみを更新する場合に使用できる。 例えばこんな感じ。

class BitSet (WIDTH: Int) extends Module {
  val io = IO(new Bundle {
    val in    = Input(UInt(WIDTH.W))
    val valid = Input(Bool())
    val idx = Input(UInt(log2Ceil(WIDTH).W))
    val out = Output(UInt(WIDTH.W))
  })

  io.out := io.in
  when(io.valid) {
    io.out := io.in.bitSet(io.idx, true.B)
  }
}

io.validが有効になると、io.inのうちio.idxで指定された1ビットのみが1にアップデートされてio.outに返される。それ以外はio.inがそのままio.outに返されるという記述になる。

出力されたVerilogは以下の通り。

module BitSet( // @[:@3.2]
  input         clock, // @[:@4.4]
  input         reset, // @[:@5.4]
  input  [31:0] io_in, // @[:@6.4]
  input         io_valid, // @[:@6.4]
  input  [4:0]  io_idx, // @[:@6.4]
  output [31:0] io_out // @[:@6.4]
);
  wire [31:0] _T_15; // @[bitset.scala 18:27:@10.6]
  wire [31:0] _T_16; // @[bitset.scala 18:27:@11.6]
  assign _T_15 = 32'h1 << io_idx; // @[bitset.scala 18:27:@10.6]
  assign _T_16 = io_in | _T_15; // @[bitset.scala 18:27:@11.6]
  assign io_out = io_valid ? _T_16 : io_in; // @[bitset.scala 16:10:@8.4 bitset.scala 18:12:@16.6]
endmodule
  • 再代入可能なvar変数を使う

これは若干やり方が汚いし、生成させる回路も汚い。なのであまりお勧めしないが、どうしてもこの書き方の方がScala的にきれいになる場合、この方法を使用する。

var変数を使うことで、valと異なり再代入を行うことができるようになる。 例えば、以下の記述は32ビット各ビットに対して特定の演算func()を適用し、その結果を返す。

class VarLoopTest (WIDTH: Int) extends Module {
  val io = IO(new Bundle {
    val in1 = Input(UInt(WIDTH.W))
    val in2 = Input(UInt(WIDTH.W))
    val out = Output(UInt(WIDTH.W))
  })

  def func(a: Bool, b: Bool) : Bool = {
    return a ^ b
  }
  var res = WireInit(0.U(WIDTH.W))
  for (i <- 0 until WIDTH) {
    res = res | (func(io.in1(i), io.in2(i)) << i)
  }

  io.out := res
}

変数resは再代入可能なので、32回ループを回しながら当該ビット位置に結果を当てはめる。 ちなみに生成されるコードはとても汚い。以下のようなVerilogが生成された。なんでこれしきのコードにこんなに長いVerilogファイルが生成されるのか悲しい気持ちになるが。。。

module VarLoopTest( // @[:@3.2]
  input         clock, // @[:@4.4]
  input         reset, // @[:@5.4]
  input  [31:0] io_in1, // @[:@6.4]
  input  [31:0] io_in2, // @[:@6.4]
  output [31:0] io_out // @[:@6.4]
);
  wire  _T_14; // @[bitset.scala 35:29:@10.4]
  wire  _T_15; // @[bitset.scala 35:40:@11.4]
  wire  _T_16; // @[bitset.scala 31:14:@12.4]
  wire [31:0] _T_18; // @[bitset.scala 35:15:@14.4]
  wire  _T_19; // @[bitset.scala 35:29:@15.4]
  wire  _T_20; // @[bitset.scala 35:40:@16.4]
  wire  _T_21; // @[bitset.scala 31:14:@17.4]
  wire [1:0] _GEN_0; // @[bitset.scala 35:45:@18.4]
  wire [1:0] _T_22; // @[bitset.scala 35:45:@18.4]
  wire [31:0] _GEN_1; // @[bitset.scala 35:15:@19.4]
...
  wire  _T_171; // @[bitset.scala 31:14:@167.4]
  wire [31:0] _GEN_60; // @[bitset.scala 35:45:@168.4]
  wire [31:0] _T_172; // @[bitset.scala 35:45:@168.4]
  assign _T_14 = io_in1[0]; // @[bitset.scala 35:29:@10.4]
  assign _T_15 = io_in2[0]; // @[bitset.scala 35:40:@11.4]
  assign _T_16 = _T_14 ^ _T_15; // @[bitset.scala 31:14:@12.4]
  assign _T_18 = {{31'd0}, _T_16}; // @[bitset.scala 35:15:@14.4]
...
  assign _GEN_60 = {{31'd0}, _T_171}; // @[bitset.scala 35:45:@168.4]
  assign _T_172 = _GEN_60 << 31; // @[bitset.scala 35:45:@168.4]
  assign io_out = _T_168 | _T_172; // @[bitset.scala 38:10:@170.4]
endmodule

まあ、この程度のサンプルコードであれば、以下のように書いた方がきれいだし、生成されるVerilog的にも(比較的)心の平安が保たれる(これでも生成されるコードはかなりどぎついが...)

class VarLoopTest (WIDTH: Int) extends Module {
  val io = IO(new Bundle {
    val in1 = Input(UInt(WIDTH.W))
    val in2 = Input(UInt(WIDTH.W))
    val out = Output(UInt(WIDTH.W))
  })

  def func(a: Bool, b: Bool) : Bool = {
    return a ^ b
  }
  var res = Wire(Vec(WIDTH, Bool()))
  for(i <- 0 until WIDTH) {
    res(i) := func(io.in1(i), io.in2(i))
  }

  io.out := res.asUInt
}

LLVMのバックエンドを作るための第一歩 (54. Compressed命令を実装する検討)

f:id:msyksphinz:20190425001356p:plain

RISC-Vの命令セットは基本的に32ビット長だが、Compresed命令という16ビット長の短縮命令が定義されている。これはArmのThumb命令のようなもので、命令フェッチのサイズを減らし、性能を向上させることを目的としている。

今回はこのCompressed命令をLLVMに実装する方法について検討する。

Compressed命令の仕様

Compressed命令は16ビット長の命令で、命令フェッチサイズを削減し性能を向上させることを目的としている。 16ビットで命令を表現するために、定義されているのは必要最小限の命令で、かつ指定できるレジスタの範囲にも制限がある。 以下に、RISC-Vで定義されているCompressed命令のフォーマットを示す。このように、大きく分けて9種類の命令フォーマットが定義されている。

1565885086152

また、rs1', rs2', rd'などで定義されているレジスタは以下のようなマップになっている。3ビットでレジスタを表現するために、必要最小限のレジスタのみを指定できる。

RVC Register Number 000 001 010 011 100 101 110 111
Integer Register Number x8 x9 x10 x11 x12 x13 x14 x15
Integer Register ABI Name s0 s1 a0 a1 a2 a3 a4 a5
Floating-Point Register Number f8 f9 f10 f11 f12 f13 f14 f15
Floating-Point Register ABI Name fs0 fs1 fa0 fa1 fa2 fa3 fa4 fa5

まずは、命令フォーマットを定義します。上記の9種類の命令フォーマットをLLVMで表現しましょう。

  • llvm-myriscvx/lib/Target/MYRISCVX/MYRISCVXInstrFormats.td
// MYRISCVX Compressed Format
class MYRISCVXCInst<dag outs, dag ins, string asmstr, list<dag> pattern,
                    InstrItinClass itin, Format f>: Instruction
{
  // Inst and Size: for tablegen(... -gen-emitter) and
  // tablegen(... -gen-disassembler) in CMakeLists.txt
  field bits<16> Inst;
  Format Form = f;
  let Namespace = "MYRISCVX";
  let Size = 2;
  bits<2> Opcode = 0;

  // Bottom 2 bits are the 'opcode' field
  let Inst{1-0} = Opcode;

...

  field bits<32> SoftFail = 0;
}

MYRISCVXInstに加えて、MYRISCVXCInstを定義した。変更しているのは、field bits<16> Instとして命令長を16ビットに絞っているところである。

このクラスを利用して、上記の9種類の命令フォーマットを定義する

  • llvm-myriscvx/lib/Target/MYRISCVX/MYRISCVXInstrInfoC.td
// Compressed Instruciton CR (Compressed Register)
class MYRISCVX_CR<bits<4> funct4, bits<2> op,
                  dag outs, dag ins, string asmstr,
                  list<dag> pattern, InstrItinClass itin> :
  MYRISCVXCInst<outs, ins, asmstr, pattern, itin, FrmR>
{
  bits<5> rd;
  bits<5> rs2;

  let Inst{15-12} = funct4;
  let Inst{11-7}  = rd;
  let Inst{6-2}   = rs2;
}
// Compressed Instruciton CI (Compressed Immediate)
class MYRISCVX_CI<bits<3> funct3, bits<2> op,
                  dag outs, dag ins, string asmstr,
                  list<dag> pattern, InstrItinClass itin> :
  MYRISCVXCInst<outs, ins, asmstr, pattern, itin, FrmR>
{
  // 省略
}
  • MYRISCVX_CSSクラス(スタックポインタ制御命令)
// Compressed Instruciton CSS (Compressed Stack-relative Store)
class MYRISCVX_CSS<bits<3> funct3,
                  dag outs, dag ins, string asmstr,
                  list<dag> pattern, InstrItinClass itin> :
  MYRISCVXCInst<outs, ins, asmstr, pattern, itin, FrmR>
{
  // 省略
}
  • MYRISCVX_CIWクラス(幅広即値命令)
// Compressed Instruciton CIW (Compressed Wide Immediate)
class MYRISCVX_CIW<bits<3> funct3,
                  dag outs, dag ins, string asmstr,
                  list<dag> pattern, InstrItinClass itin> :
  MYRISCVXCInst<outs, ins, asmstr, pattern, itin, FrmR>
{
  // 省略
}
  • MYRISCVX_CLクラス (ロード命令)
// Compressed Instruciton CS (Compressed Store)
class MYRISCVX_CS<bits<3> funct3,
                  dag outs, dag ins, string asmstr,
                  list<dag> pattern, InstrItinClass itin> :
  MYRISCVXCInst<outs, ins, asmstr, pattern, itin, FrmR>
{
  // 省略
}
  • MYRISCVX_CSクラス (ストア命令)
class MYRISCVX_CS<bits<3> funct3,
                  dag outs, dag ins, string asmstr,
                  list<dag> pattern, InstrItinClass itin> :
  MYRISCVXCInst<outs, ins, asmstr, pattern, itin, FrmR>
{
  // 省略
}
  • MYRISCVX_CAクラス (算術演算命令)
// Compressed Instruciton CA (Compressed Arithmetic)
class MYRISCVX_CA<bits<6> funct6, bits<2> funct2,
                  dag outs, dag ins, string asmstr,
                  list<dag> pattern, InstrItinClass itin> :
  MYRISCVXCInst<outs, ins, asmstr, pattern, itin, FrmR>
{
  // 省略
}
  • MYRISCVX_CBクラス (条件分岐命令)
// Compressed Instruciton CB (Compressed Branch)
class MYRISCVX_CB<bits<3> funct3,
                  dag outs, dag ins, string asmstr,
                  list<dag> pattern, InstrItinClass itin> :
  MYRISCVXCInst<outs, ins, asmstr, pattern, itin, FrmR>
{
  // 省略
}
  • MYRISCVX_CJクラス (無条件分岐命令)
// Compressed Instruciton CJ (Compressed Jump)
class MYRISCVX_CJ<bits<3> funct3,
                  dag outs, dag ins, string asmstr,
                  list<dag> pattern, InstrItinClass itin> :
  MYRISCVXCInst<outs, ins, asmstr, pattern, itin, FrmR>
{
  // 省略
}

これらを登録してまずはLLVMコンパイルしてみる。

ChiselのパラメタライズによりGenericなモジュールを作成する手法

https://cdn-ak.f.st-hatena.com/images/fotolife/m/msyksphinz/20181105/20181105012126.png

Chiselによりインタフェースのパラメタライズの検討を行う。例えば、汎用インタフェースを使用してバスのマルチプレクサを構成することを考える。

インタフェースとしては以下のものを使う。以下のGenBundleTで汎用化されている。valid, sideband, dataの信号線が用意されており、dataは一般化されており、任意のデータ型を渡すことが可能である。

class GenBundle[T <: Data](dataType: T) extends Bundle {
  override def cloneType: this.type =
    new GenBundle(dataType).asInstanceOf[this.type]

  val valid = Output(Bool())
  val sideband = Output(UInt(10.W))
  val data  = Output(dataType)
}

例えば、以下のような汎用化を考える。nポートのインタフェースから、1つのポートを選んで返す。

class GenericArbiter[T <: Data](val gen:T, val n: Int) extends Module {
  val io = IO(new Bundle {
    val in = Input(Vec(n, gen))
    val out = Output(gen)
  })
  val idx = RegInit(0.U(log2Ceil(n).W))
  idx := idx + 1.U

  io.out := io.in(idx)
}

これは不思議なことに、GenBundleOutput / Inputの属性を付属させなかった場合は動作しない。

...
[error] (run-main-0) chisel3.core.Binding$RebindingException: Attempted reassignment of binding to chisel3.core.UInt@0
[error] chisel3.core.Binding$RebindingException: Attempted reassignment of binding to chisel3.core.UInt@0
...

また、GenBundleの属性をInputに設定しても動作しない。

class GenBundle[T <: Data](dataType: T) extends Bundle {
  override def cloneType: this.type =
    new GenBundle(dataType).asInstanceOf[this.type]

  // Inputでは正しく生成できない。
  val valid    = Input(Bool())
  val sideband = Input(UInt(10.W))
  val data     = Input(dataType)
}
[error] firrtl.passes.CheckInitialization$RefNotInitializedException:  @[:@6.4] : [module GenericArbiter]  Reference io is not fully initialized.
[error]    : io.in[1].valid <= VOID
[error] firrtl.passes.CheckInitialization$RefNotInitializedException:  @[:@6.4] : [module GenericArbiter]  Reference io is not fully initialized.
[error]    : io.in[1].data <= VOID
[error] firrtl.passes.CheckInitialization$RefNotInitializedException:  @[:@6.4] : [module GenericArbiter]  Reference io is not fully initialized.

以下の構成だと正しくVerilogが生成できる。

class GenBundle[T <: Data](dataType: T) extends Bundle {
  override def cloneType: this.type =
    new GenBundle(dataType).asInstanceOf[this.type]

  val valid    = Output(Bool())
  val sideband = Output(UInt(10.W))
  val data     = Output(dataType)
}

class GenericArbiter[T <: Data](val gen:T, val n: Int) extends Module {
  // val io = IO(new ArbiterIO(gen, n))
  val io = IO(new Bundle {
    val in = Input(Vec(n, gen))
    val out = Output(gen)
  })

  val idx = RegInit(0.U(log2Ceil(n).W))
  idx := idx + 1.U

  io.out := io.in(idx)
}

あるいは、Input/Outputを1つにまとめてArbiterとしてI/Oを宣言する手法もある。 `

class GenBundle[T <: Data](dataType: T) extends Bundle {
  override def cloneType: this.type =
    new GenBundle(dataType).asInstanceOf[this.type]

  val valid    = Output(Bool())
  val sideband = Output(UInt(10.W))
  val data     = Output(dataType)
}

class ArbiterIO[T <: Data](val gen: T, val n: Int) extends Bundle {
  val in  = Flipped(Vec(n, gen))
  val out = gen
}


class GenericArbiter[T <: Data](val gen:T, val n: Int) extends Module {
  val io = IO(new ArbiterIO(gen, n))

  val idx = RegInit(0.U(log2Ceil(n).W))
  idx := idx + 1.U

  io.out := io.in(idx)
}

LLVMのバックエンドを作るための第一歩 (53. RV64 / RV32両方のサポート)

f:id:msyksphinz:20190425001356p:plain

RISC-Vには32ビットモード(RV32)、64ビットモード(RV64)、128ビットモード(RV128)が定義されている。これまではRV32による32ビットのみをサポートしてきたが、RV64もサポートしたい。具体的に言えば、

  • RV64モードの時にレジスタ幅を64ビットとして取り扱う(スタックの取り扱いなどをそれに伴い変える)
  • RV64モード用の命令が使えるようになる。

などが行えるようになりたい。ここでは、RV64をサポートして、さまざまな追加命令と命令生成の調整を行う。

HwModeの追加

まず、2つのハードウェアタイプを追加する。RV64とRV32だ。ここでは、+64bit-64bitによりそれぞれのハードウェアタイプを識別することにする。

  • lib/Target/MYRISCVX/MYRISCVX.td
def RV64 : HwMode<"+64bit">;
def RV32 : HwMode<"-64bit">;

レジスタ定義の変更

次に、これまで32ビットで定義していたレジスタを拡張しなければならない。レジスタの定義はMYRISCVXRegister.tdで行っていたので、こちらを変更する。

  • llvm-myriscvx/lib/Target/MYRISCVX/MYRISCVXRegisterInfo.td
def GPR : RegisterClass<"MYRISCVX", [i32], 32, (add
  // Reserved
  ZERO,
  // Return Values and Arguments
  A0, A1, A2, A3, A4, A5, A6, A7,
  // Not preserved across procedure calls
  T0, T1, T2, T3, T4, T5, T6,
  // Callee save
  FP, S1, S2, S3, S4, S5, S6, S7, S8, S9, S10, S11,
  // Reserved
  RA, SP, GP, TP
  )>

i32のみで定義していたので、HwModeに応じてレジスタの定義を変えるように変更する。

def XLenVT : ValueTypeByHwMode<[RV32, RV64, DefaultMode],
                               [i32,  i64,  i32]>;

def GPR : RegisterClass<"MYRISCVX", [XLenVT], 32, (add
  // Reserved
  ZERO,
  // Return Values and Arguments
  A0, A1, A2, A3, A4, A5, A6, A7,
  // Not preserved across procedure calls
  T0, T1, T2, T3, T4, T5, T6,
  // Callee save
  FP, S1, S2, S3, S4, S5, S6, S7, S8, S9, S10, S11,
  // Reserved
  RA, SP, GP, TP
  )> {
    let RegInfos = RegInfoByHwMode<
      [RV32,              RV64,              DefaultMode],
      [RegInfo<32,32,32>, RegInfo<64,64,64>, RegInfo<32,32,32>]>;
}

XLenVTという変数を導入した。XLenVTはHwModeに応じて型が変わる。これに応じて、レジスタのサイズを変える、という訳だ。

生成されたレジスタ情報MYRISCVXGenRegisterInfo.incには3種類のモードが登録されている。

  • build-myriscvx/lib/Target/MYRISCVX/MYRISCVXGenRegisterInfo.inc
static const TargetRegisterInfo::RegClassInfo RegClassInfos[] = {
  // Mode = 0 (Default)
  { 32, 32, 32, VTLists+4 },    // FPR_S
  { 32, 32, 32, VTLists+0 },    // GPR
  { 64, 64, 32, VTLists+6 },    // FPR_D
  // Mode = 1 (RV32)
  { 32, 32, 32, VTLists+4 },    // FPR_S
  { 32, 32, 32, VTLists+0 },    // GPR
  { 64, 64, 32, VTLists+6 },    // FPR_D
  // Mode = 2 (RV64)
  { 32, 32, 32, VTLists+4 },    // FPR_S
  { 64, 64, 64, VTLists+2 },    // GPR
  { 64, 64, 32, VTLists+6 },    // FPR_D
};

64ビットロードストア命令の追加

次に、64ビットのロードストア命令を追加する。RISC-Vでは、64ビットのロードストア命令としてLD/SDが定義されている。

funct7 rs2 rs1 funct3 rd opcode
LD imm[11:5] imm[4:0] rs1 011 rd 0000011
SD imm[11:5] rs2 rs1 011 imm[4:0] 0100011

これをMYRISCVXInstrInfo.tdに登録する。

  • llvm-myriscvx/lib/Target/MYRISCVX/MYRISCVXInstrInfo.td
defm LD     : LoadM32 <0b0000011, 0b011, "ld",  GPR, load_a>;
defm SD     : StoreM32<0b0100011, 0b011, "sd",  GPR, store_a>;

そして、生成パタンも登録する。

def : Pat<(i64 (load GPR:$rs1))                          , (LD GPR:$rs1, 0)           >;
def : Pat<(i64 (load addr_fi:$rs1))                      , (LD addr_fi:$rs1, 0)       >;
def : Pat<(i64 (load (add GPR:$rs1, simm12:$simm12)))    , (LD GPR:$rs1, $simm12)     >;
def : Pat<(i64 (load (add addr_fi:$rs1, simm12:$simm12))), (LD addr_fi:$rs1, $simm12) >;

def : Pat<(store GPR:$rs2, GPR:$rs1)                          , (SD GPR:$rs2, GPR:$rs1, 0)                         >;
def : Pat<(store GPR:$rs2, addr_fi:$rs1)                      , (SD GPR:$rs2, addr_fi:$rs1, 0)                     >;
def : Pat<(store GPR:$rs2, (add GPR:$rs1, simm12:$simm12))    , (SD GPR:$rs2, GPR:$rs1, simm12:$simm12)            >;
def : Pat<(store GPR:$rs2, (add addr_fi:$rs1, simm12:$simm12)), (SD GPR:$rs2, addr_fi:$rs1, simm12:$simm12)        >;