FPGA開発日記

カテゴリ別記事インデックス https://msyksphinz.github.io/github_pages , English Version https://fpgadevdiary.hatenadiary.com/

Arm DesignStart Cortex-M3を試す(3. Modelsimを使ってDhrystoneを流す)

Arm DesignStart ProgramではCortex-M3も開放されており、こちらもRTLシミュレーション環境が用意されていた。

https://community.arm.com/cfs-filesystemfile/__key/communityserver-components-secureimagefileviewer/communityserver-blogs-components-weblogfiles-00-00-00-37-86/designstart_2D00_chip.png_2D00_900x506x2.jpg_2D00_900x506x2.jpg?_=636704413372858051

DesignStartのウェブサイトから Cortex-M3のデザインをダウンロードする。AT421-MN-80001-r0p0-02rel0というパッケージ名で公開されているのだが、これをダウンロードして展開する。

AT421-MN-80001-r0p0-02rel0/m3designstart/logical/testbench/execution_tb に移動して、make helpを実行してみると使い方が分かる。

$ make help
###################################################################
This is the top Makefile for the execution testbench
make or make help shows this extra information

See make.cfg for additional build configuration settings

Usage: make target [options]
target is one of:
compile                     : compile the testbench (simulator can be vcs, mti, ius)
run                         : run a test (simulator can be vcs, mti, ius)
runall                      : run all tests (simulator can be vcs, mti, ius)
tests                       : compile all tests
testcode                    : compile a specific test
clean                       : clean the compiled testbench
clean_tests                 : clean all compiled test code
clean_all                   : clean the compiled testbench and all compiled test code
options can be:
TESTNAME=<test>             : specify the test name
PLUSARGS=<plusargs_list>    : run time options
BUILDOPTS=<buildopts_list>  : build time options
SIMULATOR=<ius,mti,vcs>     : choose simulator tool
TOOL_CHAIN=<ds5,gcc,keil>   : choose C compiler tool
DSM=no                      : used with compile and run time. Setting DSM=yes will pick Carbon model

使えるシミュレータとしては、VCS, ModelSim, Incisiveがあるらしい。 SIMULATOR=オプションで指定する。また、テストパタンはTESTNAME=で記述する。

テストパタンとしては、AT421-MN-80001-r0p0-02rel0/m3designstart/logical/testbench/testcodesの中から指定すればいいのかな?

apb_mux_tests
cxdt
default_slaves_tests
designtest_m3
dhry
dualtimer_demo
generic
gpio_driver_tests
gpio_tests
hello
interrupt_demo
keil_multiple
memory_tests
rtx_demo
self_reset_demo
sleep_demo
timer_driver_tests
timer_tests
uart_driver_tests
uart_tests
watchdog_demo

例えば、Dhrystoneを実行する場合には以下のように実行する。 compile / runの順で実行するのが良いようだ。

$ make compile
$ make run TESTNAME=dhry
options.mk:106: "Warning: TARMAC trace would not be generated for obfuscated RTL"
 >> Running testbench with mti   and DSM=no
export LD_LIBRARY_PATH=:/home/msyksphinz/riscv64/lib; export TARMAC_ENABLE=1; vsim  -quiet -assertdebug -voptargs="+acc=blnr"  tb_fpga_shield -64 -c -do "radix hex; run 40000us ;quit -f"  | tee "mti_dhry_run.log"
Reading pref.tcl

# 10.5b

# vsim -quiet -assertdebug -voptargs="+acc=blnr" tb_fpga_shield -c -do "radix hex; run 40000us ;quit -f"
# Start time: 23:28:17 on Oct 24,2018
# ** Warning: Design size of 39941 statements exceeds ModelSim-Intel FPGA Starter Edition recommended capacity.
# Expect performance to be adversely affected.
# radix hex
# hexadecimal
#  run 40000us
# ** Warning: (vsim-3116) Problem reading symbols from linux-gate.so.1 : can not open ELF file.
# Loading CXDT from parameter IMAGENAME (./CXDT.bin)
# *
# * Max. address:                        001ffff
# * Begin of full protection address:    0000000
# * Begin of half protection address:    0010000
# * Begin of quarter protection address: 0018000
# *
# ===========================================================
#
#  nvSRAM Power UP
# *
# * Max. address:                        001ffff
# * Begin of full protection address:    0000000
# * Begin of half protection address:    0010000
# * Begin of quarter protection address: 0018000
# *
# ===========================================================
#
...

という訳でModelSim Intel FPGA Starter Editionを使っているのだが、30分以上実行してもまだ終わらない。。。なかなか先は長い。。。

という訳で、helloを実行してみる。

$ make run TESTNAME=hello
...
#  nvSRAM Power UP
# 130040.000ns UART: Hello world
# 161640.000ns UART: ** TEST PASSED **
# 164720.000ns UART: Test Ended
# ** Note: $stop    : ../verilog/cmsdk_uart_capture_ard.v(240)
#    Time: 164720 ns  Iteration: 1  Instance: /tb_fpga_shield/u_cmsdk_uart_capture_ard
# Break in NamedBeginStat p_sim_end at ../verilog/cmsdk_uart_capture_ard.v line 240
# Stopped at ../verilog/cmsdk_uart_capture_ard.v line 240
# quit -f
# End time: 00:27:15 on Oct 25,2018, Elapsed time: 0:01:30
# Errors: 0, Warnings: 2

正しく実行できたようだ。

RISC-V Compliance Task Groupのテストパタンを試す(2. 自作RISC-Vシミュレータでテストパタンを通す)

f:id:msyksphinz:20181016221815p:plain

RISC-V Foundationが公開しているテストパタンには、riscv-toolsリポジトリの中に含まれているriscv-testsテストパタンとは別に、RISC-V Compliance Task Groupのテストパタンが公開されている。

github.com

ダウンロードして試行することができる。デフオルトではriscvOVPsimが動いているようだ。

前回自作RISC-Vシミュレータを使ってテストパタンを動かす試行を少ししたのだが、テストが結構落ちてしまった。 原因を解析すると、いろいろシミュレータに設定を追加しなければならなかったり、テストの設定を変えなければならなかったり。。。 しかし、riscv-testsで落ちなかったにも関わらずriscv-complianceでは落ちたので、実装を作ったときは両方とも流してみた方が良いかもね。

テストパタンは以下のカテゴリが用意されている。

$ ls -1 riscv-test-suite/
rv32i
rv32im
rv32imc
rv32mi
rv32si
rv32ua
rv32uc
rv32ud
rv32uf
rv32ui
rv64i
rv64im

それぞれで、必要となるアーキテクチャの構成が違うので注意。例えば、rv32iはC系列の命令(16ビット長命令)は動かない前提で作ってあるので注意。

例えば、C命令がサポートされている場合は2-byte alignの場所にジャンプできるが、C命令がサポートされていないテストで2-byte alignの場所にジャンプすると例外が発生する。

m命令(設定レジスタ)のテストパタンはいまだにいくつか落ちるが、それ以外は問題なく通過するようになった。 というか、テストを通すためにオプションを新設する必要があったりしたので、それを対応した。(`--archオプションを追加した。今のところC命令とビット長しか効果が無いけど)。

github.com

usage: ./swimmer_riscv [options] ...
options:
      --max_size          Max size of log file [MB] (unsigned int [=0])
      --max               Max instructions to simulate (unsigned long [=0])
      --binfile           Binary file to simulate. (string [=])
      --hexfile           Hex file to simulate. (string [=])
      --only_info_load    Debug Info is only loaded (only enable with --binfile)
      --debug             Generate debug log
      --out               Output log filename (string [=])
      --load-dump         Dump Loaded Bin file (only enable with --binfile)
      --parallel          CPU Parallel Execution
      --init_pc           Initial Program Counter Value (string [=])
      --stop-host         Stop simulation by accessing MTOHOST
      --use-pk            Location of RISC-V Proxy Kernel (string [=])
      --arch              Support RISC-V Architecture (ex. --arch rv32imafd.../rv64imafd...) (string [=rv64imafdc])
      --trace-hier        Generate Hierarcical Trace
      --trace-out         Hierarcical Trace Output Filename (string [=])
      --vmlinux           Location of vmlinux (string [=])
      --logstart          cycle of log start (unsigned long [=0])
      --printstep         print number of steps each cycle (unsigned long [=0])
      --signature         Generate Signature and filename  (string [=])
  -v, --version           Show Version Information
  -?, --help              print this message

同一環境上で複数のGitアカウントを切り替えるための1アイデア

1台のLinuxマシン上でGitを使っていて、基本的に同一のアカウントを使っているのだけれども、リポジトリによっては別のアカウントを使ったり、状況に応じて複数のGitのユーザ情報を切り替えたいケースが発生することがある。

これは例えば会社でとあるプロジェクトの時はこちらのユーザ名を使ってコミットし、別のプロジェクトの時は別のユーザ名を使ってコミットする、というような状況である。

通常であれば、${HOME}/.gitconfigにユーザ情報を記入している。これはメインで使われているアカウントが入っている場合が多い。

  • .gitconfig
[user]
    name = msyksphinz
    email = msyksphinz_dev.gmail.com

これ以外に、特定のGitリポジトリでは別のアカウントを使いたいとき、そのリポジトリのルートディレクトリの直下の.git/configに登録する、という手があるらしい。

  • ${Repository}/.git/config
[user]
    name = sub_msyksphinz
    email = sub_msyksphinz_dev.gmail.com

この方法は一見よさそうに思えるが、同じリポジトリを複数のディレクトリに展開しているとき(一方は開発用、一方はローカル環境でリグレッションを流している場合など、複数の場所にリポジトリを展開することは良くある)、cloneしたリポジトリに何度も同じ設定をしなければならないので面倒くさい。

いろいろと調べていると、.gitconfigはinclude文により別のファイルから設定を取り込めることが分かった。

qiita.com

なるほど、ということはGitユーザ名の項目をinclude文で取り入れるようにして、状況によってGitユーザ名を切り替えるコマンドを用意しておけばよいのではないか。

Gitのユーザ名を切り替えるためには、Environmental Modulesを使用した。つまり、以下の2つのファイルを用意した(MODULEPATH環境変数${HOME}/modulesに設定されていることを前提とする)。

$ cd ${MODULEPATH}
$ tree .
.
├── git
│   ├── git.local -> /home/msyksphinz/dotfiles/modules/git/git.local
│   ├── git.sub-> /home/msyksphinz/dotfiles/modules/git/git.sub
│   ├── local -> /home/msyksphinz/dotfiles/modules/git/local
│   └── sub-> /home/msyksphinz/dotfiles/modules/git/sub
└── riscv
    ├── riscv32 -> /home/msyksphinz/dotfiles/modules/riscv/riscv32
    ├── riscv64 -> /home/msyksphinz/dotfiles/modules/riscv/riscv64
    ├── riscv64-bare
...

git/localgit/subが用意されており、それぞれユーザ名の情報を格納したgit.localgit.subというファイルを作った。

  • git.local
[user]
    name = msyksphinz
    email = msyksphinz_dev.gmail.com
  • git.sub
[user]
    name = sub_msyksphinz
    email = sub_msyksphinz_dev.gmail.com

以下のModulesの設定は何をしているかというと、ホームディレクトリに置かれている.gitconfig.localというファイルを、Modules毎に書き換えている。一回rmしてsymbolic linkを張りなおしている。

  • git/local
#%Module1.0
##
proc ModulesHelp { } {
    puts stderr "Git Username for Local\n"
}

module-whatis   "Git Username for Local"

# append pathes
exec rm -f $::env(HOME)/.gitconfig.local
exec ln -s $::env(HOME)/modules/git/git.local $::env(HOME)/.gitconfig.local
  • git/sub
#%Module1.0
##
proc ModulesHelp { } {
    puts stderr "Git Username for Sub\n"
}

module-whatis   "Git Username for Sub"

# append pathes
exec rm -f $::env(HOME)/.gitconfig.local
exec ln -s $::env(HOME)/modules/git/git.sub $::env(HOME)/.gitconfig.local

そして肝心の${HOME}/.gitconfigは以下のようにしている。${HOME}/.gitconfig.localを読み込ませるだけだ。それ以外の設定は共通なのでどこでも使える。

  • ${HOME}/.gitconfig
[include]
    path = .gitconfig.local

[color]
        ui = true

[alias]
    graph = log --graph --date-order -C -M --pretty=format:'%Cred%h%Creset -%C(yellow)%d%Creset %s %Cgreen(%cr) %C(bold blue)<%an>%Creset' --all --date=short
    fgraph = !git-foresta --all --style=1 --graph-symbol-commit=★ --graph-symbol-tip=☆ --graph-margin-right=2 | less -RSX
    co    = checkout
...

例えば、git/local環境をロードしてみる。

$ module load git/local
$ git config --list
include.path=.gitconfig.local
user.name=msyksphinz
user.email=msyksphinz_dev.gmail.com
color.ui=true
...

次に、git/sub環境をロードしてみる。

$ module load git/sub
$ git config --list
user.name=sub_msyksphinz
user.email=sub_msyksphinz_dev.gmail.com
color.ui=true

切り替えはできるようになった。

ただし、この方法も万能ではない。ユーザは作業するGitリポジトリを移るたびに、moduleを再ロードして適切なユーザ設定に切り替えなければならない。 そこはユーザの自己責任だ。gitのリポジトリを何個も持っていたり、頻繁に切り替える必要がある場合は有効だと思う。あくまでも1アイデアということで。

RISC-V Compliance Task Groupのテストパタンを試す

f:id:msyksphinz:20181016221815p:plain

RISC-V Foundationが公開しているテストパタンには、riscv-toolsリポジトリの中に含まれているriscv-testsテストパタンとは別に、RISC-V Compliance Task Groupのテストパタンが公開されている。

github.com

ダウンロードして試行することができる。デフオルトではriscvOVPsimが動いているようだ。

$ git clone https://github.com/riscv/riscv-compliance.git
$ cd riscv-compliance
$ make
...
make[1]: ディレクトリ '/home/msyksphinz/work/riscv-compliance' に入ります
make \
        RISCV_TARGET=riscvOVPsim \
        RISCV_DEVICE=rv32i \
        RISCV_PREFIX=riscv64-unknown-elf- \
        run -C /home/msyksphinz/work/riscv-compliance/riscv-test-suite/rv32i                                                                                                                                                                 make[2]: ディレクトリ '/home/msyksphinz/work/riscv-compliance/riscv-test-suite/rv32i' に入ります                                                                                                                                             riscv64-unknown-elf-gcc -march=rv32i -mabi=ilp32 -static -mcmodel=medany -fvisibility=hidden -nostdlib -nostartfiles -I/home/msyksphinz/work/riscv-compliance/riscv-test-env/ -I/home/msyksphinz/work/riscv-compliance/riscv-test-env/p/ -I/h
ome/msyksphinz/work/riscv-compliance/riscv-target/riscvOVPsim/ -T/home/msyksphinz/work/riscv-compliance/riscv-test-env/p/link.ld src/I-ENDIANESS-01.S -o /home/msyksphinz/work/riscv-compliance/work//I-ENDIANESS-01.elf; riscv64-unknown-elf
-objdump -D /home/msyksphinz/work/riscv-compliance/work//I-ENDIANESS-01.elf > /home/msyksphinz/work/riscv-compliance/work//I-ENDIANESS-01.elf.objdump
/home/msyksphinz/work/riscv-compliance/riscv-ovpsim/bin/Linux64/riscvOVPsim.exe --variant RV32I --program /home/msyksphinz/work/riscv-compliance/work//I-ENDIANESS-01.elf --signaturedump --customcontrol --override riscvOVPsim/cpu/sigdump/
SignatureFile=/home/msyksphinz/work/riscv-compliance/work//I-ENDIANESS-01_signature.output --override riscvOVPsim/cpu/sigdump/ResultReg=3 --override riscvOVPsim/cpu/simulateexceptions=T --override riscvOVPsim/cpu/defaultsemihost=F --logf
ile /home/msyksphinz/work/riscv-compliance/work//I-ENDIANESS-01.out32 --override riscvOVPsim/cpu/user_version=2.3 --override riscvOVPsim/cpu/priv_version=1.11
Imperas riscvOVPsim

CpuManagerFixedPlatform (64-Bit) v99999999 Open Virtual Platform simulator from www.IMPERAS.com.
Copyright (c) 2005-2018 Imperas Software Ltd.  Contains Imperas Proprietary Information.
Licensed Software, All Rights Reserved.
Visit www.IMPERAS.com for multicore debug, verification and analysis solutions.

CpuManagerFixedPlatform started: Sun Oct 21 09:39:04 2018


Info (OR_OF) Target 'riscvOVPsim/cpu' has object file read from '/home/msyksphinz/work/riscv-compliance/work//I-ENDIANESS-01.elf'
...

00000000ffffffff00000000ffffffff
Test PASSED
Info
Info ---------------------------------------------------
Info CPU 'riscvOVPsim/cpu' STATISTICS
Info   Type                  : riscv (RV64IM)
Info   Nominal MIPS          : 100
Info   Final program counter : 0x80000044
Info   Simulated instructions: 190
Info   Simulated MIPS        : run too short for meaningful result
Info ---------------------------------------------------
Info
Info ---------------------------------------------------
Info SIMULATION TIME STATISTICS
Info   Simulated time        : 0.00 seconds
Info   User time             : 0.00 seconds
Info   System time           : 0.00 seconds
Info   Elapsed time          : 0.02 seconds
Info ---------------------------------------------------

CpuManagerFixedPlatform finished: Sun Oct 21 09:30:52 2018


CpuManagerFixedPlatform (64-Bit) v99999999 Open Virtual Platform simulator from www.IMPERAS.com.
Visit www.IMPERAS.com for multicore debug, verification and analysis solutions.

make[2]: ディレクトリ '/home/msyksphinz/work/riscv-compliance/riscv-test-suite/rv64im' から出ます
riscv-test-env/verify.sh


Compare to reference files ...

Check             DIVW ... OK
Check             MULW ... OK
Check            REMUW ... OK
Check             REMW ... OK
--------------------------------
OK: 4/4
make[1]: ディレクトリ '/home/msyksphinz/work/riscv-compliance' から出ます

最後にチェック項目がOK: 4/4になっているのでOKだと思う。

Spikeを使ってシミュレーションする場合は、RISCV_TARGET=spikeを指定する。

$ make RISCV_TARGET=spike
...
spike --isa=rv64im +signature=/home/msyksphinz/work/riscv-compliance/work//REMUW_signature.output /home/msyksphinz/work/riscv-compliance/work//REMUW.elf 2> /home/msyksphinz/work/riscv-compliance/work//REMUW.out64
riscv64-unknown-elf-gcc -march=rv64im -mabi=lp64 -static -mcmodel=medany -fvisibility=hidden -nostdlib -nostartfiles -I/home/msyksphinz/work/riscv-compliance/riscv-test-env/ -I/home/msyksphinz/work/riscv-compliance/riscv-test-env/p/ -I/home/msyksphinz/work/riscv-compliance/riscv-target/spike/ -T/home/msyksphinz/work/riscv-compliance/riscv-test-env/p/link.ld src/DIVW.S -o /home/msyksphinz/work/riscv-compliance/work//DIVW.elf; riscv64-unknown-elf-objdump -D /home/msyksphinz/work/riscv-compliance/work//DIVW.elf > /home/msyksphinz/work/riscv-compliance/work//DIVW.elf.objdump
spike --isa=rv64im +signature=/home/msyksphinz/work/riscv-compliance/work//DIVW_signature.output /home/msyksphinz/work/riscv-compliance/work//DIVW.elf 2> /home/msyksphinz/work/riscv-compliance/work//DIVW.out64
make[2]: ディレクトリ '/home/msyksphinz/work/riscv-compliance/riscv-test-suite/rv64im' から出ます
riscv-test-env/verify.sh


Compare to reference files ...

Check             DIVW ... OK
Check             MULW ... OK
Check            REMUW ... OK
Check             REMW ... OK
--------------------------------
OK: 4/4
make[1]: ディレクトリ '/home/msyksphinz/work/riscv-compliance' から出ます

自作RISC-Vシミュレータを使ってテストパタンを流してみる

自作シミュレータなど、ターゲットを増やしたいときは以下のようにファイルを追加するらしい。

$ tree riscv-target/ -L 1
riscv-target/
├── Codasip-simulator
├── README.md
├── riscvOVPsim
├── spike
└── swimmer_riscv   # このディレクトリを追加。spikeのものをコピーする。

ディレクトリの中身にはMakefile.includeが入っているので、ここにシミュレータのオプションを書き換えていく。

$ cd riscv-target/swimmer_riscv/
$ tree
.
├── compliance_io.h
├── compliance_test.h
└── device
    ├── rv32i
    │   └── Makefile.include
    ├── rv32im
    │   └── Makefile.include
    ├── rv32imc
    │   └── Makefile.include
    ├── rv32mi
    │   └── Makefile.include
    ├── rv32si
    │   └── Makefile.include
    ├── rv32ua
    │   └── Makefile.include
    ├── rv32uc
    │   └── Makefile.include
    ├── rv32ud
    │   └── Makefile.include
    ├── rv32uf
    │   └── Makefile.include
    ├── rv32ui
    │   └── Makefile.include
    ├── rv64i
    │   └── Makefile.include
    └── rv64im
        └── Makefile.include

13 directories, 14 files
  • riscv-compliance/riscv-target/swimmer_riscv/device/rv32i/Makefile.include
TARGET_SIM ?= swimmer_riscv
ifeq ($(shell command -v $(TARGET_SIM) 2> /dev/null),)
    $(error Target simulator executable '$(TARGET_SIM)` not found)
endif

RUN_TARGET=\
    $(TARGET_SIM) --bit-mode 32 --stop-host \
        --signature $(work_dir_isa)/$(*)_signature.output \
        --binfile $(work_dir_isa)/$< 2> $(work_dir_isa)/$@

RISCV_PREFIX   ?= riscv32-unknown-elf-
RISCV_GCC      ?= $(RISCV_PREFIX)gcc
RISCV_OBJDUMP  ?= $(RISCV_PREFIX)objdump
RISCV_GCC_OPTS ?= -static -mcmodel=medany -fvisibility=hidden -nostdlib -nostartfiles

COMPILE_TARGET=\
        $$(RISCV_GCC) $(2) $$(RISCV_GCC_OPTS) \
                -I$(ROOTDIR)/riscv-test-env/ \
                -I$(ROOTDIR)/riscv-test-env/p/ \
                -I$(ROOTDIR)/riscv-target/$(RISCV_TARGET)/ \
                -T$(ROOTDIR)/riscv-test-env/p/link.ld $$< \
                -o $(work_dir_isa)/$$@; \
        $$(RISCV_OBJDUMP) -D $(work_dir_isa)/$$@ > $(work_dir_isa)/$$@.objdump

これで実行してみる。途中で止まってしまったのだが、これはシミュレータのバグだと思う。環境としてはできたかな。

$ make RISCV_TARGET=swimmer_riscv
for isa in rv32i rv32im rv32imc rv32mi rv32si rv32ua rv32uc rv32ud rv32uf rv32ui rv64i rv64im; do \
        echo $isa; \
        make RISCV_TARGET=swimmer_riscv RISCV_DEVICE=$isa RISCV_ISA=$isa variant; \
                rc=$?; \
                if [ $rc -ne 0 ]; then \
                exit $rc; \
        fi \
done
rv32i
make[1]: Entering directory '/home/msyksphinz/work/riscv/riscv-compliance'
make \
        RISCV_TARGET=swimmer_riscv \
        RISCV_DEVICE=rv32i \
        RISCV_PREFIX=riscv64-unknown-elf- \
        run -C /home/msyksphinz/work/riscv/riscv-compliance/riscv-test-suite/rv32i
make[2]: Entering directory '/home/msyksphinz/work/riscv/riscv-compliance/riscv-test-suite/rv32i'
riscv64-unknown-elf-gcc -march=rv32i -mabi=ilp32 -static -mcmodel=medany -fvisibility=hidden -nostdlib -nostartfiles -I/home/msyksphinz/work/riscv/riscv-compliance/riscv-test-env/ -I/home/msyksphinz/work/riscv/riscv-compliance/riscv-test-env/p/ -I/home/msyksphinz/work/riscv/riscv-compliance/riscv-target/swimmer_riscv/ -T/home/msyksphinz/work/riscv/riscv-compliance/riscv-test-env/p/link.ld src/I-ENDIANESS-01.S -o /home/msyksphinz/work/riscv/riscv-compliance/work//I-ENDIANESS-01.elf; riscv64-unknown-elf-objdump -D /home/msyksphinz/work/riscv/riscv-compliance/work//I-ENDIANESS-01.elf > /home/msyksphinz/work/riscv/riscv-compliance/work//I-ENDIANESS-01.elf.objdump
swimmer_riscv --bit-mode 32 --stop-host --signature /home/msyksphinz/work/riscv/riscv-compliance/work//I-ENDIANESS-01_signature.output --binfile /home/msyksphinz/work/riscv/riscv-compliance/work//I-ENDIANESS-01.elf 2> /home/msyksphinz/work/riscv/riscv-compliance/work//I-ENDIANESS-01.out32
riscv64-unknown-elf-gcc -march=rv32i -mabi=ilp32 -static -mcmodel=medany -fvisibility=hidden -nostdlib -nostartfiles -I/home/msyksphinz/work/riscv/riscv-compliance/riscv-test-env/ -I/home/msyksphinz/work/riscv/riscv-compliance/riscv-test-env/p/ -I/home/msyksphinz/work/riscv/riscv-compliance/riscv-target/swimmer_riscv/ -T/home/msyksphinz/work/riscv/riscv-compliance/riscv-test-env/p/link.ld src/I-RF_x0-01.S -o /home/msyksphinz/work/riscv/riscv-compliance/work//I-RF_x0-01.elf; riscv64-unknown-elf-objdump -D /home/msyksphinz/work/riscv/riscv-compliance/work//I-RF_x0-01.elf > /home/msyksphinz/work/riscv/riscv-compliance/work//I-RF_x0-01.elf.objdump
...

Googleの量子コンピュータフレームワークCirqを使ってみる(7. Cirqのチュートリアルで量子フーリエ変換を試す)

量子コンピュータの勉強を続けており、Cirqの資料をひたすら読み進めている。

Cirqのサンプルプログラムでも、量子フーリエ変換の例が挙げられている。

以下の論文を参考にしているらしい。

  • Implementation of Shor’s Algorithm on a Linear Nearest Neighbour Qubit Array

https://arxiv.org/pdf/quant-ph/0402196.pdf

def generate_2x2_grid_qft_circuit():
    # Define a 2*2 square grid of qubits.
    a,b,c,d = [cirq.GridQubit(0, 0), cirq.GridQubit(0, 1),
               cirq.GridQubit(1, 1), cirq.GridQubit(1, 0)]

    circuit = cirq.Circuit.from_ops(
        cirq.H(a),
        _cz_and_swap(a, b, 0.5),
        _cz_and_swap(b, c, 0.25),
        _cz_and_swap(c, d, 0.125),
        cirq.H(a),
        _cz_and_swap(a, b, 0.5),
        _cz_and_swap(b, c, 0.25),
        cirq.H(a),
        _cz_and_swap(a, b, 0.5),
        cirq.H(a),
        strategy=cirq.InsertStrategy.EARLIEST
    )
    return circuit

私の使っているサンプルプログラムと微妙に違うなあ...?

とりあえず実行してみる。

$ python3 quantum_fourier_transform.py
Circuit:
(0, 0): ───H───@───────×───H────────────@─────────×───H────────────@───────×───H───
               │       │                │         │                │       │
(0, 1): ───────@^0.5───×───@────────×───@^0.5─────×───@────────×───@^0.5───×───────
                           │        │                 │        │
(1, 0): ───────────────────┼────────┼───@─────────×───┼────────┼───────────────────
                           │        │   │         │   │        │
(1, 1): ───────────────────@^0.25───×───@^0.125───×───@^0.25───×───────────────────

FinalState
[0.25+0.j 0.25+0.j 0.25+0.j 0.25+0.j 0.25+0.j 0.25+0.j 0.25+0.j 0.25+0.j
 0.25+0.j 0.25+0.j 0.25+0.j 0.25-0.j 0.25+0.j 0.25+0.j 0.25+0.j 0.25+0.j]

すべての状態で量子の確率が同一になった。わたしの最初に実装したケースと違うなあ。

初期量子状態を少し変更してみる。 周期が0(すべての量子状態の確率が同一)の状態を作ってみる。

diff --git a/examples/quantum_fourier_transform.py b/examples/quantum_fourier_transform.py
index 893298a..bf850f4 100644
--- a/examples/quantum_fourier_transform.py
+++ b/examples/quantum_fourier_transform.py
@@ -38,7 +38,8 @@ def main():
     print()
     print('FinalState')
     print(np.around(result.final_state, 3))
-
+    print(np.abs(np.around(result.final_state, 3)))
+
 def _cz_and_swap(q0, q1, rot):
     yield cirq.CZ(q0, q1)**rot
     yield cirq.SWAP(q0,q1)
@@ -52,6 +53,10 @@ def generate_2x2_grid_qft_circuit():

     circuit = cirq.Circuit.from_ops(
+        cirq.H(a),
+        cirq.H(b),
+        cirq.H(d),
+        cirq.H(c),
         cirq.H(a),
         _cz_and_swap(a, b, 0.5),
         _cz_and_swap(b, c, 0.25),
         _cz_and_swap(c, d, 0.125),

実行結果。これは自作量子シミュレータと一緒だ。

$ python3 quantum_fourier_transform.py
Circuit:
(0, 0): ───H───H───@───────×───H────────────@─────────×───H────────────@───────×───H───
                   │       │                │         │                │       │
(0, 1): ───H───────@^0.5───×───@────────×───@^0.5─────×───@────────×───@^0.5───×───────
                               │        │                 │        │
(1, 0): ───H───────────────────┼────────┼───@─────────×───┼────────┼───────────────────
                               │        │   │         │   │        │
(1, 1): ───H───────────────────@^0.25───×───@^0.125───×───@^0.25───×───────────────────

FinalState
[ 1.+0.j -0.-0.j -0.-0.j  0.+0.j  0.+0.j  0.+0.j -0.+0.j  0.-0.j -0.+0.j
  0.+0.j -0.-0.j  0.-0.j -0.-0.j -0.+0.j -0.-0.j -0.-0.j]
[1. 0. 0. 0. 0. 0. 0. 0. 0. 0. 0. 0. 0. 0. 0. 0.]

もう一つ周期を1つ増やしてみる。

+#        cirq.H(a),
+        cirq.H(b),
+        cirq.H(d),
+        cirq.H(c),
$ python3 quantum_fourier_transform.py
Circuit:
(0, 0): ───H───@───────×───H────────────@─────────×───H────────────@───────×───H───
               │       │                │         │                │       │
(0, 1): ───H───@^0.5───×───@────────×───@^0.5─────×───@────────×───@^0.5───×───────
                           │        │                 │        │
(1, 0): ───H───────────────┼────────┼───@─────────×───┼────────┼───────────────────
                           │        │   │         │   │        │
(1, 1): ───H───────────────@^0.25───×───@^0.125───×───@^0.25───×───────────────────

FinalState
[-0.   +0.707j  0.   -0.j    -0.444+0.088j -0.132+0.088j  0.   -0.j
 -0.   -0.j    -0.059+0.088j -0.018+0.088j -0.   -0.j     0.   -0.j
  0.018+0.088j  0.059+0.088j -0.   -0.j    -0.   -0.j     0.132+0.088j
  0.444+0.088j]
[0.707      0.         0.45263672 0.15864426 0.         0.
 0.1059481  0.08982205 0.         0.         0.08982205 0.1059481
 0.         0.         0.15864426 0.45263672]

うーん、自作量子シミュレータど結果と少し違うかなあ? 色々見てみたけどよく分からん。。。

f:id:msyksphinz:20180926011313p:plain

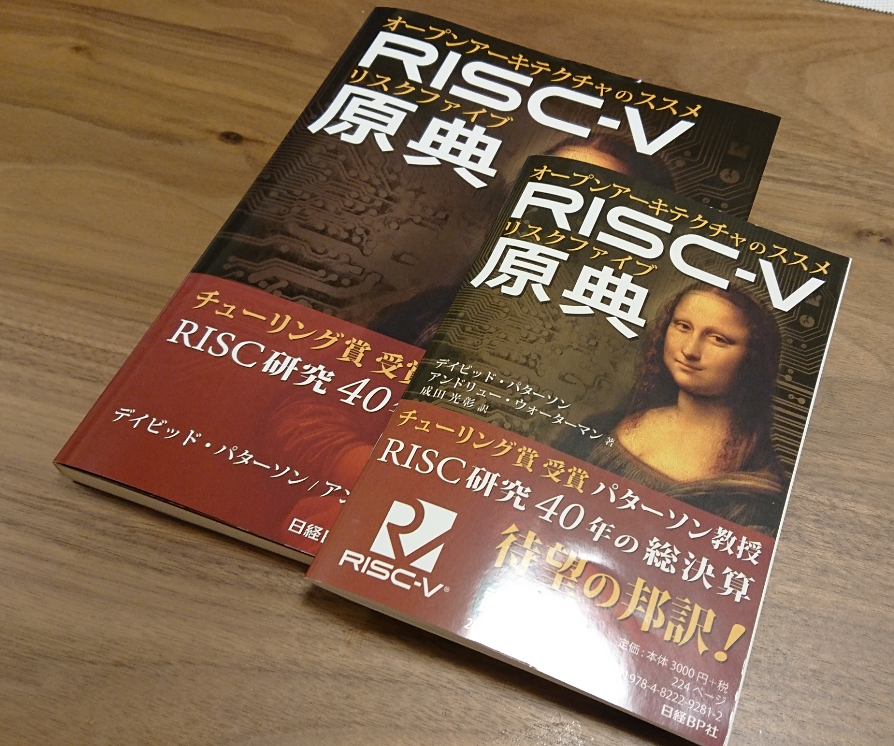
RISC-V Reader(日本語版: RISC-V原典)を買った(もらった)

RISC-V Day Tokyo 2018の特典としてついてきたのだけれども、発表者も参加費払わないといけなかったし、これは実質買ったと言っていいでしょ。

RISC-V Readerというのはチューリング賞を受賞したDavid Patterson先生の書いたRISC-Vの入門書的な本なのだが、それが日本語訳になって出版され、RISC-V Day Tokyoに参加した人だけ貰えるらしい。

という訳でもらってきた。ついでに、著者の一人の方にサインももらってきた。

さらにさらに、試供品として1章だけ載っている冊子があるのだが、それもおまけでもらってきた。

帰りの電車の中でパラパラとめく手ってみたが、まあRISC-Vの仕様書をよりかみ砕いた感じ。 仕様書を把握しているなら、あまり真剣に読む必要はないかな。

f:id:msyksphinz:20181019005314p:plain

という訳で、今日明かされた謎のHyperVisorの仕様と、SIMDアーキテクチャについて勉強することにしよう。

自作量子コンピュータ・シミュレータで量子フーリエ変換を実装する

量子コンピュータで効率化できるアルゴリズムとして有名なもののひとつに、量子フーリエ変換というものがある。

これは通常の離散フーリエ変換量子コンピュータに応用するもので、詳細な理論は良く分からないのだが、RSA暗号を解読するためのベースとなる技術らしい。 良く分からないが、RSA暗号のカギとなる技術である素因数分解を高速に実行するために、周期を見つけ出すためにフーリエ変換が有効らしい。

下記のページを主に参考にした。なるほど数式が大量に入っているが、最後に綺麗に量子回路に起こしてあるため、何となくイメージがつけやすい。

量子フーリエ変換 (Quantum Fourier Transform) とは - 物理とか

あとは以下の書籍を参考にした。

量子コンピュータ―超並列計算のからくり (ブルーバックス)

量子コンピュータ―超並列計算のからくり (ブルーバックス)

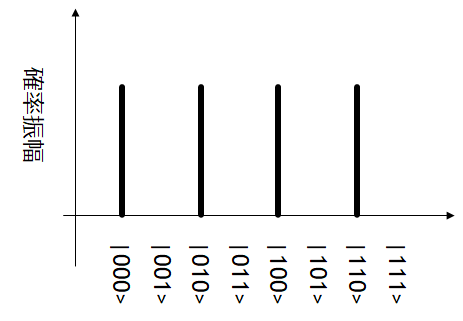
入力と出力が良く分からないが、例えば3ビットの量子ビットを定義したら、その量子ビットが取りうる値を確率として表現する。 例えば、以下のような確率で量子ビットが表現されるとしたら、

f:id:msyksphinz:20181017232302p:plain

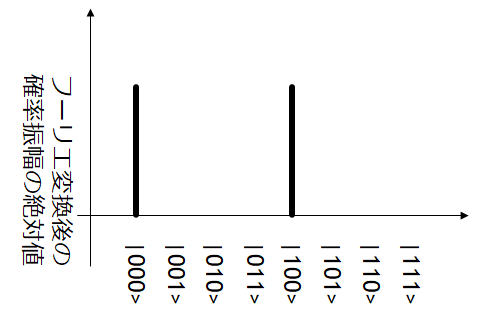
フーリエ変換は以下のようになるらしい。ほんとか?フーリエ変換が波数分布を表現していると書いてあるが。。。なんかイメージと違うなあ。

f:id:msyksphinz:20181017232500p:plain

波形の周期を表現したほうがフーリエ変換としてはスッキリしそうだけど。。。

とりあえず理論はさておき、以下のように量子フーリエ変換は表現されるらしい(https://whyitsso.net/physics/quantum_mechanics/QFT.html より抜粋)。 アダマールゲートと、制御付き位相変換回路を使用する。

f:id:msyksphinz:20181017232648p:plain

制御付き位相変換回路は無いので実装した。検査用のビットが1ならば、対象のビットの位相を変える。

void Qbits::CRot (int c_idx, int v_idx, double rad)
{
  complex2d_t matrix;
  matrix.resize(m_qbit_size);
  for (size_t i = 0; i < m_qbit_size; i++) {
    matrix[i].resize(m_qbit_size);
    for (size_t j = 0; j < m_qbit_size; j++) {
      matrix[i][j] = 0.0;
    }
  }

  uint64_t c_bitmask = 1 << c_idx;
  uint64_t v_bitmask = 1 << v_idx;
  for (size_t idx = 0; idx < m_qbit_size; idx++) {
    if ((idx & c_bitmask) == c_bitmask) {
      if ((idx & v_bitmask) == 0) {
        matrix[idx][idx] = 1.0;
      } else {
        matrix[idx][idx] = cos(rad / 2) + sin(rad / 2) * static_cast<std::complex<double>>(1.0if);
      }
    } else {
      matrix[idx][idx] = 1.0;
    }
  }

  m_comp_amp = MatrixMul(matrix, *m_comp_amp);
}

以下のようにPythonのコードで量子回路を記述した。

import math
import collections

length = 3

qubits = [qbit.make_qbit() for i in range(length)]

# qbit.h(qubits[0])
# qbit.h(qubits[1])
# qbit.h(qubits[2])

for j in range(length-1, -1, -1):
    qbit.h(qubits[j])
    for i in range(j-1, -1, -1):
        qbit.crot(qubits[i], qubits[j], 2 * math.pi / (2 ** (j-i)))

result = []

for i in range(0, 10000):
    val = 0
    for idx in range(length):
        val = val | (qbit.val(qubits[idx]) << idx)
    result.append(val)

c = collections.Counter(result)
print(c.most_common(20))

まずは、周期1の波形を作ってみる。

qbit.h(qubits[0])
qbit.h(qubits[1])
qbit.h(qubits[2])
$ ./qbit_simulator ../test/test_qft.py
Before QFT:
[(5, 1320), (2, 1307), (6, 1257), (3, 1245), (7, 1224), (0, 1219), (1, 1216), (4, 1212)]
After QFT:
[(0, 10000)]

量子ビット=0のところにだけ波形が出た。これはつまり周期が一番小さい or 存在しないということかな?

次に、周期2の波形を作ってみた。

# qbit.h(qubits[0])
qbit.h(qubits[1])
qbit.h(qubits[2])

量子ビット0と1のところに波形が出た。周期が1つ飛びなので1が出てきたのかな?

$ ./qbit_simulator ../test/test_qft.py
Before QFT:
[(2, 2552), (4, 2532), (6, 2481), (0, 2435)]
After QFT:
[(0, 5017), (1, 4983)]

次に周期4の波形を作ってみた。

# qbit.h(qubits[0])
# qbit.h(qubits[1])
qbit.h(qubits[2])

実行してみた。0,1,2,3のところに確率が分布したが、これは合っているのかなあ?

$ ./qbit_simulator ../test/test_qft.py
Before QFT:
[(4, 5013), (0, 4987)]
After QFT:
[(0, 2559), (1, 2535), (3, 2504), (2, 2402)]