FPGA開発日記

カテゴリ別記事インデックス https://msyksphinz.github.io/github_pages , English Version https://fpgadevdiary.hatenadiary.com/

LLVMのバックエンドを作るための第一歩 (5. 命令の定義)

f:id:msyksphinz:20190425001356p:plain
LLVM Compiler Infrastructure

LLVMバックエンドを追加するにあたり、MYRISCVXアーキテクチャを定義するためのtdファイルを作成する必要がある。 tdファイルはLLVMのバックエンドを定義するためのDSLで、バックエンドを理解するためには避けては通れないものだ。

命令を定義する

MYRISCVXInstrInfo.tdには先ほど作成したMYRISCVXInstrFormats.tdをincludeする。

//===----------------------------------------------------------------------===//
// Instruction format superclass
//===----------------------------------------------------------------------===//

include "MYRISCVXInstrFormats.td"
//===----------------------------------------------------------------------===//
// MYRISCVX Operand, Complex Patterns and Transformations Definitions.
//===----------------------------------------------------------------------===//

// Instruction operand types
// Signed Operand
def simm12 : Operand<i32> {
  let DecoderMethod= "DecodeSimm12";
}
def immSExt12 : PatLeaf<(imm), [{ return isInt<12>(N->getSExtValue()); }]>;
// Arithmetic and logical instructions with 2 register operands.
class ArithLogicR<bits<7> opcode, bits<3> funct3, bits<7>funct7,
                  string instr_asm, SDNode OpNode,
                  RegisterClass RC> :
  MYRISCVX_R<opcode, funct3, funct7, (outs RC:$rd), (ins RC:$rs1, RC:$rs2),
  !strconcat(instr_asm, "\t$rd, $rs1, $rs2"),
  [(set RC:$rd, (OpNode RC:$rs1, RC:$rs2))], IIAlu> {
    let isReMaterializable = 1;
}


// Arithmetic and logical instructions with 2 register operands.
class ArithLogicI<bits<7> opcode, bits<3> funct3,
                  string instr_asm, SDNode OpNode,
                  Operand Od, PatLeaf imm_type, RegisterClass RC> :
  MYRISCVX_I<opcode, funct3, (outs RC:$rd), (ins RC:$rs1, Od:$imm12),
  !strconcat(instr_asm, "\t$rd, $rs1, $imm12"),
  [(set RC:$rd, (OpNode RC:$rs1, imm_type:$imm12))], IIAlu> {
    let isReMaterializable = 1;
}

class ArithLogicU<bits<7> opcode,
                  string instr_asm, RegisterClass RC, Operand Od, PatLeaf imm_type> :
  MYRISCVX_U<opcode, (outs RC:$rd), (ins Od:$imm20),
    !strconcat(instr_asm, "\t$rd, $imm20"), [], IIAlu> {
      let isReMaterializable = 1;
}
//===----------------------------------------------------------------------===//
// Instruction definition
//===----------------------------------------------------------------------===//

//===----------------------------------------------------------------------===//
// MYRISCVX Instructions
//===----------------------------------------------------------------------===//

def ADDI : ArithLogicI<0b0010011, 0b000, "addi", add, simm12, immSExt12, GPR>;

def LUI  : ArithLogicU<0b0110111, "lui", GPR, simm20, immSExt12>;
def ADD  : ArithLogicR<0b0110011, 0b000, 0b0000000, "add", add, GPR>;
def SUB  : ArithLogicR<0b0110011, 0b000, 0b0100000, "sub", sub, GPR>;

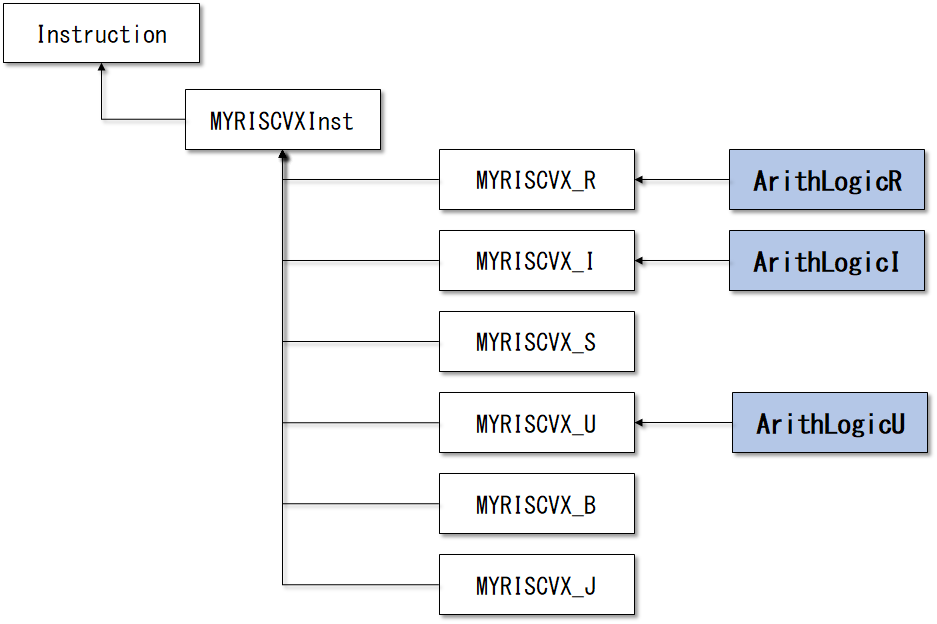
とりあえずこれだけだ。LUI, ADD, SUB, ADDIに加えてさらにこれらの定義をラップするためのArithLogicR, ArithLogicI, ArithLogicUを定義した。 これらは、似たような種類の命令を何度も定義するにあたり、同じような定義を何度も繰り返さないように作られたラップ用のクラスだ。
f:id:msyksphinz:20190501235430p:plain
ArithLogicI, ArithLogicR, ArithLogicUを定義した。

それぞれ、

  • ArithLogicR : MYRISCVX_Rを継承
  • ArithLogicI : MYRISCVX_Iを継承
  • ArithLogicU : MYRISCVX_Uを継承

となっており、その意味はすぐに分かると思う。 一つADDI命令に着目してみると、

def ADDI : ArithLogicI<0b0010011, 0b000, "addi", add, simm12, immSExt12, GPR>;

ArithLogicIでは、

  • opcode = 0b0010011
  • funct3 = 0b000
  • instr_asm = "addi"
  • OpNode = add
  • Od = simm12
  • imm_type = immSExt12
  • RC = GPR

となっている。opcodefunct3は命令デコードをそのまま示しており、これは分かりやすいと思う。 そして、MYRISCVX_Iクラスにそのままこの値が渡されて、命令でコードに使用される。 instr_asmは命令のニーモニックの表記だ。 ArithLogicI内で!strconcat(instr_asm, "\t$rd, $rs1, $imm12"),で、"addi"と"\t$rd, $rs1, $imm12"がconcatされて文字列が接合され、addi\t$rd, $rs1, $imm12が生成されていることが分かる。

RCレジスタクラスで、MYRISCVXRegisterInfo.tdで定義したGPRを設定している。 このGPR内のどれかのレジスタ割り当てられることになる。

つぎにOdだが、これはどのような即値情報が渡されるかを示している。 ADDIの定義ではsimm12が設定されている。 simm12は、12ビットの即値だが、tdの定義を見ればわかるように、32ビット整数のクラスを継承している。 これは後で登場するが、ディスアセンブラを定義するとき、DecodeSimm12というメソッドを定義してこの12ビットの即値をどのように表記するかを決定する。

imm_typePatLeafというクラスを継承して定義されたimmSExt12が設定されている。 これは即値を定義するためのHelperクラスで、その内容を見ればわかるが、オペランド値を受け取り、それを12ビット目をMSBにして符号拡張するパタンになる。

最後に、OpNodeとして設定されているaddは、この命令が加算操作を行う命令であるということを示している。

ArithLogicI内で、入力ノード、出力ノード、演算ノードを使用してどのような演算が作られるのか定義されている。

  MYRISCVX_I<opcode, funct3, (outs RC:$rd), (ins RC:$rs1, Od:$imm12),
  !strconcat(instr_asm, "\t$rd, $rs1, $imm12"),
  [(set RC:$rd, (OpNode RC:$rs1, imm_type:$imm12))], IIAlu> {
...

つまり、

  • (outs RC:$rd) : RCレジスタクラスの一員として$rdを定義する。これは出力ノードである。
  • (ins RC:$rs1, Od:$imm12) : RCレジスタクラスの一員として$rs1レジスタを定義する。そしてOdクラスの一員として$imm12クラスを定義する。これらは、入力ノードである。
  • この命令は、$rs1レジスタと即値$imm12に対してOpNodeに基づく演算を実行し、その実行結果を$dに設定する命令である。

ということが定義されました。ArithLogicRについても同様だ。

  MYRISCVX_R<opcode, funct3, funct7, (outs RC:$rd), (ins RC:$rs1, RC:$rs2),
  !strconcat(instr_asm, "\t$rd, $rs1, $rs2"),
  [(set RC:$rd, (OpNode RC:$rs1, RC:$rs2))], IIAlu> {

MYRISCVX_Uについては、パタンの定義が行われていない([]で空白となっている)。 これはMYRISCVX_Uで定義される命令はLUIAUIPCなど1つのテンプレートとして表現することができないので、とりあえず省略しているのだ。

  MYRISCVX_U<opcode, (outs RC:$rd), (ins Od:$imm20),
    !strconcat(instr_asm, "\t$rd, $imm20"), [], IIAlu> {
LLVMのバックエンドを作るための第一歩 (4. 命令フォーマットを定義する)

f:id:msyksphinz:20190425001356p:plain
LLVM Compiler Infrastructure

LLVMバックエンドを追加するにあたり、MYRISCVXアーキテクチャを定義するためのtdファイルを作成する必要がある。 tdファイルはLLVMのバックエンドを定義するためのDSLで、バックエンドを理解するためには避けては通れないものだ。

MYRISCVXInstrInfo.td

次に追加すべきは、MYRISCVXの命令を定義するためのMYRISCVXInstrInfo.tdだ。 MYRISCVXInstrInfo.td内には命令フォーマットを定義するためのMYRISCVXInstrFormats.tdを用意する必要がある。

  • lib/Target/MYRISCVX/MYRISCVXInstrFormats.td
// Generic MYRISCVX Format
class MYRISCVXInst<dag outs, dag ins, string asmstr, list<dag> pattern,
                   InstrItinClass itin, Format f>: Instruction
{
  // Inst and Size: for tablegen(... -gen-emitter) and
  // tablegen(... -gen-disassembler) in CMakeLists.txt
  field bits<32> Inst;
  Format Form = f;

  let Namespace = "MYRISCVX";

  let Size = 4;

  let OutOperandList = outs;
  let InOperandList  = ins;

  let AsmString   = asmstr;
  let Pattern     = pattern;
  let Itinerary   = itin;

  //
  // Attributes specific to MYRISCVX instructions...
  //
  bits<4> FormBits = Form.Value;

  // TSFlags layout should be kept in sync with MYRISCVXInstrInfo.h.
  let TSFlags{3-0}   = FormBits;

  let DecoderNamespace = "MYRISCVX";

  field bits<32> SoftFail = 0;
}

MYRISCVXInstがベースのクラスになる。32ビットのフィールドInstを定義し、これが命令フィールドそのものになる。 OutOperandListはこの命令で書き込まれるレジスタのリスト、InOperandListはこの命令で読み込まれるレジスタのリストだ。 このオペランドリストを使用してデータフローを構築したり、レジスタ割り付けの解析を行う。 さらに、命令のニーモニックを格納するためにAsmStringを定義し、PatternLLVM IRから命令を生成するために必要なパターンを格納する。

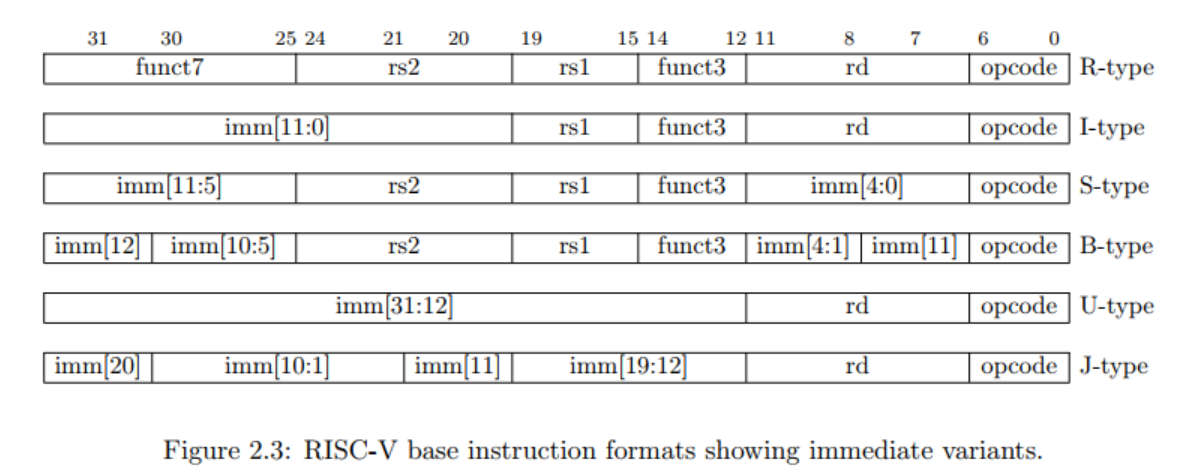
さて、ここから先はいよいよ命令フォーマットの定義氏をしていく。RISC-Vには、基本として以下の命令フォーマットが決められている。

f:id:msyksphinz:20190501234316p:plain
RISC-Vの命令フォーマット

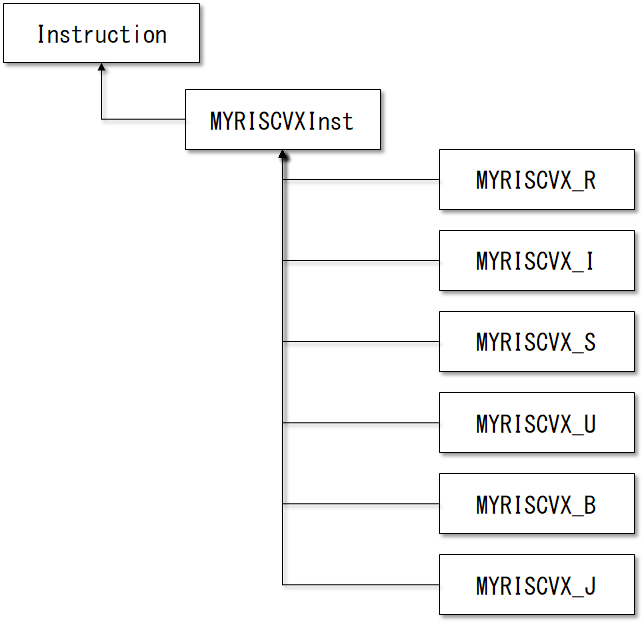
ここでは、上記の6つの命令フォーマットについてクラスを作ればよいことになる。 それぞれ、上記で定義したMYRISCVXInstクラスを継承して定義する。

f:id:msyksphinz:20190501234502p:plain
命令フォーマットクラスの継承関係
  • lib/Target/MYRISCVX/MYRISCVXInstrFormats.td
//===----------------------------------------------------------------------===//
// R-Type instruction class in MYRISCVX : <|opcode|funct7|funct3|rd|rs1|rs2|>
//===----------------------------------------------------------------------===//

class MYRISCVX_R<bits<7> opcode, bits<3> funct3, bits<7> funct7,
                dag outs, dag ins, string asmstr,
                list<dag> pattern, InstrItinClass itin>:
      MYRISCVXInst<outs, ins, asmstr, pattern, itin, FrmR>
{
  bits<5>  rd;
  bits<5>  rs1;
  bits<5>  rs2;

  let Inst{31-25} = funct7;
  let Inst{24-20} = rs2;
  let Inst{19-15} = rs1;
  let Inst{14-12} = funct3;
  let Inst{11-7}  = rd;
  let Inst{6-0}   = opcode;
}

MYRISCVXInstを継承して、MYRISCVX_Rクラスを作成した。 引数としてopcode, funct3, func7を取る。 また、outs, insは使用すレジスタを指定し、データフローを構築する。 asmstrには命令のニーモニックを定義する。

rd, rs1, rs2を定義して、オペランドとして指定されるレジスタオペランドを作成する。 そして、MYRISCVXInstインスタンスしたInst変数に対して、ビットフィールドを指定する形で値を設定する。 Inst{31-25}ならば、Inst変数の31ビットから25ビットまでの7ビットにfunct7が代入されるという意味になる。

  • lib/Target/MYRISCVX/MYRISCVXInstrFormats.td

MYRISCVX_Iは即値命令を扱うためのフォーマットだ。

//===----------------------------------------------------------------------===//
// I-Type instruction class in MYRISCVX : <|opcode|funct3|rd|rs1|imm12|>
//===----------------------------------------------------------------------===//
class MYRISCVX_I<bits<7> opcode, bits<3> funct3,
                 dag outs, dag ins, string asmstr, list<dag> pattern,
                 InstrItinClass itin>:
  MYRISCVXInst<outs, ins, asmstr, pattern, itin, FrmI>
{
  bits<5>  rd;
  bits<5>  rs1;
  bits<12> imm12;

  let Inst{31-20} = imm12;
  let Inst{19-15} = rs1;
  let Inst{14-12} = funct3;
  let Inst{11-7}  = rd;
  let Inst{6-0}   = opcode;
}
  • lib/Target/MYRISCVX/MYRISCVXInstrFormats.td

MYRISCVX_Sはメモリストア命令を扱うためのフォーマットだ。

//===----------------------------------------------------------------------===//
// S-Type instruction class in MYRISCVX : <|opcode|rs2|rs1|width|offset>
//===----------------------------------------------------------------------===//
class MYRISCVX_S<bits<7> opcode, bits<3> funct3,
                 dag outs, dag ins, string asmstr, list<dag> pattern,
                 InstrItinClass itin>:
  MYRISCVXInst<outs, ins, asmstr, pattern, itin, FrmS>
{
  bits<5>  rs2;
  bits<5>  rs1;
  bits<12> simm12;

  let Inst{31-25} = simm12{11-5};
  let Inst{19-15} = rs1;
  let Inst{24-20} = rs2;
  let Inst{14-12} = funct3;
  let Inst{11-7}  = simm12{4-0};
  let Inst{6-0}   = opcode;

  let DecoderMethod = "DecodeStore";
}
  • lib/Target/MYRISCVX/MYRISCVXInstrFormats.td

MYRISCVX_Uは即値生成命令(LUI命令やAUIPC命令など)を扱うためのフォーマットだ。

//===----------------------------------------------------------------------===//
// U-Type instruction class in MYRISCVX : <|opcode|rd|imm31-12>
//===----------------------------------------------------------------------===//
class MYRISCVX_U<bits<7> opcode,
                 dag outs, dag ins, string asmstr, list<dag> pattern,
                 InstrItinClass itin>:
  MYRISCVXInst<outs, ins, asmstr, pattern, itin, FrmI>
{
  bits<5>  rd;
  bits<20> imm20;

  let Inst{31-12} = imm20;
  let Inst{11-7}  = rd;
  let Inst{6-0}   = opcode;
}
  • lib/Target/MYRISCVX/MYRISCVXInstrFormats.td

MYRISCVX_Bは条件分岐命令を扱うためのフォーマットだ。

//===----------------------------------------------------------------------===//
// B-Type instruction class in MYRISCVX : <|opcode|funct3|rs1|rs2|imm12|>
//===----------------------------------------------------------------------===//
class MYRISCVX_B<bits<7> opcode, bits<3> funct3,
                 dag outs, dag ins, string asmstr, list<dag> pattern,
                 InstrItinClass itin>:
  MYRISCVXInst<outs, ins, asmstr, pattern, itin, FrmI>
{
  bits<12> imm12;
  bits<5>  rs2;
  bits<5>  rs1;

  let Inst{31}    = imm12{11};
  let Inst{30-25} = imm12{9-4};
  let Inst{14-12} = funct3;
  let Inst{11-8}  = imm12{3-0};
  let Inst{7}     = imm12{10};
  let Inst{6-0}   = opcode;
}
  • lib/Target/MYRISCVX/MYRISCVXInstrFormats.td

MYRISCVX_Jは即値ジャンプ命令を扱うためのフォーマットだ。

//===----------------------------------------------------------------------===//
// J-Type instruction class in MYRISCVX : <|opcode|imm20|>
//===----------------------------------------------------------------------===//
class MYRISCVX_J<bits<7> opcode,
                 dag outs, dag ins, string asmstr, list<dag> pattern,
                 InstrItinClass itin>:
  MYRISCVXInst<outs, ins, asmstr, pattern, itin, FrmI>
{
  bits<20> imm20;

  let Inst{31}    = imm20{19};
  let Inst{30-21} = imm20{9-0};
  let Inst{20}    = imm20{10};
  let Inst{19-12} = imm20{18-11};
  let Inst{6-0}   = opcode;
}

Formatsを定義する

上記の命令区分に応じて、命令を区別するためのFormatsを定義する。 これはMYRISCVXInst内でTSFlagsに格納される。

  • lib/Target/MYRISCVX/MYRISCVXInstrFormats.td
// Format specifies the encoding used by the instruction.  This is part of the
// ad-hoc solution used to emit machine instruction encodings by our machine
// code emitter.
class Format<bits<3> val> {
  bits<3> Value = val;
}

def Pseudo : Format<0>;
def FrmR   : Format<1>;
def FrmI   : Format<2>;
def FrmS   : Format<3>;
def FrmU   : Format<4>;
def FrmB   : Format<5>;
def FrmJ   : Format<6>;

LLVMのバックエンドを作るための第一歩 (3. Target Descriptionの記述してレジスタを定義する)

f:id:msyksphinz:20190425001356p:plain
LLVM Compiler Infrastructure

LLVMバックエンドを追加するにあたり、MYRISCVXアーキテクチャを定義するためのtdファイルを作成する必要がある。 tdファイルはLLVMのバックエンドを定義するためのDSLで、バックエンドを理解するためには避けては通れないものだ。

用意するtdファイル

まず、tdファイルとして以下を用意する必要がある。

  • MYRISCVX.td : すべてのtdファイルをまとめるトップ
  • MYRISCVXRegisterInfo.td : MYRISCVXレジスタ情報を定義する
  • MYRISCVXInstrFormats.td : MYRISCVXの命令フォーマットを定義する
  • MYRISCVXInstrInfo.td : MYRISCVXの命令を定義するファイル

すべてのtdファイルはMYRISCVX.tdにまとめられる(includeの形式で呼び出される)のですが、MYRISCVXRegisterInfo.tdMYRISCVXInstrInfo.tdは同じ階層で呼ばれる。 MYRISCVXInstrFormats.tdMYRISCVXInstrInfo.td内でincludeされる。

MYRISCVX.td
  include MYRISCVXRegisterInfo.td
  include MYRISCVXInstrInfo.td
    include MYRISCVXInstrFormats.td
  • lib/Target/MYRISCVX.td
//===-- MYRISCVX.td - Describe the MYRISCVX Target Machine -*- tablegen -*-===//
//
//                     The LLVM Compiler Infrastructure
//
// This file is distributed under the University of Illinois Open Source
// License. See LICENSE.TXT for details.
//
//===----------------------------------------------------------------------===//
// This is the top level entry point for the MYRISCVX target.
//===----------------------------------------------------------------------===//

include "llvm/Target/Target.td"

//===----------------------------------------------------------------------===//
// Target-dependent interfaces
//===----------------------------------------------------------------------===//

include "MYRISCVXRegisterInfo.td"
include "MYRISCVXInstrInfo.td"

def MYRISCVXInstrInfo : InstrInfo;

def MYRISCVX : Target {
  let InstructionSet = MYRISCVXInstrInfo;
}

MYRISCVXRegisterInfo.td

  • lib/Target/MYRISCVXRegisterInfo.td
//===-- MYRISCVXRegisterInfo.td - RISC-V Register defs -----*- tablegen -*-===//
//
//                     The LLVM Compiler Infrastructure
//
// This file is distributed under the University of Illinois Open Source
// License. See LICENSE.TXT for details.
//
//===----------------------------------------------------------------------===//

//===----------------------------------------------------------------------===//
//  Declarations that describe the MYRISCVX register files
//===----------------------------------------------------------------------===//

let Namespace = "MYRISCVX" in {
  // We have banks of 32 registers each.
  class MYRISCVXReg<bits<5> Enc, string n, list<string> alt = []> : Register<n> {
    let HWEncoding{4-0} = Enc;
    let AltNames = alt;
  }

  // RISCV CPU Registers
  class MYRISCVXGPRReg<bits<5> Enc, string n, list<string> alt> : MYRISCVXReg<Enc, n>;
}

まずNamespaceについて。LLVMバックエンドでは、例えばNamespace"MYRISCVX"内で定義されたレジスタなどは、C++の実装内でMYRISCVX::<変数名>として参照することができる。 例えば、

let Namespace = "MYRISCVX" in {
  def ZERO : MYRISCVXGPRReg<0,  "zero", ["zero"]>,  DwarfRegNum<[0]>;
}

となっていると、定義したレジスタZEROC++内ではMYRISCVX::ZEROとして参照することができる。

次にクラスの定義だ。 Target Descriptionのクラスは、C++のクラスの定義とあまり変わりがない。

  class MYRISCVXReg<bits<5> Enc, string n, list<string> alt = []> : Register<n> {
    let HWEncoding{4-0} = Enc;
    let AltNames = alt;
  }

だと、クラスMYRISCVXRegを定義し、その引数に以下を取ることができる。

  • 5ビットの整数(bits) : Enc
  • 文字列(string) : n
  • 文字列のリスト([string]) : alt

:以下は、そのクラスの継承元の親クラスとなる。

//===----------------------------------------------------------------------===//
//  Registers
//===----------------------------------------------------------------------===//

let Namespace = "MYRISCVX" in {
  def ZERO : MYRISCVXGPRReg<0,  "zero", ["zero"]>,  DwarfRegNum<[0]>;

  def RA   : MYRISCVXGPRReg<1,  "x1", ["ra"]>,    DwarfRegNum<[1]>;
  def SP   : MYRISCVXGPRReg<2,  "x2", ["sp"]>,    DwarfRegNum<[2]>;
  def GP   : MYRISCVXGPRReg<3,  "x3", ["gp"]>,    DwarfRegNum<[3]>;
  def TP   : MYRISCVXGPRReg<4,  "x4", ["tp"]>,    DwarfRegNum<[4]>;
  def T0   : MYRISCVXGPRReg<5,  "x5", ["t0"]>,    DwarfRegNum<[5]>;
  def T1   : MYRISCVXGPRReg<6,  "x6", ["t1"]>,    DwarfRegNum<[6]>;
  def T2   : MYRISCVXGPRReg<7,  "x7", ["t2"]>,    DwarfRegNum<[7]>;
  def S0   : MYRISCVXGPRReg<8,  "x8", ["s0", "fp"]>, DwarfRegNum<[8]>;  // used as FP
  def S1   : MYRISCVXGPRReg<9,  "x9", ["s1"]>,    DwarfRegNum<[9]>;

  def A0   : MYRISCVXGPRReg<10, "x10", ["a0"]>,   DwarfRegNum<[10]>;
  def A1   : MYRISCVXGPRReg<11, "x11", ["a1"]>,   DwarfRegNum<[11]>;
  def A2   : MYRISCVXGPRReg<12, "x12", ["a2"]>,   DwarfRegNum<[12]>;
  def A3   : MYRISCVXGPRReg<13, "x13", ["a3"]>,   DwarfRegNum<[13]>;
  def A4   : MYRISCVXGPRReg<14, "x14", ["a4"]>,   DwarfRegNum<[10]>;
  def A5   : MYRISCVXGPRReg<15, "x15", ["a5"]>,   DwarfRegNum<[11]>;
  def A6   : MYRISCVXGPRReg<16, "x16", ["a6"]>,   DwarfRegNum<[12]>;
  def A7   : MYRISCVXGPRReg<17, "x17", ["a7"]>,   DwarfRegNum<[13]>;

  def S2   : MYRISCVXGPRReg<18, "x18", ["s2"]>,   DwarfRegNum<[18]>;
  def S3   : MYRISCVXGPRReg<19, "x19", ["s3"]>,   DwarfRegNum<[19]>;
  def S4   : MYRISCVXGPRReg<20, "x20", ["s4"]>,   DwarfRegNum<[20]>;
  def S5   : MYRISCVXGPRReg<21, "x21", ["s5"]>,   DwarfRegNum<[21]>;
  def S6   : MYRISCVXGPRReg<22, "x22", ["s6"]>,   DwarfRegNum<[22]>;
  def S7   : MYRISCVXGPRReg<23, "x23", ["s7"]>,   DwarfRegNum<[23]>;
  def S8   : MYRISCVXGPRReg<24, "x24", ["s8"]>,   DwarfRegNum<[24]>;
  def S9   : MYRISCVXGPRReg<25, "x25", ["s9"]>,   DwarfRegNum<[25]>;
  def S10  : MYRISCVXGPRReg<26, "x26", ["s10"]>,   DwarfRegNum<[26]>;
  def S11  : MYRISCVXGPRReg<27, "x27", ["s11"]>,   DwarfRegNum<[27]>;

  def T3   : MYRISCVXGPRReg<28, "x28", ["t3"]>,   DwarfRegNum<[28]>;
  def T4   : MYRISCVXGPRReg<29, "x29", ["t4"]>,   DwarfRegNum<[29]>;
  def T5   : MYRISCVXGPRReg<30, "x30", ["t5"]>,   DwarfRegNum<[30]>;
  def T6   : MYRISCVXGPRReg<31, "x31", ["t6"]>,   DwarfRegNum<[31]>;
}

AltNameとして、S0レジスタだけは"s0", "fp"の両方で使用できるようになっている。

//===----------------------------------------------------------------------===//
//@Register Classes
//===----------------------------------------------------------------------===//

def GPR : RegisterClass<"MYRISCVX", [i32], 32, (add
  // Reserved
  ZERO,
  // Return Values and Arguments
  A0, A1, A2, A3, A4, A5, A6, A7,
  // Not preserved across procedure calls
  T0, T1, T2, T3, T4, T5, T6,
  // Callee save
  S0, S1, S2, S3, S4, S5, S6, S7, S8, S9, S10, S11,
  // Reserved
  RA, SP, GP, TP
  )>;

上記はGPRという名前で、レジスタクラスを作成している。 レジスタクラスは複数のレジスタをまとめて表現するためのクラスで、ここでは定義したレジスタをすべて挿入した。

SiFive社のRISC-Vボード HiFive Unleashedを使ってみる (4. ベンチマークプログラムの実行)

f:id:msyksphinz:20190419223924p:plain
HiFive Unleashed 評価ボード

HiFive Unleashed DebianでCoremarkを動かす

次に、ベンチマークプログラムを動かして、HiFive UnleashedのRISC-Vコアの性能を見てみる。 今回はCoremarkベンチマークプログラムを使用する。 linux64/core_portme.makを変更して、CFLAGSの最適化オプションを-O3に変更した。

diff --git a/linux64/core_portme.mak b/linux64/core_portme.mak
index 5cfabee..68fdb3d 100755
--- a/linux64/core_portme.mak
+++ b/linux64/core_portme.mak
@@ -24,7 +24,7 @@ OUTFLAG= -o
 CC = gcc
 # Flag: CFLAGS
 #      Use this flag to define compiler options. Note, you can add compiler opt
ions from the command line using XCFLAGS="other flags"
-PORT_CFLAGS = -O2
+PORT_CFLAGS = -O3
 FLAGS_STR = "$(PORT_CFLAGS) $(XCFLAGS) $(XLFLAGS) $(LFLAGS_END)"
 CFLAGS = $(PORT_CFLAGS) -I$(PORT_DIR) -I. -DFLAGS_STR=\"$(FLAGS_STR)\"
 #Flag: LFLAGS_END
git clone https://github.com/eembc/coremark.git
cd coremark/
make TARGET=linux64
echo Loading done ./coremark.exe
Loading done ./coremark.exe
make port_postload
...
make port_prerun
...
./coremark.exe  0x3415 0x3415 0x66 0 7 1 2000  > ./run2.log
make port_postrun
...

無事にコンパイルベンチマーク実行がうまくいった。

root@buildroot:~/work/riscv/coremark# less ./run2.log
2K validation run parameters for coremark.
CoreMark Size    : 666
Total ticks      : 13323
Total time (secs): 13.323000
Iterations/Sec   : 2251.745102
Iterations       : 30000
Compiler version : GCC8.3.0
Compiler flags   : -O3 -DPERFORMANCE_RUN=1  -lrt
Memory location  : Please put data memory location here
                        (e.g. code in flash, data on heap etc)
seedcrc          : 0x18f2
[0]crclist       : 0xe3c1
[0]crcmatrix     : 0x0747
[0]crcstate      : 0x8d84
[0]crcfinal      : 0xff48
Correct operation validated. See README.md for run and reporting rules.

HiFive Unleashedの動作周波数は1000MHzなので、Coremark/MHzは  2251.745102 / 1000 = 2.25 となった。 HiFive UnleashedのU54のCoremarkスコアは2.75 Coremark/MHzなので、公称値よりも低下してした。 OSによるパフォーマンスの低下の可能性もある。

HiFive Unleashedでマルチコアプログラミングに挑戦

HiFive UnleashedにDebianをインストールしたので、様々なプログラミングの幅が広がった。 RISC-Vのマルチコアは、C++のPthreadなどのライブラリを使えば簡単に活用することができる。 ここでは、C++でPthreadのプログラムを記述して、HiFive Unleashedでマルチコアの性能を見てみる。

ここでは、HiFive Unleashedで数値積分のプログラムをマルチコアで動かし、その性能を測定する。 数値積分は、ある関数に対して区間  [a, b] の間の積分を計算するわけだが区間を分割してマルチコアで計算し、最後に加算しても特に積分結果に問題はないはずだ(数値計算の専門家から言わせると厳密にもう少しケアしなければならない部分があるかもしれませんが、今回はあまり気にせず進める)。

#include <assert.h>
#include <chrono>
#include <cstdio>
#include <iostream>
#include <limits.h>
#include <mutex>
#include <thread>
#include <vector>

std::mutex mtx_;
double int_ans = 0.0;

double f(double x)
{
  return x * x;
}

void add_count(double ans)
{
  std::lock_guard<std::mutex> lock(mtx_);
  int_ans += ans;
}

void worker(double a, double b)
{
  static double step = 0.00000001;

  double x = a;
  double s = 0.0;

  while(x < b) {
    x = x + step;
    s = s + f(x);
  }

  s = step * ((f(a) + f(b)) / 2.0 + s);
  add_count(s);
}


int main (int argc, char **argv)
{
  size_t num_threads = 1;
  if (argc != 2) {
    std::cerr << "Error: multi_core [num_threads]\n";
    exit (EXIT_FAILURE);
  }

  size_t val = strtoul (argv[1], NULL, 10);
  if (val == 0) {
  } else {
    num_threads = val;
    std::cout << "Number of threads " << num_threads << " : ";
  }

  double length = 1.0 / num_threads;
  // start to measure
  auto start = std::chrono::high_resolution_clock::now();

  std::vector<std::thread> threads;

  for(size_t i = 0; i < num_threads; ++i){
    double start = static_cast<double>(i) / num_threads;
    threads.emplace_back(std::thread(worker, start, start + length));
  }

  for(auto& thread : threads){
    thread.join();
  }

  auto end = std::chrono::high_resolution_clock::now();
  auto dur = end - start;
  auto msec = std::chrono::duration_cast<std::chrono::milliseconds>(dur).count();
  std::cout << msec << "msec\n";
  std::cout << "Answer = " << int_ans << '\n';

  return 0;
}

区間積分の対象範囲を  [0, 1.0) に設定し、その間の区間をコア数によって分割している。 これをコンパイルし、さっそく1コア、2コア、4コアで実行して時間を測定する。

# g++ multi_core.cpp -lpthread
# ./a.out 1
Number of threads 1 : 6905msec
Answer = 0.333333
# ./a.out 2
Number of threads 2 : 3453msec
Answer = 0.333333
# ./a.out 4
Number of threads 4 : 1727msec
Answer = 0.333333
# ./a.out 8
Number of threads 8 : 1729msec
Answer = 0.333333

コア数を増やすと、順当に実行時間を削減することができた。

Chiselでモジュールを再帰インスタンスする方法

f:id:msyksphinz:20190119013850p:plain

Chiselでモジュールを書く場合の、いくつか便利な書き方をまとめておく。

Chiselで再帰を書く

この程度だったらVerilogでも可能。

class recurse_module (w: Int = 5) extends Module {
  val io = IO(new Bundle {
    val inst = Input(UInt(2.W))
    val dec = Output(UInt(20.W))
  })

  if (w == 1) {
    io.dec := io.inst
  } else {
    val u_mod = Module (new recurse_module(w-1))
    u_mod.io.inst := io.inst + 1.U
    io.dec := Cat(0.U(1.W), u_mod.io.dec)
  }
}

生成されたVerilogは、ひたすらモジュールがコピーされる。つまり、パラメータで静的に解析できなければ無理。w: Intコンパイル時に静的に決定できる必要がある。

module recurse_module( // @[:@3.2]
module recurse_module_1( // @[:@10.2]
  recurse_module recurse_module ( // @[option_some.scala 35:24:@15.4]
module recurse_module_2( // @[:@24.2]
  recurse_module_1 recurse_module ( // @[option_some.scala 35:24:@29.4]
module recurse_module_3( // @[:@38.2]
  recurse_module_2 recurse_module ( // @[option_some.scala 35:24:@43.4]
module recurse_module_4( // @[:@52.2]
  recurse_module_3 recurse_module ( // @[option_some.scala 35:24:@57.4]
module recurse_module_5( // @[:@66.2]
  recurse_module_4 recurse_module ( // @[option_some.scala 35:24:@71.4]
module recurse_module_6( // @[:@80.2]
  recurse_module_5 recurse_module ( // @[option_some.scala 35:24:@85.4]
module recurse_module_7( // @[:@94.2]
  recurse_module_6 recurse_module ( // @[option_some.scala 35:24:@99.4]
module recurse_module_8( // @[:@108.2]
  recurse_module_7 recurse_module ( // @[option_some.scala 35:24:@113.4]
module recurse_module_9( // @[:@122.2]
  recurse_module_8 recurse_module ( // @[option_some.scala 35:24:@127.4]

LLVMのバックエンドを作るための第一歩 (2. LLVMバックエンドにターゲットアーキテクチャを登録する)

f:id:msyksphinz:20190425001356p:plain
LLVM Compiler Infrastructure

LLVMバックエンドを追加するにあたり、まずはLLVMに新しいバックエンドを登録する必要がある。

とりあえず、LLVMバックエンドがMYRISCVXアーキテクチャを認識できるようになりたい。そのために最低限追加すべきファイルについて見ていく。

lib/Target/MYRISCVX
├── CMakeLists.txt
├── LLVMBuild.txt
├── MCTargetDesc
│   ├── CMakeLists.txt
│   ├── LLVMBuild.txt
│   ├── MYRISCVXMCTargetDesc.cpp
│   └── MYRISCVXMCTargetDesc.h
├── MYRISCVX.h
├── MYRISCVX.td
├── MYRISCVXInstrFormats.td
├── MYRISCVXInstrInfo.td
├── MYRISCVXRegisterInfo.td
├── MYRISCVXTargetMachine.cpp
├── MYRISCVXTargetMachine.h
└── TargetInfo
    ├── CMakeLists.txt
    ├── LLVMBuild.txt
    └── MYRISCVXTargetInfo.cpp

MYRISCVXをターゲット名として登録する作業

以下のファイルを追加して、MYRISCVXというターゲット名をLLVMに認識させる。

CMakeLists.txt
cmake/config-ix.cmake
include/llvm/ADT/Triple.h
include/llvm/BinaryFormat/ELF.h
include/llvm/BinaryFormat/ELFRelocs/MYRISCVX.def
include/llvm/Object/ELFObjectFile.h
lib/Object/ELF.cpp
lib/Support/Triple.cpp
  • CMakeLists.txt
  diff --git a/CMakeLists.txt b/CMakeLists.txt
  index 81c2bab39ec..09ecfb45d8d 100644
  --- a/CMakeLists.txt
  +++ b/CMakeLists.txt
  @@ -299,6 +299,7 @@ set(LLVM_ALL_TARGETS
     WebAssembly
     X86
     XCore
  +  MYRISCVX   // CMakeListsにMYRISCVXをターゲットとして追加
     )
  • cmake/config-ix.cmake

    ```diff diff --git a/cmake/config-ix.cmake b/cmake/config-ix.cmake index 900c35ee4f0..8737afb9d35 100644 --- a/cmake/config-ix.cmake +++ b/cmake/config-ix.cmake @@ -410,6 +410,8 @@ elseif (LLVM_NATIVE_ARCH MATCHES "riscv32") set(LLVM_NATIVE_ARCH RISCV) elseif (LLVM_NATIVE_ARCH MATCHES "riscv64") set(LLVM_NATIVE_ARCH RISCV) +elseif (LLVM_NATIVE_ARCH MATCHES "myriscvx") // "myriscvx"というアーキテクチャ名を使えるようにする。

    • set(LLVM_NATIVE_ARCH MYRISCVX) else () message(FATAL_ERROR "Unknown architecture ${LLVM_NATIVE_ARCH}") endif () ```
  • include/llvm/ADT/Triple.h Tripleの並び順は、上記に示すようにARCHITECTURE-VENDOR-OPERATING_SYSTEMの並びで与えられる。 この時にARCHITECTUREに指定できる項目としてmyriscvx32myriscvx64を追加する。

  diff --git a/include/llvm/ADT/Triple.h b/include/llvm/ADT/Triple.h
  index e06a68e2731..1ba59ac1e74 100644
  --- a/include/llvm/ADT/Triple.h
  +++ b/include/llvm/ADT/Triple.h
  @@ -67,6 +67,8 @@ public:
    enum ArchType {
      UnknownArch,
  ...
       amdgcn,         // AMDGCN: AMD GCN GPUs
       riscv32,        // RISC-V (32-bit): riscv32
       riscv64,        // RISC-V (64-bit): riscv64
  +    myriscvx32,     // MYRISCVX (32-bit): myriscvx32
  +    myriscvx64,     // MYRISCVX (64-bit): myriscvx64
       sparc,          // Sparc: sparc
       sparcv9,        // Sparcv9: Sparcv9
       sparcel,        // Sparc: (endianness = little). NB: 'Sparcle' is a CPU variant
  • lib/Target/LLVMBuild.txt 各バックエンドターゲットは、lib/Target/以下にディレクトリとして登録される。 新しいターゲットは、lib/Target/LLVMBuild.txtに登録することで認識される。
  diff --git a/lib/Target/LLVMBuild.txt b/lib/Target/LLVMBuild.txt
  index 0ed7e9f854d..d3e945db482 100644
  --- a/lib/Target/LLVMBuild.txt
  +++ b/lib/Target/LLVMBuild.txt
  @@ -37,6 +37,7 @@ subdirectories =
    WebAssembly
    X86
    XCore
  + MYRISCVX
  
   ; This is a special group whose required libraries are extended (by llvm-build)
   ; with the best execution engine (the native JIT, if available, or the

ChiselでBundleの演算子をオーバロードする方法

https://cdn-ak.f.st-hatena.com/images/fotolife/m/msyksphinz/20181105/20181105012126.png

ハードウェア記述言語の一種であるChiselは、Scalaをベースにした言語であり、Scalaの機能を使って様々な便利な記法が実現可能だ。

その一つの便利な手法として、Bundleを使った演算子のオーバロードがある。SystemVerilogからの移行や、Chiselでの便利な書き方の一つとしてメモしておきたい。

Bundleとは、SystemVerilogのstructのようなもの。複数の信号をまとめて、一つの信号タイプとして定義する。 以下の例は、Bundle ExampleBundleを定義する。ExampleBundleには、upperlowerのそれぞれ32ビットの信号が含まれている。

class ExampleBundle extends Bundle {
  val upper = UInt(32.W)
  val lower = UInt(32.W)
}

このBundleは、Chiselのモジュール内で様々な形で使用することができる。SystemVerilogと同様、信号の入出力と肩に使用したり、内部ステートを記憶するためのレジスタや配線として定義することもできる。 以下は単純な例だが、ExampleBundle型の信号を一度レジスタで叩き、その結果を出力する(まあスライサみたいなものだ)。

  • モジュール : ExampleModule
  • 入力ポート : in_a(ExampleBundle型)
  • 入力ポート : out_a(ExampleBundle型)
class ExampleBundle extends Bundle {
  val upper = UInt(32.W)
  val lower = UInt(32.W)
}

class ExampleModule extends Module {
  val io = IO(new Bundle {
    val in_a = Input(new BundleExample)
    val out_a = Output(new BundleExample)
  })

  val reg_a = Reg(new BundleExample)
  reg_a := io.in_a
  io.out_a := reg_a
}

Verilogを生成すると、以下のようになる。

module ExampleModule( // @[:@3.2]
  input         clock, // @[:@4.4]
  input         reset, // @[:@5.4]
  input  [31:0] io_in_a_upper, // @[:@6.4]
  input  [31:0] io_in_a_lower, // @[:@6.4]
  output [31:0] io_out_a_upper, // @[:@6.4]
  output [31:0] io_out_a_lower // @[:@6.4]
);
  reg [31:0] reg_a_upper; // @[bundle_example.scala 18:18:@8.4]
  reg [31:0] reg_a_lower; // @[bundle_example.scala 18:18:@8.4]
  assign io_out_a_upper = reg_a_upper; // @[bundle_example.scala 20:12:@12.4]
  assign io_out_a_lower = reg_a_lower; // @[bundle_example.scala 20:12:@11.4]
...
  always @(posedge clock) begin
    reg_a_upper <= io_in_a_upper;
    reg_a_lower <= io_in_a_lower;
  end

上記は単純な例だが、BundleExample型で定義されていない、BundleExample型同士の演算や、UInt型からのBundleExampleへの代入を行ってみると、当然エラーとなる。

class ExampleModule extends Module {
  val io = IO(new Bundle {
    val in_a = Input(new ExampleBundle)
    val out_a = Output(new ExampleBundle)
  })

  val reg_a = Reg(new ExampleBundle)
  val const_1 = Wire(new ExampleBundle)
  const_1 := 1.U

  reg_a := io.in_a + const_1
  io.out_a := reg_a
}
[error] (run-main-0) chisel3.internal.ChiselException: Connection between sink (bundle_example.ExampleBundle@2a) and source (chisel3.core.UInt@2d) failed @: Sink (bundle_example.ExampleBundle@2a) and Source (chisel3.core.UInt@2d) have different types.
[error] chisel3.internal.ChiselException: Connection between sink (bundle_example.ExampleBundle@2a) and source (chisel3.core.UInt@2d) failed @: Sink (bundle_example.ExampleBundle@2a) and Source (chisel3.core.UInt@2d) have different types.

これは、ExampleBundle型で、

が定義されていないことに依存する。C++経験者なら容易に想像できるだろうが、これは演算子のオーバロードで解決することができる。

つまり、ExamlpeBundleに対して、以下を定義する。

class ExampleBundle extends Bundle {
  val upper = UInt(32.W)
  val lower = UInt(32.W)

  def := (that: UInt) : ExampleBundle = {
    this.upper := that(63,32)
    this.lower := that(31, 0)

    this
  }

  def + (that: ExampleBundle) : ExampleBundle = {
    val res = Wire(new ExampleBundle)
    res.upper := this.upper + that.upper
    res.lower := this.lower + that.lower

    res
  }
}

C++と同様に見れば良く分かる。def :=の方は、現在のExampleBundleの実体thisに対してUIntの値thatを分割して代入する。その結果はthisとして返される。 また、def +の場合は新たな実体ExampleBundleを定義して、そこに対して実体thisともう一つのオペランドthatを代入し、その結果をresとして返す。

これでVerilogを生成すると、正しくVerilogが生成されていることが分かる。このように、新たなBundleを定義した場合、同様に多用する演算子も定義しておくと、うまくBundleを活用することができる。

module ExampleModule( // @[:@3.2]
  input         clock, // @[:@4.4]
  input         reset, // @[:@5.4]
  input  [31:0] io_in_a_upper, // @[:@6.4]
  input  [31:0] io_in_a_lower, // @[:@6.4]
  output [31:0] io_out_a_upper, // @[:@6.4]
  output [31:0] io_out_a_lower // @[:@6.4]
);
  reg [31:0] reg_a_upper; // @[bundle_example.scala 34:18:@8.4]
  reg [31:0] reg_a_lower; // @[bundle_example.scala 34:18:@8.4]
  wire [32:0] _T_16; // @[bundle_example.scala 20:29:@13.4]
  wire [32:0] _T_18; // @[bundle_example.scala 21:29:@16.4]
  assign _T_16 = {{1'd0}, io_in_a_upper}; // @[bundle_example.scala 20:29:@13.4]
  assign _T_18 = io_in_a_lower + 32'h1; // @[bundle_example.scala 21:29:@16.4]
  assign io_out_a_upper = reg_a_upper; // @[bundle_example.scala 39:12:@22.4]
  assign io_out_a_lower = reg_a_lower; // @[bundle_example.scala 39:12:@21.4]
...
  always @(posedge clock) begin
    reg_a_upper <= _T_16[31:0];
    reg_a_lower <= io_in_a_lower + 32'h1;
  end