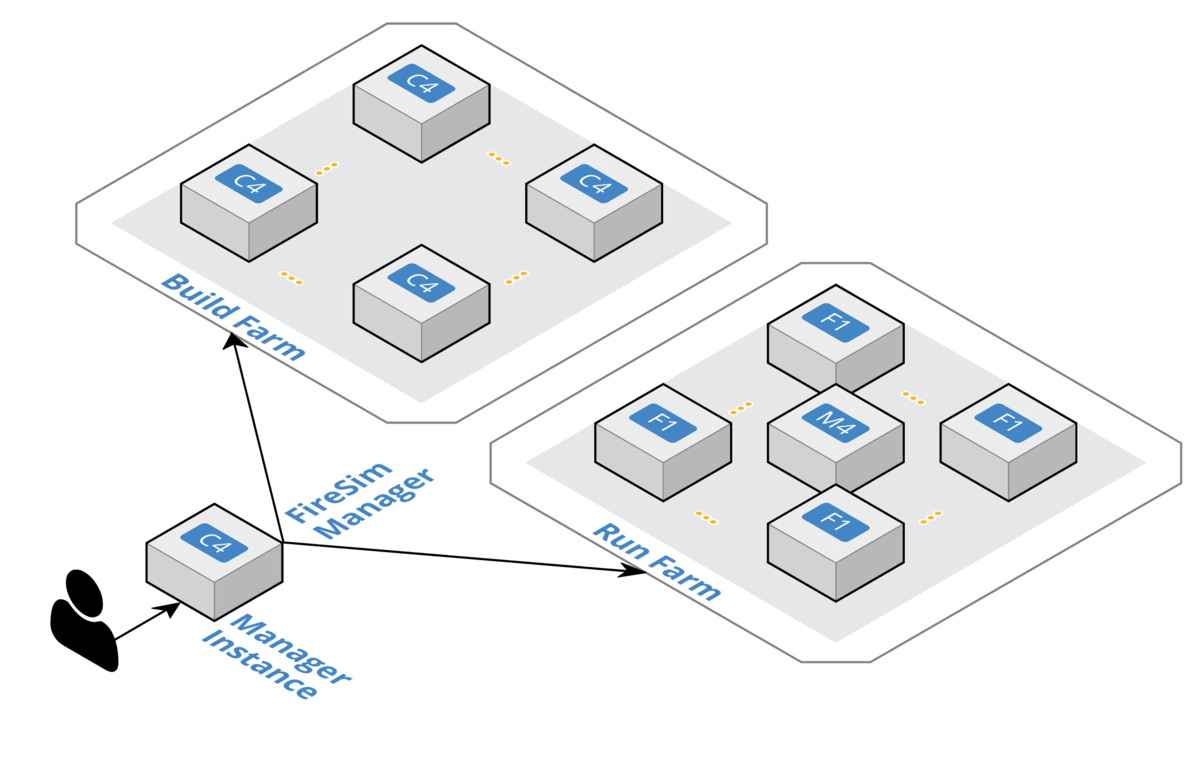
私は普段はLLVMのビルドをローカルマシンを使って行っている。私のローカルラップトップPCはSurface Laptop2なので、LLVMをデバッグモードでビルドするのにはかなり骨が折れる(実際、ビルド中は何もできない)。
しかしサーバを購入するのはもったいないし、それだけのために電気代が増えてしまうのもなんだか悔しいので、ビルドの時だけ強力なサーバを立ち上げるクラウドのような方式が欲しいと思った。
そこで、AWSをクライアントから管理するためのツールであるboto3を使ってみることにした。実際に、RISC-VのAWSシミュレーションツールであるFireSimはBoto3を使用している。

まずは入門から。参考にしたのは以下のQiitaの記事。とても分かりやすい。
S3バケットへのアクセステスト
まずはS3からデータを取得するための方法について入門する。API Keyなどは事前に取得しているものを使用した。
#!/usr/bin/python3

import boto3

print("boto3.client calling...")

s3 = boto3.client('s3',
                  aws_access_key_id='アクセスキーIDを指定する',
                  aws_secret_access_key='シークレットアクセスキーを指定する',
                  region_name='ap-northeast-1'
)

print("Getting client...")

# Getting Packet List
print("Getting packet list...")
print(s3.list_buckets())
print("Getting object...")
obj = s3.get_object(Bucket='llvm-bucket', Key='llvm.spec.in')
print(obj)
print(obj['Body'].read())
ここまでで、S3のバケットにアクセスして、ファイルを取得して中身を表示するコードの完成だ。とっても簡単。
boto3.client calling...
Getting client...
Getting packet list...
...
Getting object...
{'ResponseMetadata': {'RequestId': 'AD0CCF1B1AA44BD2', 'HostId': 'VngFXFeDJ2WZLXhzM2Yij3rT1D1wuM2YSmoXBqIgVQxkFHxPC+pd4ykG+wq0JdCQNACkdwTcVrs=', 'HTTPStatusCode': 200, 'HTTPHeaders': {'x-amz-id-2': 'VngFXFeDJ2WZLXhzM2Yij3rT1D1wuM2YSmoXBqIgVQxkFHxPC+pd4ykG+wq0JdCQNACkdwTcVrs=', 'x-amz-request-id': 'AD0CCF1B1AA44BD2', 'date': 'Sat, 17 Aug 2019 05:06:19 GMT', 'last-modified': 'Fri, 08 Mar 2019 18:22:06 GMT', 'etag': '"c1e0345abd088bbdd35a312318f0ce68"', 'accept-ranges': 'bytes', 'content-type': 'binary/octet-stream', 'content-length': '1866', 'server': 'AmazonS3'}, 'RetryAttempts': 0}, 'AcceptRanges': 'bytes', 'LastModified': datetime.datetime(2019, 3, 8, 18, 22, 6, tzinfo=tzutc()), 'ContentLength': 1866, 'ETag': '"c1e0345abd088bbdd35a312318f0ce68"', 'ContentType': 'binary/octet-stream', 'Metadata': {}, 'Body': <botocore.response.StreamingBody object at 0x7f62ef6b8390>}
b'Name: @PACKAGE_NAME@\nVersion: @PACKAGE_VERSION@\nRelease: 0\nSummary: LLVM (An Optimizing Compiler Infrastructure)\nLicense: University of Illinois/NCSA Open Source License\nVendor: None (open source)\nGroup: Development/Compilers\nURL: http://llvm..org/\nSource: http://llvm.org/releases/@PACKAGE_VERSION@/@PACKAGE_NAME@-@PACKAGE_VERSION@.tar.gz\nBuildRoot: %{_tmppath}/%{name}-root\nRequires: /sbin/ldconfig\nBuildRequires: gcc >= 3.4\n\n%description\nLLVM is a compiler infrastructure designed for compile-time, link-time, runtime,\nand idle-time optimization of programs from arbitrary programming languages.\nLLVM is written in C++ and has been developed since 2000 at the University of\nIllinois and Apple. It currently supports compilation of C and C++ programs, \nusing front-ends derived from GCC 4.0.1. A new front-end for the C family of\nlanguages is in development. The compiler infrastructure\nincludes mirror sets of programming tools as well as libraries with equivalent\nfunctionality.\n\n%prep\n%setup -q -n @PACKAGE_NAME@-@PACKAGE_VERSION@\n\n%build\n./configure \\\n--prefix=%{_prefix} \\\n--bindir=%{_bindir} \\\n--datadir=%{_datadir} \\\n--includedir=%{_includedir} \\\n--libdir=%{_libdir} \\\n--enable-optimized \\\n--enable-assertions \nmake tools-only\n\n%install\nrm -rf %{buildroot}\nmake install DESTDIR=%{buildroot}\n\n%clean\nrm -rf %{buildroot}\n\n%post -p /sbin/ldconfig\n\n%postun -p /sbin/ldconfig\n\n%files\n%defattr(-, root, root)\n%doc CREDITS.TXT LICENSE.TXT README.txt docs/*.{html,css,gif,jpg} docs/CommandGuide\n%{_bindir}/*\n%{_libdir}/*.o\n%{_libdir}/*.a\n%{_libdir}/*.so\n%{_includedir}/llvm\n\n%changelog\n* Fri Aug 04 2006 Reid Spencer\n- Updates for release 1.8\n* Fri Apr 07 2006 Reid Spencer\n- Make the build be optimized+assertions\n* Fri May 13 2005 Reid Spencer\n- Minor adjustments for the 1.5 release\n* Mon Feb 09 2003 Brian R. Gaeke\n- Initial working version of RPM spec file.\n\n\n'
EC2の立ち上げと終了のテスト
次に、EC2を立ち上げて終了したいと思う。ec2 resourceを使えば良さそうだ。デフォルトではm1.smallインスタンスが立ち上がる。これは必要に応じて変える。
print("Launching EC2..")
ec2_resouce = boto3.resource('ec2')
instances = ec2_resouce.create_instances(ImageId='ami-0a2de1c3b415889d2', MaxCount=1, MinCount=1)
print(instances)
instance = instances[0]
print("Waiting EC2 Launch ...")
instance.wait_until_running()
print("EC2 Launch Finished ...")

print(instance.network_interfaces_attribute)
instance.terminate()

print("Waiting EC2 Terminate ...")
instance.wait_until_terminated()
print("EC2 Terminate Finished ...")
立ち上がって終了した。EC2の立ち上がりは30秒くらいかな?まあまあ使い物になるかも。 マネージコンソールを見ても、m1.smallインスタンスが立ち上がってはTerminateされていることが分かる。成功だ。

Launching EC2..
[ec2.Instance(id='i-07835e8a75c47d675')]
Waiting EC2 Launch ...
EC2 Launch Finished ...
[{'Attachment': {'AttachTime': datetime.datetime(2019, 8, 17, 5, 6, 19, tzinfo=tzutc()), 'AttachmentId': 'eni-attach-094cc8843f6f7fe75', 'DeleteOnTermination': True, 'DeviceIndex': 0, 'Status': 'attaching'}, 'Description': '', 'Groups': [{'GroupName': 'default', 'GroupId': 'sg-7ca07519'}], 'Ipv6Addresses': [], 'MacAddress': '06:3c:0e:c7:ee:12', 'NetworkInterfaceId': 'eni-0a96a95c5be175cfe', 'OwnerId': '405410199528', 'PrivateDnsName': 'ip-172-31-7-114.ap-northeast-1.compute.internal', 'PrivateIpAddress': '172.31.7.114', 'PrivateIpAddresses': [{'Primary': True, 'PrivateDnsName': 'ip-172-31-7-114.ap-northeast-1.compute.internal', 'PrivateIpAddress': '172.31.7.114'}], 'SourceDestCheck': True, 'Status': 'in-use', 'SubnetId': 'subnet-71d12c06', 'VpcId': 'vpc-4a7d8e2f', 'InterfaceType': 'interface'}]
Waiting EC2 Terminate ...
EC2 Terminate Finished ...
FireSimはどのようにしてEC2を操作しているのか
例えば、ビルドファームではVivadoに回路デザインを流し込むために、マネージインスタンスからデザインの情報をビルド用のインスタンスに渡しているはずだ。このあたりの処理はどのようにして行われているのだろうか。
このあたりかな?
aws_bulildあたりが、aws-fpgaプロジェクトのコピーとか、立ち上げを実際に行っている様子だ。このあたりを見ていけば良さそうだ。
