FPGA開発日記

カテゴリ別記事インデックス https://msyksphinz.github.io/github_pages , English Version https://fpgadevdiary.hatenadiary.com/

Intel Agilex FPGAのホワイトペーパーを読んでまとめる (デジタル部に重きを置いて)

Intel(旧Altera)から発表された最新世代のFPGA、Agilexのアーキテクチャについてホワイトペーパを読んでみた。

デジタル部に重きを置いて読んでみた。I/Oの部分も野心的なI/Oコントローラが積み込まれており、面白そうだ。

www.intel.co.jp

https://www.intel.co.jp/content/dam/www/programmable/us/en/pdfs/literature/hb/agilex/ag-overview.pdf

なお、以降のすべての図は上記のpdfファイルから引用させて頂いている。


1. Intel Agilex FPGAバイス概要

  • 112Gトランシーバ

  • PCI Express Gen5と業界初のCompute Expres Link(CXL)をFPGAに搭載

    • Gen4 x16 (レーン当たり16Gbps) and Gen5 x16(レーンあたり32Gbps)
  • 4x400GE or 8x200GEネットワークインタフェース
  • DDR5, Intel Optane メモリをサポートする第4世代メモリコントローラ
    • DDR4 x72 at 3200Mbps, DDR5 x72 at 4400Mbps
    • 最大16GBまでのHBMをサポート
  • 40TFlops (FP16)までサポートするDSP
    • ハードウェアIEEE 754固定小数点および浮動小数DSP
    • Quad-core 64-bit Arm Cortex A53コア at 1.5GHz
  • 第2世代のIntel Hyperflexコアファブリックにより、40%の性能向上を実現

  • 10nm FinFET (第3世代)での製造 : 3million logic elements相当を搭載

    • Stratix 10 FPGAは14nm FinFET
  • SiP上にフレキシブルに実装

f:id:msyksphinz:20190412225208p:plain
Intel Agilex FPGA Blockダイアグラムの概要

Intel Agilex FPGA シリーズ

  • F-Series : バランス型
  • I-Series : 高性能型
  • M-Series : こちらも高性能型。HBMオプション 、Optane使用可能

  • Arm Core : Quad-core ARM Cortex-A53 MPCore processor with ARM CoreSight debug and trace technology

Agilexでは第2世代のHyperflexコアアーキテクチャを採用。40%のコアクロックの向上、電力の削減。 Second Generation HyperflexではHyper-Registerの最適化。Hyper RgisterというのはALM内でのリタイミングを行うためのレジスタ

f:id:msyksphinz:20190412224954p:plain
Intel Agilex Hyper Register

ALMというのはAdaptive Logic Moduleのことで、LUTとレジスタの対のようなもの。

様々なDSP

AgilexのDSPはコンフィグレーションによってさまざまな構成を取ることができる。 - BFLOAT16 浮動小数点フォーマット - Low Precision Fixed Point Mode - Standard Precision Fixed Point Mode - High Precision Fixed Point Mode - Half Precision Floating Point Arithmetic 16-bit - Single Precision Floating Point Arithmetic 32-bit

Hard Processor System(HPS)

いわゆるArm Cortex CPUを積んだSoCの部分。AgilexではCortex-A53のQuad Coreを搭載している。

f:id:msyksphinz:20190412225048p:plain
Hard Processor System (HPS)の概要

オリジナルLLVM Backendを追加しよう (27. Intrinsicのサポート)

https://cdn-ak.f.st-hatena.com/images/fotolife/m/msyksphinz/20181123/20181123225150.png

LLVMにはすでにRISC-Vのバックエンドサポートが追加されている。しかし、勉強のために独自のRISC-V実装をLLVMに追加している。

jonathan2251.github.io

第11章では、アセンブラやIntrinsicをサポートする。

具体的には、Intrinsic関数などのC言語の内部にアセンブラを埋め込む処理をサポートするのだが、これまで、さんざんアセンブリ言語のサポートを追加してきたじゃん。。。 Intrinsicでのアセンブリ記述をサポートするためには、さらにllcに改造を加える必要があるらしい。

まずは、何も改造せずにCのソースコード内にアセンブリ命令を挿入するとどうなるのか。

/// ch11_1.cpp
/// start
asm("lw $2, 8($sp)");
asm("sw $0, 4($sp)");
asm("addi $3, $zero, 0");
asm("add $s0, $s1, $t1");
asm("sub $3, $2, $3");
asm("mul $2, $1, $3");
asm("div $3, $2, $1");
asm("divu $2, $3, $10");
asm("and $2, $1, $3");
asm("or $3, $1, $2");
asm("xor $1, $2, $3");
asm("mul $11, $4, $3");
asm("mul $12, $3, $2");
// asm("mfhi $3");
// asm("mflo $2");
// asm("mthi $2");
// asm("mtlo $2");
asm("srai $2, $2, 2");
// asm("rol $2, $1, 3");
// asm("ror $3, $3, 4");
asm("slli $2, $2, 2");
asm("srli $2, $3, 5");
// asm("cmp $sw, $2, $3");
// asm("jeq $sw, 20");
// asm("jne $sw, 16");
// asm("jlt $sw, -20");
// asm("jle $sw, -16");
// asm("jgt $sw, -4");
// asm("jge $sw, -12");
// asm("jsub 0x000010000");
// asm("jr $4");
// asm("ret $lr");
asm("jalr $t6");
asm("li $3, 0x00700000");
asm("la $3, 0x00800000($6)");
asm("la $3, 0x00900000");

まず、上記のC言語のコードをclangでIRに変換するのだが、ここでは現在開発に使用しているclang/llcではなく、リリース済みの標準のclangを使用する。 開発中のclangでは、なぜかclangに読み込ませた段階でアセンブリ言語を認識してしまい、Errorを吐いてしまった。 たぶん、何かしらオプションを指定しないと、clangがデフォルトのアセンブリ言語x86と認識しているのかなあ。。。

LLVM IRをアセンブリに直接変換することはできるが、ハンドコードしたアセンブリ命令をオブジェクトファイルに直接変換することはできない。

これはなぜかというと、アセンブリ命令はAsmParserという機能が司っているかららしい。

アセンブリ命令を読み取ると、AsmParserParseInstruction()という関数を呼び、これがどの命令であるのかをチェックする。そして、このアセンブリ命令を読み取ったうえで、LLVM IRを作成し、それを返す。 そのあとでMatchAndEmitInstruction()を呼び出して生成したLLVM IRをMCInstに変換する。どうせなら一気通貫で何も考えずにやってくれればよいのに。

しかしそうは言っても、LLVMはある程度アセンブリ命令にマッチするための関数を出力してくれる。この自動生成されたヘッダファイルを使用して、アセンブリ言語のサポートを少しでも簡単に実装してみる。

clang -target mips-unknown-linux-gnu -c ../lbdex/input/ch11_1.cpp -emit-llvm -o ch11_1.bc
./bin/llc -march=myriscvx32 -relocation-model=pic -filetype=obj ch11_1.bc
./bin/llvm-objdump -d ch11_1.o
ch11_1.o:       file format ELF32-unknown

Disassembly of section .text:
.text:
       0:       83 25 84 00     lw      x11, 8(x8)
       4:       23 22 00 00     sw      x0, 4(x0)
       8:       13 06 00 00     addi    x12, x0, 0
       c:       33 84 64 00     add     x8, x9, x6
      10:       33 86 c5 40     sub     x12, x11, x12
      14:       b3 05 c5 02     mul     x11, x10, x12
      18:       33 c6 a5 02     div     x12, x11, x10
      1c:       b3 55 66 02     divu    x11, x12, x6
      20:       b3 75 c5 00     and     x11, x10, x12
      24:       33 66 b5 00     or      x12, x10, x11
      28:       33 c5 c5 00     xor     x10, x11, x12
      2c:       b3 83 c6 02     mul     x7, x13, x12
      30:       33 0e b6 02  <unknown>
      34:       93 d5 25 40     srai    x11, x11, 2
      38:       93 95 25 00     slli    x11, x11, 2
      3c:       93 55 56 00     srli    x11, x12, 5
      40:       67 80 00 00     jalr    x0
      44:       37 06 07 00     lui     x12, 112
      48:       13 66 06 00     ori     x12, x12, 0
      4c:       37 06 08 00     lui     x12, 128
      50:       13 66 06 00     ori     x12, x12, 0
      54:       33 06 f6 00     add     x12, x12, x15
      58:       37 06 09 00     lui     x12, 144
      5c:       13 66 06 00     ori     x12, x12, 0

まず、ParseInstruction()について見て行く。

bool MYRISCVXAsmParser::
ParseInstruction(ParseInstructionInfo &Info, StringRef Name, SMLoc NameLoc,
                 OperandVector &Operands) {

  // Create the leading tokens for the mnemonic, split by '.' characters.
  size_t Start = 0, Next = Name.find('.');
  StringRef Mnemonic = Name.slice(Start, Next);
  // Refer to the explanation in source code of function DecodeJumpFR(...) in
  // MYRISCVXDisassembler.cpp
  if (Mnemonic == "ret")
    Mnemonic = "jr";

  Operands.push_back(MYRISCVXOperand::CreateToken(Mnemonic, NameLoc));

  // Read the remaining operands.
  if (getLexer().isNot(AsmToken::EndOfStatement)) {
    // Read the first operand.
    if (ParseOperand(Operands, Name)) {
      SMLoc Loc = getLexer().getLoc();
      Parser.eatToEndOfStatement();
      return Error(Loc, "unexpected token in argument list");
    }

    while (getLexer().is(AsmToken::Comma) ) {
      Parser.Lex();  // Eat the comma.

      // Parse and remember the operand.
      if (ParseOperand(Operands, Name)) {
        SMLoc Loc = getLexer().getLoc();
        Parser.eatToEndOfStatement();
        return Error(Loc, "unexpected token in argument list");
      }
    }
  }

  if (getLexer().isNot(AsmToken::EndOfStatement)) {
    SMLoc Loc = getLexer().getLoc();
    Parser.eatToEndOfStatement();
    return Error(Loc, "unexpected token in argument list");
  }

  Parser.Lex(); // Consume the EndOfStatement
  return false;
}

オペコードの中でも、.で分離できるものを分離するらしい。しかし、RISC-Vではそのような命令形態はないので、とりあえず無視していいかな。

次に、MatchAndEmitInstruction()である。

//@2 {
bool MYRISCVXAsmParser::MatchAndEmitInstruction(SMLoc IDLoc, unsigned &Opcode,
                                                OperandVector &Operands,
                                                MCStreamer &Out,
                                                uint64_t &ErrorInfo,
                                                bool MatchingInlineAsm) {
...
   unsigned MatchResult = MatchInstructionImpl(Operands, Inst, ErrorInfo,
                                              MatchingInlineAsm);
...

MatchInstructionImpl()は、build-myriscvx/lib/Target/MYRISCVX/MYRISCVXGenAsmMatcher.incで定義されている。どうやら、Instに命令のデコードした結果生成されるLLVM IRを返すらしい。

  switch (MatchResult) {
    default: break;
    case Match_Success: {
      if (needsExpansion(Inst)) {
        SmallVector<MCInst, 4> Instructions;

MatchInstructionImpl()でのマッチングに成功すると、Expansionの確認を行った後にEmitInstruction()に命令を出力する。needExppansion()はオペコードによっては命令を展開する必要があるため、その判断に使用している。

bool MYRISCVXAsmParser::needsExpansion(MCInst &Inst) {

  switch(Inst.getOpcode()) {
    case MYRISCVX::LoadImm32Reg:
    case MYRISCVX::LoadAddr32Imm:
    case MYRISCVX::LoadAddr32Reg:
      return true;
    default:
      return false;
  }
}

void MYRISCVXAsmParser::expandInstruction(MCInst &Inst, SMLoc IDLoc,
                                          SmallVectorImpl<MCInst> &Instructions){
  switch(Inst.getOpcode()) {
    case MYRISCVX::LoadImm32Reg:
      return expandLoadImm(Inst, IDLoc, Instructions);
...
void MYRISCVXAsmParser::expandLoadImm(MCInst &Inst, SMLoc IDLoc,
                                      SmallVectorImpl<MCInst> &Instructions){

  MCInst tmpInst;
  const MCOperand &ImmOp = Inst.getOperand(1);
  assert(ImmOp.isImm() && "expected immediate operand kind");
  const MCOperand &RegOp = Inst.getOperand(0);
  assert(RegOp.isReg() && "expected register operand kind");

  int ImmValue = ImmOp.getImm();
  tmpInst.setLoc(IDLoc);
  if ( 0 <= ImmValue && ImmValue <= 65535) {
    // for 0 <= j <= 65535.
    // li d,j => ori d,$zero,j
    tmpInst.setOpcode(MYRISCVX::ORI);
    tmpInst.addOperand(MCOperand::createReg(RegOp.getReg()));
...
  } else if ( ImmValue < 0 && ImmValue >= -32768) {
    // for -32768 <= j < 0.
    // li d,j => addiu d,$zero,j
    tmpInst.setOpcode(MYRISCVX::ADDI); //TODO:no ADDiu64 in td files?
...
  } else {
    // for any other value of j that is representable as a 32-bit integer.
    // li d,j => lui d,hi16(j)
    //           ori d,d,lo16(j)
    tmpInst.setOpcode(MYRISCVX::LUI);
    tmpInst.addOperand(MCOperand::createReg(RegOp.getReg()));
    tmpInst.addOperand(MCOperand::createImm((ImmValue & 0xffff0000) >> 16));
  }
}
 

見ての通り、生成しなければならない値範囲に応じて生成方法を変えている。

  • 0 < Imm < 0xffff の場合 : ori dest, $zero, jに単純に置き換える。
  • -32768 < Imm < 0 の場合 : addi dest, $zero, jに置き換える。
  • それ以外の範囲の場合 : lui hi16(Imm); ori dest, dest, lo16(Imm)に置き換える。

に置き換えるという条件判断を、愚直に書き下ろしている訳だ。

その結果、生成されたオブジェクトコードをダンプしてみると、以下のようになる。

$ ./bin/llc -march=myriscvx32 -relocation-model=pic -filetype=obj ch11_1.bc
$ ./bin/llvm-objdump -d ch11_1.o
ch11_1.o:       file format ELF32-unknown

Disassembly of section .text:
.text:
       0:       83 25 84 00     lw      x11, 8(x8)
       4:       23 22 00 00     sw      x0, 4(x0)
       8:       13 06 00 00     addi    x12, x0, 0
       c:       33 84 64 00     add     x8, x9, x6
      10:       33 86 c5 40     sub     x12, x11, x12
      14:       b3 05 c5 02     mul     x11, x10, x12
      18:       33 c6 a5 02     div     x12, x11, x10
      1c:       b3 55 66 02     divu    x11, x12, x6
      20:       b3 75 c5 00     and     x11, x10, x12                                                                             
      24:       33 66 b5 00     or      x12, x10, x11
      28:       33 c5 c5 00     xor     x10, x11, x12
      2c:       b3 83 c6 02     mul     x7, x13, x12
      30:       33 0e b6 02  <unknown>
      34:       93 d5 25 40     srai    x11, x11, 2
      38:       93 95 25 00     slli    x11, x11, 2
      3c:       93 55 56 00     srli    x11, x12, 5
      40:       67 80 00 00     jalr    x0
      44:       37 06 07 00     lui     x12, 112
      48:       13 66 06 00     ori     x12, x12, 0
      4c:       37 06 08 00     lui     x12, 128
      50:       13 66 06 00     ori     x12, x12, 0
      54:       33 06 f6 00     add     x12, x12, x15
      58:       37 06 09 00     lui     x12, 144
      5c:       13 66 06 00     ori     x12, x12, 0

Immediate値が、luiとorに変換されている様子が確認できた。

AWS F1インスタンス上のFireSimでBOOMコアをシミュレーションする試行(4. F1インスタンスの立ち上げとLinuxのブート)

f:id:msyksphinz:20190405012417p:plain

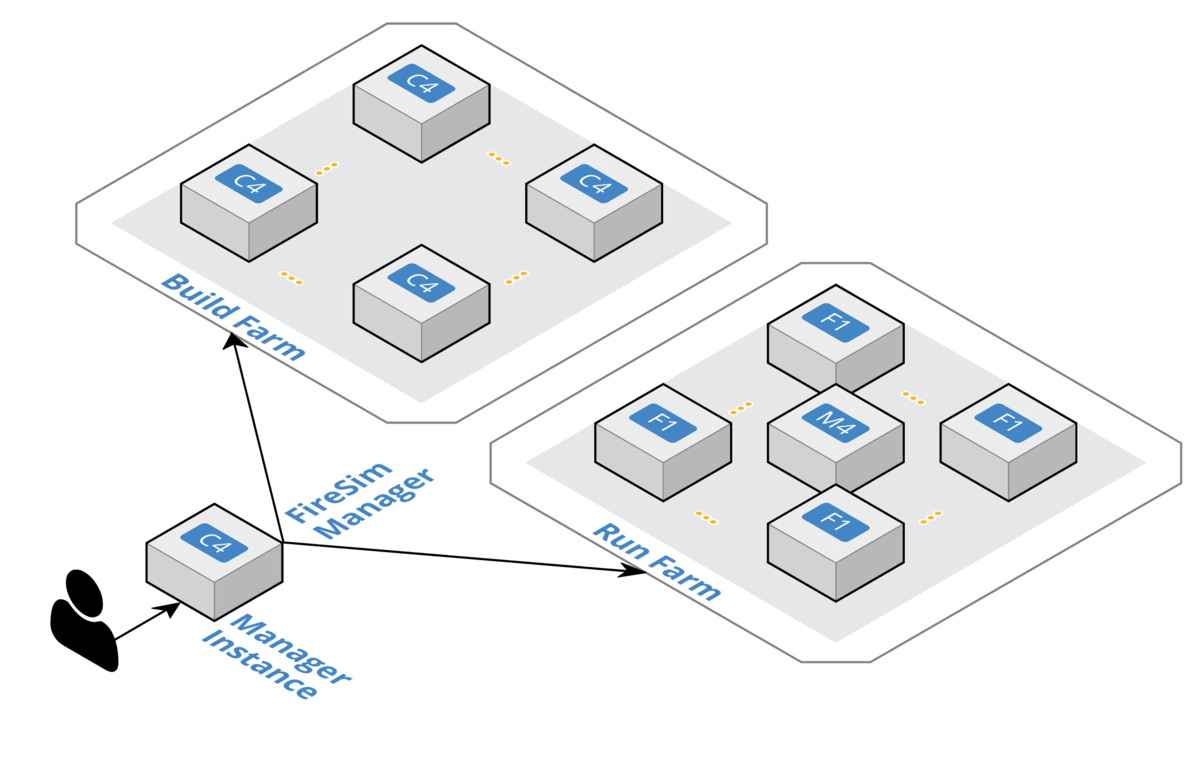
AWS F1インスタンス上でRISC-Vコアを動かすことのできるFireSimは、徐々にバージョンが上がっており、現在はBOOM(Berkeley Out-of Order Machine)のLinux起動もサポートできるようになっているらしい。

fires.im

一度、F1インスタンスチュートリアルはやってみたことがあるのだが、しばらく時間もたっているし、前回はRocketコアで検証した環境を、BOOMコアを使って再検証してみたい。

チュートリアルを見ながら、再度FireSimをF1インスタンス上に構築するチュートリアルを試してみることにした。以下の資料を参考にした。

docs.fires.im

シングルノードのシミュレーション

ここでは、FireSimのシミュレーションを行う。シングルターゲットノードを"f1.2xlarge" (1 FPGA)に乗せてシミュレーションを実行することになる。

ターゲットソフトウェアのビルド

まずはFireSim上で動作させるソフトウェアのビルドを行う。今回のチュートリルでは、buildrootを使用した簡単なLinuxディストリビューションをビルドする。

cd firesim/sw/firesim-software
./marshal -v build workloads/br-base.json
...
Running: "chmod +x /home/centos/firesim/sw/firesim-software/wlutil/br/firesim-overlay/firesim.sh" in /home/centos/firesim/sw/firesim-software
Running: "mkdir /home/centos/firesim/sw/firesim-software/disk-mount" in /home/centos/firesim/sw/firesim-software
Running: "sudo mount -o loop /home/centos/firesim/sw/firesim-software/images/br-base.img /home/centos/firesim/sw/firesim-software/disk-mount" in /home/centos/firesim/sw/firesim-software
Running: "sudo rsync -a --chown=root:root /home/centos/firesim/sw/firesim-software/wlutil/br/firesim-overlay/* /home/centos/firesim/sw/firesim-software/disk-mount" in /home/centos/firesim/sw/firesim-software
Running: "sudo umount /home/centos/firesim/sw/firesim-software/disk-mount" in /home/centos/firesim/sw/firesim-software
Log available at: /home/centos/firesim/sw/firesim-software/logs/br-base-build-2019-04-06--03-51-50-6BCYY4R3BBCFUFGV.log

生成されたものは、

では、次にFireSimで立ち上げるデザインの構成を行う。この構成はdeploy/config_runtime.iniで設定する。デフォルトは以下のようになっていた。

# RUNTIME configuration for the FireSim Simulation Manager
# See docs/Advanced-Usage/Manager/Manager-Configuration-Files.rst for documentation of all of these params.

[runfarm]
runfarmtag=mainrunfarm

f1_16xlarges=1
m4_16xlarges=0
f1_4xlarges=0
f1_2xlarges=0

runinstancemarket=ondemand
spotinterruptionbehavior=terminate
spotmaxprice=ondemand

[targetconfig]
topology=example_8config
no_net_num_nodes=2
linklatency=6405
switchinglatency=10
netbandwidth=200
profileinterval=-1

# This references a section from config_hwconfigs.ini
# In homogeneous configurations, use this to set the hardware config deployed
# for all simulators
defaulthwconfig=firesim-quadcore-nic-ddr3-llc4mb

[tracing]
enable=no
startcycle=0
endcycle=-1

[workload]
workloadname=linux-uniform.json
terminateoncompletion=no

このファイルで以下の行を変更する。

  • 変更前
f1_16xlarges=1
m4_16xlarges=0
f1_4xlarges=0
f1_2xlarges=0
  • 変更後
f1_16xlarges=0
m4_16xlarges=0
f1_4xlarges=0
f1_2xlarges=1
  • 変更前
defaulthwconfig=firesim-quadcore-nic-ddr3-llc4mb
  • 変更後
defaulthwconfig=fireboom-singlecore-no-nic-ddr3-llc4mb   # BOOMの場合
# defaulthwconfig=firesim-quadcore-no-nic-ddr3-llc4mb   # Rocket-Chipの場合
  • 変更前
topology=example_8config
no_net_num_nodes=2
  • 変更後
topology=no_net_config
no_net_num_nodes=1

この設定が完了すると、deploy/config_runtime.iniは以下のようになっているはずだ。

# RUNTIME configuration for the FireSim Simulation Manager
# See docs/Advanced-Usage/Manager/Manager-Configuration-Files.rst for documentation of all of these params.

[runfarm]
runfarmtag=mainrunfarm

f1_16xlarges=0
m4_16xlarges=0
f1_4xlarges=0
f1_2xlarges=1

runinstancemarket=ondemand
spotinterruptionbehavior=terminate
spotmaxprice=ondemand

[targetconfig]
topology=no_net_config
no_net_num_nodes=1
linklatency=6405
switchinglatency=10
netbandwidth=200
profileinterval=-1

# This references a section from config_hwconfigs.ini
# In homogeneous configurations, use this to set the hardware config deployed
# for all simulators
defaulthwconfig=firesim-quadcore-no-nic-ddr3-llc4mb

[tracing]
enable=no
startcycle=0
endcycle=-1

[workload]
workloadname=linux-uniform.json
terminateoncompletion=no

これでデザインの構成は完了となる。次に、F1インスタンスを起動する。

$ firesim launchrunfarm

以下の出力が得られるはず。これで、先ほど設定したf1_2xlargesが立ち上がった。これをE2マネジメントコンソールで確認してみる。

~/firesim$ firesim launchrunfarm
FireSim Manager. Docs: http://docs.fires.im
Running: launchrunfarm

Waiting for instance boots: 0 f1.16xlarges
Waiting for instance boots: 0 f1.4xlarges
Waiting for instance boots: 0 m4.16xlarges
Waiting for instance boots: 1 f1.2xlarges
i-0bd1ac5bfadc33b28 booted!
The full log of this run is:
/home/centos/firesim/deploy/logs/2019-04-10--14-14-58-launchrunfarm-5A5C62RIA49RZ71E.log
f:id:msyksphinz:20190411001700p:plain
EC2マネジメントコンソールの様子。f1.2xlargesが立ち上がっていることが分かる。

f1.2xlargesインスタンスが追加されており、FPGAが立ち上がったことが確認できる。では、いよいよRocket-Chipデザインを流し込む。

~/firesim$ firesim infrasetup
FireSim Manager. Docs: http://docs.fires.im
Running: infrasetup

Building FPGA software driver for FireSimNoNIC-FireSimRocketChipQuadCoreConfig-FireSimDDR3FRFCFSLLC4MBConfig90MHz
[192.168.0.87] Executing task 'instance_liveness'
[192.168.0.87] Checking if host instance is up...
[192.168.0.87] Executing task 'infrasetup_node_wrapper'
[192.168.0.87] Copying FPGA simulation infrastructure for slot: 0.
[192.168.0.87] Installing AWS FPGA SDK on remote nodes. Upstream hash: e5b68dd8d432c746f7094b54abf35334bc51b9d1
[192.168.0.87] Unloading XDMA/EDMA/XOCL Driver Kernel Module.
[192.168.0.87] Copying AWS FPGA XDMA driver to remote node.
[192.168.0.87] Unloading XDMA/EDMA/XOCL Driver Kernel Module.
[192.168.0.87] Loading XDMA Driver Kernel Module.
[192.168.0.87] Clearing FPGA Slot 0.
[192.168.0.87] Checking for Cleared FPGA Slot 0.
[192.168.0.87] Flashing FPGA Slot: 0 with agfi: agfi-0fd2554e204e2b0e3.
[192.168.0.87] Checking for Flashed FPGA Slot: 0 with agfi: agfi-0fd2554e204e2b0e3.
[192.168.0.87] Unloading XDMA/EDMA/XOCL Driver Kernel Module.
[192.168.0.87] Loading XDMA Driver Kernel Module.
[192.168.0.87] Starting Vivado hw_server.
[192.168.0.87] Starting Vivado virtual JTAG.
The full log of this run is:
/home/centos/firesim/deploy/logs/2019-04-10--14-16-15-infrasetup-59BRLK66FUS135F6.log

無事にRocket-ChipがFPGAに書き込まれた。ベンチマーク(Linux) を立ち上げてみる。

$ firesim runworkload

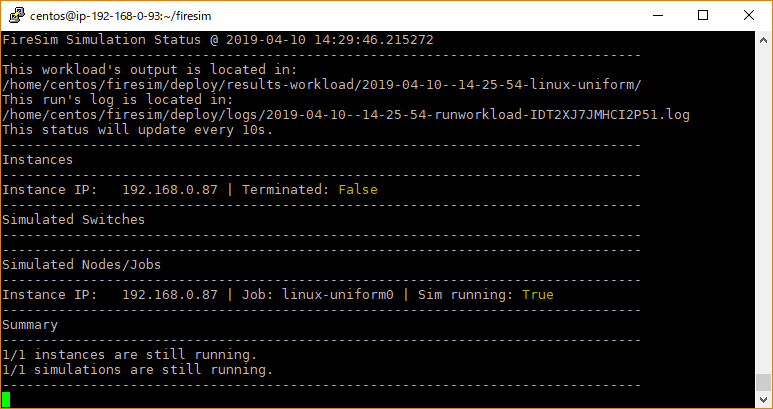
上記のコマンドにより、コンソール画面はFireSimのステータスを表示するモードに切り替わる。以下のようなステータスが表示されるようになり、10秒毎に更新されるモードになる。

FireSim Simulation Status @ 2019-04-10 14:26:09.350651
--------------------------------------------------------------------------------
This workload's output is located in:
/home/centos/firesim/deploy/results-workload/2019-04-10--14-25-54-linux-uniform/
This run's log is located in:
/home/centos/firesim/deploy/logs/2019-04-10--14-25-54-runworkload-IDT2XJ7JMHCI2P51.log
This status will update every 10s.
--------------------------------------------------------------------------------
Instances
--------------------------------------------------------------------------------
Instance IP:   192.168.0.87 | Terminated: False
--------------------------------------------------------------------------------
Simulated Switches
--------------------------------------------------------------------------------
--------------------------------------------------------------------------------
Simulated Nodes/Jobs
--------------------------------------------------------------------------------
Instance IP:   192.168.0.87 | Job: linux-uniform0 | Sim running: True
--------------------------------------------------------------------------------
Summary
--------------------------------------------------------------------------------
1/1 instances are still running.
1/1 simulations are still running.
--------------------------------------------------------------------------------
f:id:msyksphinz:20190411001820p:plain
FireSimの動作状態確認モード

このままではRocket-Chipにログインできないため、もう一度同じIPでマネージャインスタンスにログインする。以下を入力し、sourceme-f1-manager.shを読み込む。

$ cd firesim
$ source sourceme-f1-manager.sh

最初のコンソールを確認すると、インスタンスのIPとして192.168.0.87が割り当てられていることが確認できる。このため、このIPにSSHでログインし、シリアルで接続してFireSimの状態を確認する。

$ ssh 192.168.0.87
$ screen -r fsim0

すると、以下のような画面が表示された。FireSim上でLinuxがブートしている最中だったようだ。しばらくするとログイン画面が表示され、ログインできるようになる。ユーザ名root、パスワードfiresimでログインできる。

f:id:msyksphinz:20190411001959p:plain
FireSimでRISC-Vコア上のLinuxがブートしたところ

これで、F1インスタンス上で動作しているRocket-Chipにログインすることができた。試しに、uname -aをしてみる。

# uname -a
Linux buildroot 4.15.0-rc6-31587-gcae6324ee357 #1 SMP Wed Apr 10 12:07:35 UTC 2019 riscv64 GNU/Linux
f:id:msyksphinz:20190411002411p:plain
Linux上で`uname -a`を実行した結果。

RISC-Vコアであることが認識されており、正しく動作している。次に、/proc/cpuinfoを確認した。

# cat /proc/cpuinfo
hart    : 0
isa     : rv64imafdc
mmu     : sv39
uarch   : ucb-bar,boom0

BOOMコアだ。素晴らしい。

シャットダウン

Rocket-Chipをシャットダウンするためには、poweroff -fでシャットダウンする。

シャットダウンしたのち、F1インスタンスをTerminateする。これを放置していると、F1インスタンスが立ち上がりっぱなしになってしまい大変な料金を徴収されてしまう。

$ firesim terminaterunfarm

EC2マネジメントコンソールで、f1.2xlargeインスタンスがTerminateされたことを確認しておく。

メモ : firesim infrasetupが完了しない!

firesim infrasetupを実行しても、[192.168.0.87] Checking if host instance is up...と表示されその先に進まないことがある。

これは、EC2のセキュリティグループにfiresimと名の付くセキュリティグループが2つ以上存在している場合に発生するようだった。 セキュリティグループを確認し、firesimと名の付くグループをすべて削除したのちに、t2.nanoインスタンスでのAWSセットアップ作業からやり直すのが確実のようだ。

オリジナルLLVM Backendを追加しよう (26. ELFのサポートとobjdump)

https://cdn-ak.f.st-hatena.com/images/fotolife/m/msyksphinz/20181123/20181123225150.png

LLVMにはすでにRISC-Vのバックエンドサポートが追加されている。しかし、勉強のために独自のRISC-V実装をLLVMに追加している。

jonathan2251.github.io

第10章は、ELF形式のサポートと、objdumpコマンドを動かす。

まずは、ELFの形式をサポートする。ELFの形式は、以下のように表現される。

https://jonathan2251.github.io/lbd/_images/12.png

まずは通常通りllcでオブジェクトファイルを生成して、ELFのヘッダを確認してみる。 Machineの項は<unknown>: 0xf8となっており、認識できない。

$ ./bin/llc -march=myriscvx32 -relocation-model=pic -filetype=obj ch6_1.bc -o ch6_1.myriscvx.o
$ readelf -h ch6_1.myriscvx.o
ELF Header:
  Magic:   7f 45 4c 46 01 01 01 00 00 00 00 00 00 00 00 00
  Class:                             ELF32
  Data:                              2's complement, little endian
  Version:                           1 (current)
  OS/ABI:                            UNIX - System V
  ABI Version:                       0
  Type:                              REL (Relocatable file)
  Machine:                           <unknown>: 0xf8
  Version:                           0x1
  Entry point address:               0x0
  Start of program headers:          0 (bytes into file)
  Start of section headers:          572 (bytes into file)
  Flags:                             0x0
  Size of this header:               52 (bytes)
  Size of program headers:           0 (bytes)
  Number of program headers:         0
  Size of section headers:           40 (bytes)
  Number of section headers:         8
  Section header string table index: 1

次に、MIPSのオブジェクトファイルを生成してみる。Machineの項はMIPS R3000と認識されている。

$ ./bin/llc -march=mips -relocation-model=pic -filetype=obj ch6_1.bc -o ch6_1.mips.o
$ readelf -h ch6_1.mips.o
ELF Header:
  Magic:   7f 45 4c 46 01 02 01 00 00 00 00 00 00 00 00 00
  Class:                             ELF32
  Data:                              2's complement, big endian
  Version:                           1 (current)
  OS/ABI:                            UNIX - System V
  ABI Version:                       0
  Type:                              REL (Relocatable file)
  Machine:                           MIPS R3000
  Version:                           0x1
  Entry point address:               0x0
  Start of program headers:          0 (bytes into file)
  Start of section headers:          700 (bytes into file)
  Flags:                             0x50001007, noreorder, pic, cpic, o32, mips32
  Size of this header:               52 (bytes)
  Size of program headers:           0 (bytes)
  Number of program headers:         0
  Size of section headers:           40 (bytes)
  Number of section headers:         14
  Section header string table index: 1

これらのオブジェクトは実行ファイルではないので、セグメントは入っていない。

$ readelf -l ch6_1.myriscvx.o

There are no program headers in this file.

オブジェクトのセクション情報を確認してみる。

$ readelf -S ch6_1.myriscvx.o
There are 8 section headers, starting at offset 0x23c:

Section Headers:
  [Nr] Name              Type            Addr     Off    Size   ES Flg Lk Inf Al
  [ 0]                   NULL            00000000 000000 000000 00      0   0  0
  [ 1] .strtab           STRTAB          00000000 0001d4 000068 00      0   0  1
  [ 2] .text             PROGBITS        00000000 000034 00004c 00  AX  0   0  4
  [ 3] .rel.text         REL             00000000 0001a4 000030 08      7   2  4
  [ 4] .data             PROGBITS        00000000 000080 000008 00  WA  0   0  4
  [ 5] .comment          PROGBITS        00000000 000088 0000bb 01  MS  0   0  1
  [ 6] .note.GNU-stack   PROGBITS        00000000 000143 000000 00      0   0  1
  [ 7] .symtab           SYMTAB          00000000 000144 000060 10      1   2  4
Key to Flags:
  W (write), A (alloc), X (execute), M (merge), S (strings), I (info),
  L (link order), O (extra OS processing required), G (group), T (TLS),
  C (compressed), x (unknown), o (OS specific), E (exclude),
  p (processor specific)
$ objdump -s ch6_1.myriscvx.o

ch6_1.myriscvx.o:     file format elf32-little

Contents of section .text:
 0000 b7010000 93e10100 b3814100 37050000  ..........A.7...
 0010 13050500 130181ff 23224400 33010400  ........#"D.3...
 0020 23200000 37050000 33053500 03200500  # ..7...3.5.. ..
 0030 03200500 23200500 03200500 33040100  . ..# ... ..3...
 0040 03224400 13018100 67800000           ."D.....g...
Contents of section .data:
 0000 03000000 64000000                    ....d...
Contents of section .comment:
 0000 00636c61 6e672076 65727369 6f6e2037  .clang version 7
 0010 2e302e31 20286874 7470733a 2f2f6769  .0.1 (https://gi
 0020 74687562 2e636f6d 2f6c6c76 6d2d6d69  thub.com/llvm-mi
 0030 72726f72 2f636c61 6e672e67 69742034  rror/clang.git 4
 0040 35313965 32363337 66636334 62663665  519e2637fcc4bf6e
 0050 33303439 61306138 30653661 35653762  3049a0a80e6a5e7b
 0060 39373636 37636229 20286874 7470733a  97667cb) (https:
 0070 2f2f6769 74687562 2e636f6d 2f6d7379  //github.com/msy
 0080 6b737068 696e7a2f 6c6c766d 2e676974  ksphinz/llvm.git
 0090 20633431 36633731 33363062 61633966   c416c71360bac9f
 00a0 62336233 30396661 33643839 33326637  b3b309fa3d8932f7
 00b0 62633664 66363436 612900             bc6df646a).
$ readelf -tr ch6_1.myriscvx.o
There are 8 section headers, starting at offset 0x23c:

Section Headers:
  [Nr] Name
       Type            Addr     Off    Size   ES   Lk Inf Al
       Flags
  [ 0]
       NULL            00000000 000000 000000 00   0   0  0
       [00000000]:
  [ 1] .strtab
       STRTAB          00000000 0001d4 000068 00   0   0  1
       [00000000]:
  [ 2] .text
       PROGBITS        00000000 000034 00004c 00   0   0  4
       [00000006]: ALLOC, EXEC
  [ 3] .rel.text
       REL             00000000 0001a4 000030 08   7   2  4
       [00000000]:
  [ 4] .data
       PROGBITS        00000000 000080 000008 00   0   0  4
       [00000003]: WRITE, ALLOC
  [ 5] .comment
       PROGBITS        00000000 000088 0000bb 01   0   0  1
       [00000030]: MERGE, STRINGS
  [ 6] .note.GNU-stack
       PROGBITS        00000000 000143 000000 00   0   0  1
       [00000000]:
  [ 7] .symtab
       SYMTAB          00000000 000144 000060 10   1   2  4
       [00000000]:

Relocation section '.rel.text' at offset 0x1a4 contains 6 entries:
 Offset     Info    Type            Sym.Value  Sym. Name
00000000  00000305 unrecognized: 5       00000000   _gp_disp
00000004  00000306 unrecognized: 6       00000000   _gp_disp
0000000c  00000305 unrecognized: 5       00000000   _gp_disp
00000010  00000306 unrecognized: 6       00000000   _gp_disp
00000024  00000416 unrecognized: 16      00000004   gI
0000002c  00000417 unrecognized: 17      00000004   gI

objdumpをサポートする

objdumpをサポートするためには、Disassemblerを追加する。

diff --git a/lib/Target/MYRISCVX/CMakeLists.txt b/lib/Target/MYRISCVX/CMakeLists.txt
index 2257f4cf37a..b55c0fbf701 100644
--- a/lib/Target/MYRISCVX/CMakeLists.txt
+++ b/lib/Target/MYRISCVX/CMakeLists.txt
@@ -13,6 +13,7 @@ tablegen(LLVM MYRISCVXGenCallingConv.inc -gen-callingconv)
 tablegen(LLVM MYRISCVXGenCodeEmitter.inc -gen-emitter)
 tablegen(LLVM MYRISCVXGenMCCodeEmitter.inc -gen-emitter)
 tablegen(LLVM MYRISCVXGenAsmWriter.inc -gen-asm-writer)
+tablegen(LLVM MYRISCVXGenDisassemblerTables.inc -gen-disassembler)

 # MYRISCVXCommonTableGen must be defined
 add_public_tablegen_target(MYRISCVXCommonTableGen)
@@ -45,3 +46,4 @@ add_llvm_target(MYRISCVXCodeGen
 add_subdirectory(TargetInfo)
 add_subdirectory(MCTargetDesc)
 add_subdirectory(InstPrinter)
+add_subdirectory(Disassembler)

Disassemblerには、いくつかのオペランドの出力についてケアをする必要がある。 例えば、ストア命令は3つのオペランド(書き込みレジスタ、ベースアドレス、測地アドレス)を取るが、Target Descriptionファイルには2つのオペランドしか記述していない。 よく見ると、AlignedStoreの項目に$val, $ptrオペランドが2つ入っており、これを合わせてメモリアクセス命令のディスアセンブリを出力する必要がある。

class AlignedStore<PatFrag Node> :
  PatFrag<(ops node:$val, node:$ptr), (Node node:$val, node:$ptr), [{
    StoreSDNode *SD = cast<StoreSDNode>(N);
    return SD->getMemoryVT().getSizeInBits()/8 <= SD->getAlignment();
  }]>;
...
defm SW  : StoreM32<0b0100011, 0b010, "sw", store_a        >;
multiclass StoreM32<bits<7> opcode, bits<3> funct3, string instr_asm, PatFrag OpNode,
                    bit Pseudo = 0> {
  def #NAME# : StoreM<opcode, funct3, instr_asm, OpNode, GPR, mem, Pseudo>;
}
...
class StoreM<bits<7> opcode, bits<3> funct3, string instr_asm, PatFrag OpNode, RegisterClass RC,
             Operand MemOpnd, bit Pseudo>:
  FS<opcode, funct3, (outs), (ins RC:$rs1, MemOpnd:$addr),
     !strconcat(instr_asm, "\t$rs1, $addr"),
     [(OpNode RC:$rs1, addr:$addr)], IIStore> {
  let isPseudo = Pseudo;
}

この表記を上手く順番を並べ替えてフォーマットする。

  • lib/Target/MYRISCVX/Disassembler/MYRISCVXDisassembler.cpp
// @DecodeStore {
static DecodeStatus DecodeStore(MCInst &Inst,
                                unsigned Insn,
                                uint64_t Address,
                                const void *Decoder) {
  // @DecodeStore body {
  int Offset = SignExtend32<12>((fieldFromInstruction(Insn,  25, 7) << 5) |
                                (fieldFromInstruction(Insn,   7, 5)));
  int Reg  = (int)fieldFromInstruction(Insn, 20, 5);
  int Base = (int)fieldFromInstruction(Insn, 15, 5);

  Inst.addOperand(MCOperand::createReg(CPURegsTable[Base]));
  Inst.addOperand(MCOperand::createReg(CPURegsTable[Reg]));
  Inst.addOperand(MCOperand::createImm(Offset));

  return MCDisassembler::Success;
}
...
// @DecodeLoad {
static DecodeStatus DecodeLoad (MCInst &Inst,
                                unsigned Insn,
                                uint64_t Address,
                                const void *Decoder) {
  // @DecodeLoad body {
  int Offset = SignExtend32<12>((Insn >> 20) & 0x0fff);
  int Dest = (int)fieldFromInstruction(Insn,  7, 5);
  int Base = (int)fieldFromInstruction(Insn, 15, 5);

  Inst.addOperand(MCOperand::createReg(CPURegsTable[Dest]));
  Inst.addOperand(MCOperand::createReg(CPURegsTable[Base]));
  Inst.addOperand(MCOperand::createImm(Offset));

  return MCDisassembler::Success;
}

これでLLVMを再ビルドし、llvm-objdumpを実行してみる。

./bin/clang -c -target mips-unknown-linux-gnu ../lbdex/input/ch6_1.cpp -emit-llvm
./bin/llvm-objdump -d ch6_1.myriscvx.o
ch6_1.myriscvx.o:       file format ELF32-unknown

Disassembly of section .text:
_Z11test_globalv:
       0:       b7 01 00 00     lui     x3, 0
       4:       93 e1 01 00     ori     x3, x3, 0
       8:       b3 81 41 00     add     x3, x3, x4
       c:       37 05 00 00     lui     x10, 0
      10:       13 05 05 00     addi    x10, x10, 0
      14:       13 01 81 ff     addi    x2, x2, -8
      18:       23 22 44 00     sw      x8, 4(x4)
      1c:       33 01 04 00     move    x2, x8
      20:       23 20 00 00     sw      x0, 0(x0)
...

一応出力できたようだが、オペランドの順番が逆だ。add x3, x3, x4add x4, x3, x3にならないといけないと気がする。おかしいなあ。

AWS F1インスタンス上のFireSimでBOOMコアをシミュレーションする試行(3. FireSimリポジトリのセットアップとビルド)

f:id:msyksphinz:20190405012417p:plain

AWS F1インスタンス上でRISC-Vコアを動かすことのできるFireSimは、徐々にバージョンが上がっており、現在はBOOM(Berkeley Out-of Order Machine)のLinux起動もサポートできるようになっているらしい。

fires.im

一度、F1インスタンスチュートリアルはやってみたことがあるのだが、しばらく時間もたっているし、前回はRocketコアで検証した環境を、BOOMコアを使って再検証してみたい。

チュートリアルを見ながら、再度FireSimをF1インスタンス上に構築するチュートリアルを試してみることにした。以下の資料を参考にした。

docs.fires.im

鍵のセットアップ

マネージャインスタンスから、FireSimを経由して立ち上げるためのインスタンスを制御するために使用する鍵を用意する必要があり、 これは、前回ダウンロードした"firesim.pem"をそのまま流用する。scpなどの転送ツールを使用して、"firesim.pem"をマネージャインスタンスのホームディレクト~/firesimpemにコピーしておく。

マネージャインスタンスへのコピーが完了すると、ファイルのパーミッションを確認しておく。

chmod 600 firesim.pem

FireSimリポジトリのダウンロードとセットアップ

FireSimのリポジトリをダウンロードし、セットアップを行う。

git clone https://github.com/firesim/firesim
cd firesim
./build-setup.sh fast

./build-setup.shでは、RISC-Vのコンパイラやツールセット群などをダウンロードするが、fastオプションがついているので、プレビルドされたツール群がダウンロードされる。

distrib/var/run/
Makefile:25: XVC_FLAGS: .
make -C /lib/modules/3.10.0-862.11.6.el7.x86_64/build M=/home/centos/firesim/platforms/f1/aws-fpga/sdk/linux_kernel_drivers/xdma modules
make[1]: Entering directory `/usr/src/kernels/3.10.0-862.11.6.el7.x86_64'
/home/centos/firesim/platforms/f1/aws-fpga/sdk/linux_kernel_drivers/xdma/Makefile:25: XVC_FLAGS: .
  Building modules, stage 2.
/home/centos/firesim/platforms/f1/aws-fpga/sdk/linux_kernel_drivers/xdma/Makefile:25: XVC_FLAGS: .
  MODPOST 1 modules
make[1]: Leaving directory `/usr/src/kernels/3.10.0-862.11.6.el7.x86_64'
sudo: pip3: command not found

おや、エラーが出てきた。。pip3コマンドが存在しないようだが、これはpip3.4としてインストールされている。とりあえずbuild-setup-nolog.shを少し書き換えた。

diff --git a/build-setup-nolog.sh b/build-setup-nolog.sh
index 52c0a5d..da674bd 100644
--- a/build-setup-nolog.sh
+++ b/build-setup-nolog.sh
@@ -97,7 +97,7 @@ make

 # Set up firesim-software
 cd $RDIR
-sudo pip3 install -r sw/firesim-software/python-requirements.txt
+sudo pip3.4 install -r sw/firesim-software/python-requirements.txt

 # commands to run only on EC2
 # see if the instance info page exists. if not, we are not on ec2.

もう一度実行する。

./build-setup.sh fast
...
Root privileges are required to install. You may be asked for your password...
Executing as root...

AWS FPGA: Copying Amazon FPGA Image (AFI) Management Tools to /usr/bin
AWS FPGA: Installing shared library to /usr/local/lib64
        libfpga_mgmt.so.1 (libc6,x86-64) => /usr/local/lib64/libfpga_mgmt.so.1
AWS FPGA: Done with Amazon FPGA Image (AFI) Management Tools install.
Done with SDK install.
INFO: sdk_setup.sh PASSED
Agent pid 7343
Identity added: /home/centos/firesim.pem (/home/centos/firesim.pem)
success: firesim.pem added to ssh-agent
Setup complete!
To use the manager to deploy builds/simulations, source sourceme-f1-manager.sh to setup your environment.
To run builds/simulations manually on this machine, source sourceme-f1-full.sh to setup your environment.

完了した。メッセージに表れているように、source sourceme-f1-manager.shを実行する。

これによりAWSのシェルにRISC-VツールセットのPATHが追加され、ssh-agentが起動され他のノードにアクセスする場合に自動的に~/firesim.pemが使用されるように設定される。 マネージャインスタンスを立ち上げたときは、毎回このコマンドを入力する必要があるようだ。

~/firesim$ source sourceme-f1-manager.sh  # 毎回~/firesimディレクトリに移動して、このコマンドを入力する必要がある。
Agent pid 7343
success: firesim.pem available in ssh-agent

FireSimのマネージャには、FireSimのセットアップを続けるための様々なコマンドが用意されているので、これを使用するために、まず以下を入力する。

~/firesim$ firesim managerinit
FireSim Manager. Docs: http://docs.fires.im
Running: managerinit

Running aws configure. You must specify your AWS account info here to use the FireSim Manager.
[localhost] local: aws configure
AWS Access Key ID [None]:

t2.nanoで設定したものと同じことを聞かれるので。同様に設定を行う。

~/firesim$ firesim managerinit
FireSim Manager. Docs: http://docs.fires.im
Running: managerinit

Running aws configure. You must specify your AWS account info here to use the FireSim Manager.
[localhost] local: aws configure
AWS Access Key ID [None]: # AWSのアクセスキーをここに入力する。
AWS Secret Access Key [None]: # AWSのシークレットアクセスキーをここに入力すr。
Default region name [None]: us-east-1 # North Virginiaのインスタンスを使用しているので、"us-east-1"を設定する。
Default output format [None]: json # 出力ログの形式をjsonに設定する。
Backing up initial config files, if they exist.
Creating initial config files from examples.
If you are a new user, supply your email address [abc@xyz.abc] for email notifications (leave blank if you do not want email notifications):
# E-Mailでの通知は行わないので、ここでは何も設定しない。
You did not supply an email address. No notifications will be sent.
FireSim Manager setup completed.
The full log of this run is:
/home/centos/firesim/deploy/logs/2019-04-06--03-42-24-managerinit-EVF9NYYSS24T6KGK.log

ここまででマネージャインスタンスの設定は完了となる。

オリジナルLLVM Backendを追加しよう (25. 可変引数・動的スタック割り当て)

https://cdn-ak.f.st-hatena.com/images/fotolife/m/msyksphinz/20181123/20181123225150.png

LLVMにはすでにRISC-Vのバックエンドサポートが追加されている。しかし、勉強のために独自のRISC-V実装をLLVMに追加している。

jonathan2251.github.io

第9章の後半では、様々なイントリンジックを挿入する。

9.6.5 Function related Intrinsics support

LLVM固有のIRの組み込みを行う。大体は例外のサポートのためだ。C++での例外ハンドラのプログラムを実装するために、フレームアドレスとリターンアドレスを記録する必要があり、このためのLLVM IRを追加する。

  • lbdex/chapters/Chapter9_3/Cpu0ISelLowering.cpp
  case ISD::FRAMEADDR:          return lowerFRAMEADDR(Op, DAG);
  case ISD::RETURNADDR:         return lowerRETURNADDR(Op, DAG);
  case ISD::EH_RETURN:          return lowerEH_RETURN(Op, DAG);
  case ISD::ADD:                return lowerADD(Op, DAG);

... // include/llvm/CodeGen/SelectionDAG.h
  SDValue getCopyFromReg(SDValue Chain, const SDLoc &dl, unsigned Reg, EVT VT) {
    SDVTList VTs = getVTList(VT, MVT::Other);
    SDValue Ops[] = { Chain, getRegister(Reg, VT) };
    return getNode(ISD::CopyFromReg, dl, VTs, Ops);
  }

...
    
SDValue Cpu0TargetLowering::
lowerFRAMEADDR(SDValue Op, SelectionDAG &DAG) const {
...
  // FPレジスタの値を返す。
  SDValue FrameAddr = DAG.getCopyFromReg(
      DAG.getEntryNode(), DL, Cpu0::FP, VT);
  return FrameAddr;
SDValue MYRISCVXTargetLowering::lowerRETURNADDR(SDValue Op,
                                                SelectionDAG &DAG) const {
  // 戻りアドレスを格納しているRAレジスタを返す。暗黙的なLive-Inであることをマークする。
  unsigned Reg = MF.addLiveIn(RA, getRegClassFor(VT));
  return DAG.getCopyFromReg(DAG.getEntryNode(), SDLoc(Op), Reg, VT);
// EH_RETRUNはllvm.eh.retrun IRの結果を返す。これは__buildin_eh_return(offset, handler) から生成される。
// このIRの効果は、"offset"によってスタックポインタの位置を調整し、"handler"に移動する。

SDValue MYRISCVXTargetLowering::lowerEH_RETURN(SDValue Op, SelectionDAG &DAG)
    const {
...
  // スタックのオフセットをA1に保存し、A0にジャンプターゲットを格納する。
  // CopyToRegとEH_RETURNのノードを接続するので、これらの命令が連続して生成されるようになる。

  unsigned OffsetReg = MYRISCVX::A1;
  unsigned AddrReg = MYRISCVX::A0;
  Chain = DAG.getCopyToReg(Chain, DL, OffsetReg, Offset, SDValue());
  Chain = DAG.getCopyToReg(Chain, DL, AddrReg, Handler, Chain.getValue(1));
  return DAG.getNode(MYRISCVXISD::EH_RETURN, DL, MVT::Other, Chain,
                     DAG.getRegister(OffsetReg, Ty),
                     DAG.getRegister(AddrReg, getPointerTy(MF.getDataLayout())),
                     Chain.getValue(1));
SDValue MYRISCVXTargetLowering::lowerADD(SDValue Op, SelectionDAG &DAG) const {
...
  // この関数がどのような意味を持っているのかはよく分からない...
  MYRISCVXFI->setCallsEhDwarf();
  return Op;

テストパタンを実行した結果は以下となった。

_Z21display_returnaddressv:
...
# %bb.0:                                # %entry
        sw      x1, 8(x2)    # fn()を呼び出す前に、RAレジスタをメモリに退避する。
        lw      x3, %call16(_Z2fnv)(x3)
        jalr    x3
        lw      x3, 8(x2)
        lw      x10, 8(x2)   # RAレジスタの値をReturn Valueレジスタにロードする。
  
_Z20display_frameaddressv:
...
# %bb.0:                                # %entry
        addi    x2, x2, -8
        sw      x8, 4(x2)               # 4-byte Folded Spill
        move    x8, x2
        addi    x10, x8, 0   # FPレジスタの値をReturn Valueレジスタにロードする。
        move    x2, x8
        lw      x8, 4(x2)               # 4-byte Folded Reload
        addi    x2, x2, 8
        jalr    x1

次に、lbdex/input/ch9_3_detect_exception.cpp に実行して、例外ハンドラ(eh_return)を生成させてみる。

./bin/clang -c -target mips-unknown-linux-gnu ../lbdex/input/ch9_3_detect_exception.cpp -emit-llvm
./bin/llc -march=myriscvx32 -relocation-model=pic -filetype=asm ch9_3_detect_exception.bc -o -
  • bswapイントリンジックのサポート

bswapというイントリンジックがあるらしい。これも初めて知った。

  • ../lbdex/input/ch9_3_bswap.cpp
int test_bswap16() {
  volatile int a = 0x1234;
  int result = (__builtin_bswap16(a) ^ 0x3412);
  
  return result;
}
./bin/clang -c -target mips-unknown-linux-gnu ../lbdex/input/ch9_3_bswap.cpp -emit-llvm
./bin/llc -march=myriscvx32 -relocation-model=pic -filetype=asm ch9_3_bswap.bc -o -
_Z12test_bswap16v:
# %bb.0:                                # %entry
        addi    x2, x2, -16
        sw      x8, 12(x2)              # 4-byte Folded Spill
        move    x8, x2
        ori     x10, x0, 4660
        sw      x10, 8(x2)
        lw      x10, 8(x2)
        slli    x11, x10, 8
        lui     x12, 4080
        and     x11, x11, x12
        slli    x10, x10, 24
        or      x10, x10, x11
        shli    x10, x10, 16
        xori    x10, x10, 1042
        sw      x10, 4(x2)
        lw      x10, 4(x2)
        move    x2, x8
        lw      x8, 12(x2)              # 4-byte Folded Reload
        addi    x2, x2, 16
        jalr    x1

AWS F1インスタンス上のFireSimでBOOMコアをシミュレーションする試行(2. マネージャインスタンスの立ち上げ)

AWS F1インスタンス上でRISC-Vコアを動かすことのできるFireSimは、徐々にバージョンが上がっており、現在はBOOM(Berkeley Out-of Order Machine)のLinux起動もサポートできるようになっているらしい。

fires.im

一度、F1インスタンスチュートリアルはやってみたことがあるのだが、しばらく時間もたっているし、前回はRocketコアで検証した環境を、BOOMコアを使って再検証してみたい。

チュートリアルを見ながら、再度FireSimをF1インスタンス上に構築するチュートリアルを試してみることにした。以下の資料を参考にした。

docs.fires.im

マネージャインスタンスを立ち上げる

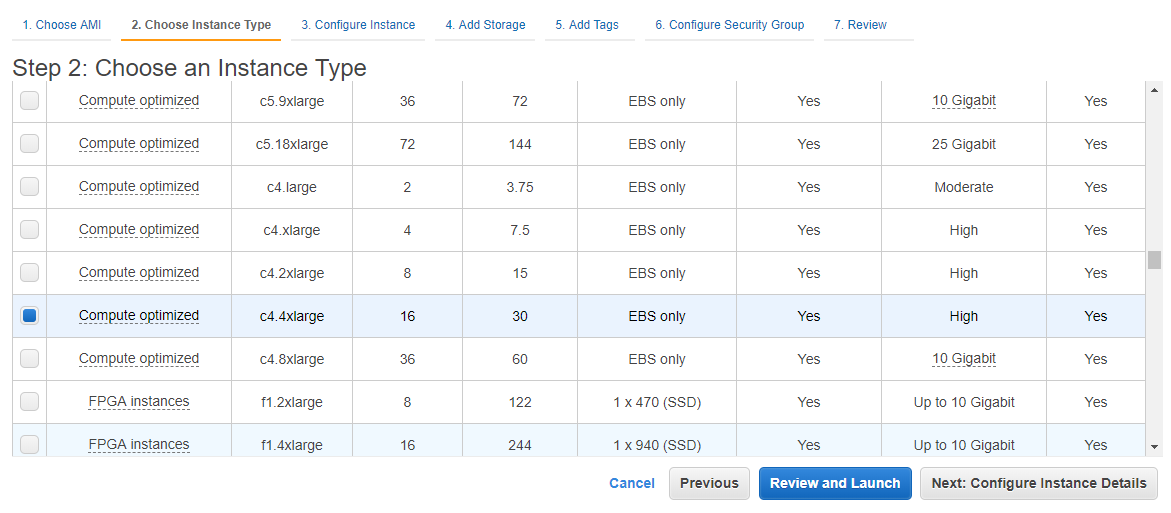
次は、FireSimとユーザのインタフェースとなるインスタンス、「マネージャインスタンス」を立ち上げる。マネージャインスタンスにはsshで接続する。 ここでは、マネージャインスタンスとしてc4.4xlargeインスタンスを用いている。c4.4xlargeインスタンスは比較的安価(0.796USD/時間)で使用することができるからだ。

まずはEC2マネジメントコンソールから[Launch Instance]をクリックし、インスタンスを構築する作業に入る。 AMIは"Community AMI"タブの"FPGA"から"FPGA Developer AMI - 1.5.0"を選択する。これ以外のAMIは使用できないらしいので、必ずこのAMIを指定すること。

f:id:msyksphinz:20190406013221p:plain
AMIの選択。"FPGA Developer AMI - 1.5.0 を選択する。

インスタンスタイプは"c4.4xlarge"を選択する。

f:id:msyksphinz:20190406013303p:plain
マネージャインスタンスには、c4.4xlargeを指定する。

"Configure Instance Details" ページでは、

  • "Network" : "firesim-xxx"というVPCが作られていますので、こちらを選択する。複数あっても、どれを使っても構わない。
  • さらに、"Protect against accidental termination"をチェックする。これを設定することで、突然マネージャインスタンスが落ちることを防ぐことができる。その代わり、通常の方法でマネージャインスタンスを止めるためには、この設定を解除する必要がある。
  • さらに、"Advanced Details"に以下を貼りつける (オリジナルのスクリプトは、 https://docs.fires.im/en/latest/Initial-Setup/Setting-up-your-Manager-Instance.html を参照のこと)。
#!/bin/bash
echo "machine launch script started" > /home/centos/machine-launchstatus
sudo yum install -y mosh
sudo yum groupinstall -y "Development tools"
sudo yum install -y gmp-devel mpfr-devel libmpc-devel zlib-devel vim git java java-devel
curl https://bintray.com/sbt/rpm/rpm | sudo tee /etc/yum.repos.d/bintray-sbt-rpm.repo
sudo yum install -y sbt texinfo gengetopt
sudo yum install -y expat-devel libusb1-devel ncurses-devel cmake "perl(ExtUtils::MakeMaker)"
# deps for poky
# pokyに必要なパッケージのインストール
sudo yum install -y python34 patch diffstat texi2html texinfo subversion chrpath git wget
# deps for qemu
# qemuに必要なパッケージのインストール
sudo yum install -y gtk3-devel
# deps for firesim-software (note that rsync is installed but too old)
# firesim-softwareに必要なパッケージのインストール(rsyncはインストールされるが、非常に古い)
sudo yum install -y python34-pip python34-devel rsync
# install DTC. it's not available in repos in FPGA AMI
# DTCのインストール。これはFPGA AMIのリポジトリでは入手できないので、ソースからインストールする。
DTCversion=dtc-1.4.4
wget https://git.kernel.org/pub/scm/utils/dtc/dtc.git/snapshot/$DTCversion.tar.gz
tar -xvf $DTCversion.tar.gz
cd $DTCversion
make -j16
make install
cd ..
rm -rf $DTCversion.tar.gz
rm -rf $DTCversion

# get a proper version of git
# 標準バージョンのgitをインストール
sudo yum -y remove git
sudo yum -y install epel-release
sudo yum -y install https://centos7.iuscommunity.org/ius-release.rpm
sudo yum -y install git2u

# install verilator
# Verilatorのインストール
git clone http://git.veripool.org/git/verilator
cd verilator/
git checkout v4.002
autoconf && ./configure && make -j16 && sudo make install
cd ..

# bash completion for manager
# bashの補完機能のインストール
sudo yum -y install bash-completion

# graphviz for manager
# Graphvizのインストール
sudo yum -y install graphviz python-devel

# these need to match what's in deploy/requirements.txt
# 作業に必要なPythonパッケージのインストール
sudo pip2 install fabric==1.14.0
sudo pip2 install boto3==1.6.2
sudo pip2 install colorama==0.3.7
sudo pip2 install argcomplete==1.9.3
sudo pip2 install graphviz==0.8.3
# for some of our workload plotting scripts
# 付加をプロットするためのスクリプトで使用するためのパッケージ
sudo pip2 install --upgrade --ignore-installed pyparsing
sudo pip2 install matplotlib==2.2.2
sudo pip2 install pandas==0.22.0
# this is explicitly installed to downgrade it to a version without deprec warnings
# cryptographyのインストール。deprecの警告を出さないために、明確にバージョンを指定する。
sudo pip2 install cryptography==2.2.2

sudo activate-global-python-argcomplete

# get a regular prompt
# 通常のプロンプトの設定
echo "PS1='\u@\H:\w\\$ '" >> /home/centos/.bashrc
echo "machine launch script completed" >> /home/centos/machine-launchstatus
f:id:msyksphinz:20190406013335p:plain
Configure Instance Detailのページ。

とても長いスクリプトだが、、これはインスタンスを立ち上げる際に最初に実行されるスクリプトで、これにより自動で必要なパッケージがインストールされたり、FireSimの動作に必要なツールがインストールされる。

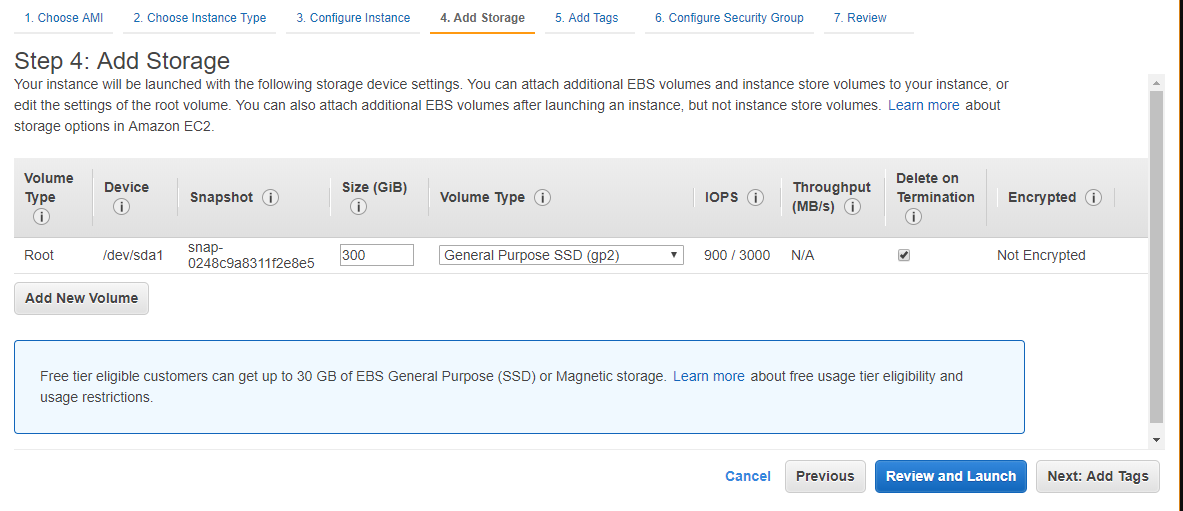
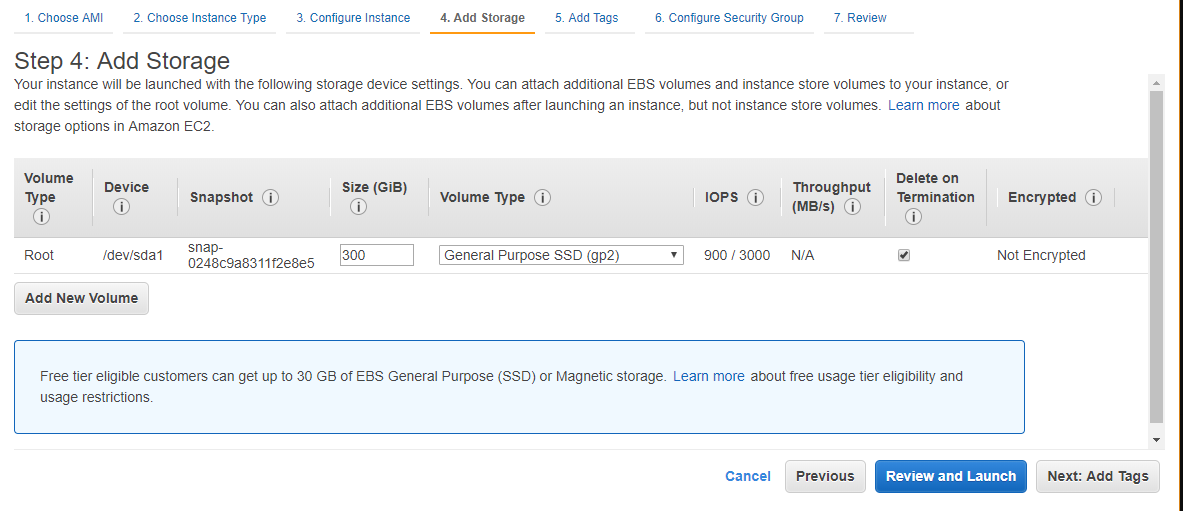
次にストレージの追加だ。EBSのディスクボリュームを300GB程度まで引き上げる。デフォルトでは75GB程度だったが、Vivadoなどで論理合成を行ったりシミュレーションを実行するとすぐにディスクがなくなってしまうので、300GB程度まで上げておく。セカンダリの5GBのボリュームは不要なので消して良い。

f:id:msyksphinz:20190406013556p:plain
ストレージの追加。300GB程度確保しておく。

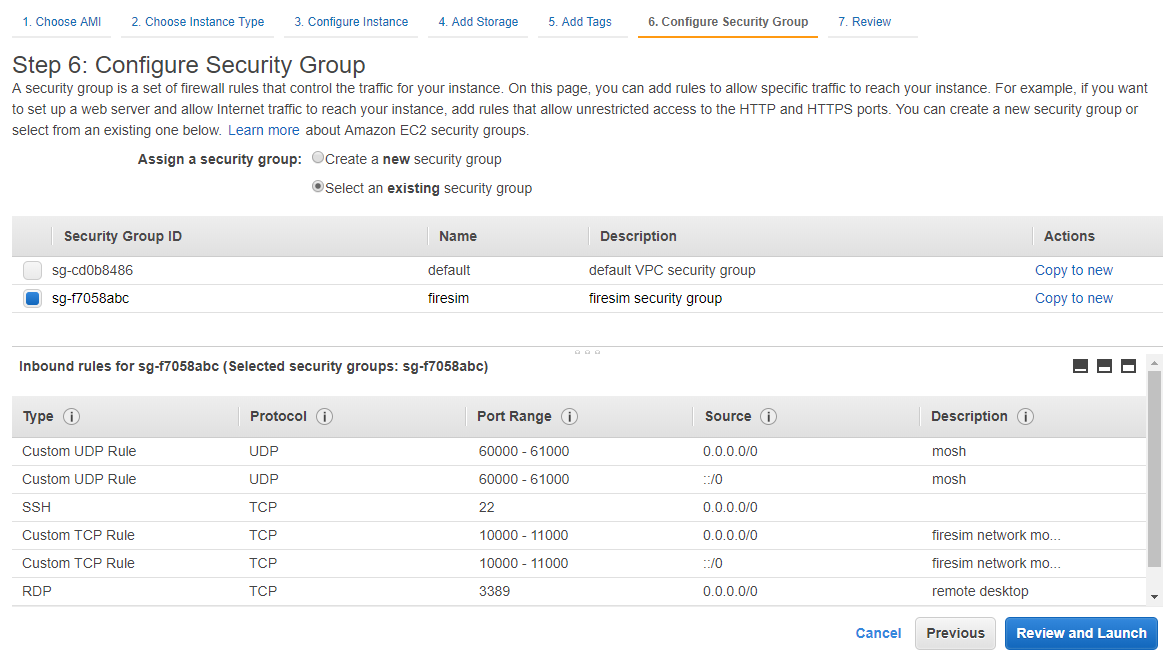
セキュリティグループの設定では、”Select an existing security group"を選択し、firesimと書かれているセキュリティグループを選択する。

f:id:msyksphinz:20190406013627p:plain
セキュリティグループの設定。firesimのセキュリティグループを選択する。

ここまで来たらインスタンスの設定は完了となる。[Review and Launch]から[Launch]をクリックする。このとき、キーペアとして、先ほど作成した"firesim"のキーペアを使用すること。

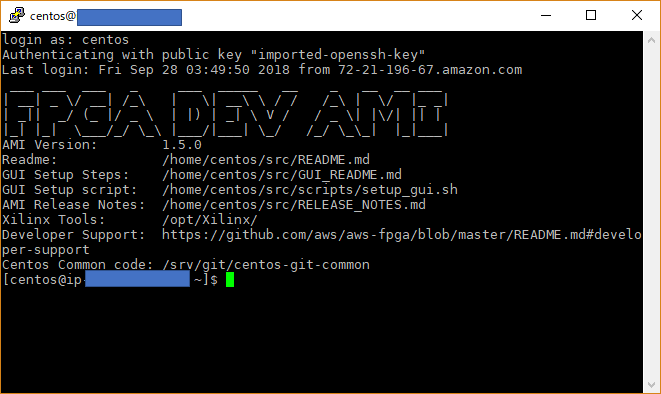
インスタンスが立ち上がると、c4.4xlargeインスタンスにアクセスできるようになる。 これは、t2.nanoインスタンスにアクセスしたときと同様に、"firesim"のキーペアを指定してログインする。 ユーザ名"centos"を入力すると、ログインできる。

f:id:msyksphinz:20190406013833p:plain
マネージャインスタンスにログインできた。

ただし、まだ上記で指定した起動時のスクリプトは実行されている最中かもしれない。~/machine-launchstatusを見て確認してみる。

cat machine-launchstatus
machine launch script started
machine launch script completed

上記のように出力されれば、初期化処理は完了していることが分かるので、手順を先に進めてよい。