FPGA開発日記

カテゴリ別記事インデックス https://msyksphinz.github.io/github_pages , English Version https://fpgadevdiary.hatenadiary.com/

LLVM Sanitizerを試す

Zapccを評価するために、図らずも自作RISC-VシミュレータをLLVMに移植したのだった。

LLVMに移植したので、どうせならLLVMメモリリークチェック機能などについて試行してみたい。 TuringCompleteFM にも出ていたのだが、LLVMのSanitizerはかなり優秀らしいということで動作させてみた。 これまではValgrindしか使ってこなかったのでLLVMのSanitizerのほうが優秀なのであれば移行したい。

github.com

LLVMのSanitizerを調査した結果、大きく分けて3種類が存在するらしい。

  • AddressSanitizer (detects addressability issues) and LeakSanitizer (detects memory leaks)
  • ThreadSanitizer (detects data races and deadlocks) for C++ and Go
  • MemorySanitizer (detects use of uninitialized memory)

一つ一つ試していこう。

Memory Sanitizer (未初期化メモリをチェックする)

Memory Sanitizerを有効化するためには、LLVMコンパイルオプションに -fsanitize=memory を追加してビルドする。 ビルド後のRISC-Vシミュレータを動作させると、いきなりGFlagsの部分で落ちてしまった。あれえ?Googleのコードなのに。

==21479==WARNING: MemorySanitizer: use-of-uninitialized-value
    #0 0x70ebf6 in std::_Rb_tree<char const*, std::pair<char const* const, google::(anonymous namespace)::CommandLineFlag*>, std::_Select1st<std::pair<char const* const, google::(anonymous namespace)::CommandLineFlag*> >, google::(anonymous namespace)::StringCmp, std::allocator<std::pair<char const* const, google::(anonymous namespace)::CommandLineFlag*> > >::_M_get_insert_unique_pos(char const* const&) /usr/lib/gcc/x86_64-linux-gnu/7.3.0/../../../../include/c++/7.3.0/bits/stl_tree.h:2035:7
    #1 0x70e6f0 in std::pair<std::_Rb_tree_iterator<std::pair<char const* const, google::(anonymous namespace)::CommandLineFlag*> >, bool> std::_Rb_tree<char const*, std::pair<char const* const, google::(anonymous namespace)::CommandLineFlag*>, std::_Select1st<std::pair<char const* const, google::(anonymous namespace)::CommandLineFlag*> >, google::(anonymous namespace)::StringCmp, std::allocator<std::pair<char const* const, google::(anonymous namespace)::CommandLineFlag*> > >::_M_insert_unique<std::pair<char const*, google::(anonymous namespace)::CommandLineFlag*> >(std::pair<char const*, google::(anonymous namespace)::CommandLineFlag*>&&) /usr/lib/gcc/x86_64-linux-gnu/7.3.0/../../../../include/c++/7.3.0/bits/stl_tree.h:2091:4
    #2 0x70d7ce in std::pair<std::_Rb_tree_iterator<std::pair<char const* const, google::(anonymous namespace)::CommandLineFlag*> >, bool> std::map<char const*, google::(anonymous namespace)::CommandLineFlag*, google::(anonymous namespace)::StringCmp, std::allocator<std::pair<char const* const, google::(anonymous namespace)::CommandLineFlag*> > >::insert<std::pair<char const*, google::(anonymous namespace)::CommandLineFlag*>, void>(std::pair<char const*, google::(anonymous namespace)::CommandLineFlag*>&&) /usr/lib/gcc/x86_64-linux-gnu/7.3.0/../../../../include/c++/7.3.0/bits/stl_map.h:810:16
    #3 0x70d045 in google::(anonymous namespace)::FlagRegistry::RegisterFlag(google::(anonymous namespace)::CommandLineFlag*) /home/msyksphinz/work/forest/riscv_forest_zapcc/vendor/gflags/src/gflags.cc:750:12
    #4 0x6fd174 in google::(anonymous namespace)::RegisterCommandLineFlag(char const*, char const*, char const*, google::(anonymous namespace)::FlagValue*, google::(anonymous namespace)::FlagValue*) /home/msyksphinz/work/forest/riscv_forest_zapcc/vendor/gflags/src/gflags.cc:1472:35
    #5 0x730f93 in google::FlagRegisterer::FlagRegisterer<long>(char const*, char const*, char const*, long*, long*) /home/msyksphinz/work/forest/riscv_forest_zapcc/vendor/gflags/src/gflags.cc:1484:3
    #6 0x47f5f0 in __cxx_global_var_init.4 /home/msyksphinz/work/forest/riscv_forest_zapcc/src/swimmer_main.cpp:62:1
    #7 0x480e02 in _GLOBAL__sub_I_swimmer_main.cpp /home/msyksphinz/work/forest/riscv_forest_zapcc/src/swimmer_main.cpp
    #8 0x77695c in __libc_csu_init (/home/msyksphinz/work/forest/riscv_forest_zapcc/build_riscvforest/riscvforest+0x77695c)
    #9 0x7f085bce0b27 in __libc_start_main /build/glibc-OTsEL5/glibc-2.27/csu/../csu/libc-start.c:266
    #10 0x490b39 in _start (/home/msyksphinz/work/forest/riscv_forest_zapcc/build_riscvforest/riscvforest+0x490b39)

SUMMARY: MemorySanitizer: use-of-uninitialized-value /usr/lib/gcc/x86_64-linux-gnu/7.3.0/../../../../include/c++/7.3.0/bits/stl_tree.h:2035:7 in std::_Rb_tree<char const*, std::pair<char const* const, google::(anonymous namespace)::CommandLineFlag*>, std::_Select1st<std::pair<char const* const, google::(anonymous namespace)::CommandLineFlag*> >, google::(anonymous namespace)::StringCmp, std::allocator<std::pair<char const* const, google::(anonymous namespace)::CommandLineFlag*> > >::_M_get_insert_unique_pos(char const* const&)
Exiting

というわけで Memory Sanitizerはいったんスキップする。

Address Sanitizer (メモリリークをチェックする)

Memory Sanitizerを有効化するためには、LLVMコンパイルオプションに -fsanitize=address を追加してビルドする。

ビルドしてバイナリを実行すると、エラーで落ちた。確かに、アドレスオーバフローを起こしている部分が存在した。 修正して再ビルドすると、エラー無く実行できるようになった。

==4691==ERROR: AddressSanitizer: stack-buffer-overflow on address 0x7ffc68865b80 at pc 0x000000552502 bp 0x7ffc68865b30 sp 0x7ffc688652e0
READ of size 4 at 0x7ffc68865b80 thread T0
    #0 0x552501 in __asan_memcpy /home/msyksphinz/software/llvm/llvm/projects/compiler-rt/lib/asan/asan_interceptors_memintrinsics.cc:23
    #1 0x673654 in ModuleRom::ModuleRom(EnvBase*, _IO_FILE*) /home/msyksphinz/work/forest/riscv_forest_zapcc/src/module_rom.cpp:62:5
    #2 0x5a4efd in RiscvPeThread::RiscvPeThread(_IO_FILE*, PrivMode, bool, bool, _IO_FILE*) /home/msyksphinz/work/forest/riscv_forest_zapcc/src/riscv_pe_thread.cpp:71:45
    #3 0x59970f in main /home/msyksphinz/work/forest/riscv_forest_zapcc/src/swimmer_main.cpp:170:33
    #4 0x7f0fc95ecb96 in __libc_start_main /build/glibc-OTsEL5/glibc-2.27/csu/../csu/libc-start.c:310
    #5 0x489479 in _start (/home/msyksphinz/work/forest/riscv_forest_zapcc/build_riscvforest/riscvforest+0x489479)

Address 0x7ffc68865b80 is located in stack of thread T0 at offset 64 in frame
    #0 0x6733cf in ModuleRom::ModuleRom(EnvBase*, _IO_FILE*) /home/msyksphinz/work/forest/riscv_forest_zapcc/src/module_rom.cpp:50

  This frame has 3 object(s):
    [32, 64) 'init' (line 53) <== Memory access at offset 64 overflows this variable
    [96, 488) 's' (line 65)
    [560, 592) 'config_string' (line 90)
HINT: this may be a false positive if your program uses some custom stack unwind mechanism, swapcontext or vfork
      (longjmp and C++ exceptions *are* supported)
SUMMARY: AddressSanitizer: stack-buffer-overflow /home/msyksphinz/software/llvm/llvm/projects/compiler-rt/lib/asan/asan_interceptors_memintrinsics.cc:23 in __asan_memcpy
Shadow bytes around the buggy address:
  0x10000d104b20: 00 00 00 00 00 00 00 00 00 00 00 00 00 00 00 00
  0x10000d104b30: 00 00 00 00 00 00 00 00 00 00 00 00 00 00 00 00
  0x10000d104b40: 00 00 00 00 00 00 00 00 00 00 00 00 00 00 00 00
  0x10000d104b50: 00 00 00 00 00 00 00 00 00 00 00 00 00 00 00 00
  0x10000d104b60: 00 00 00 00 00 00 00 00 f1 f1 f1 f1 00 00 00 00
=>0x10000d104b70:[f2]f2 f2 f2 f8 f8 f8 f8 f8 f8 f8 f8 f8 f8 f8 f8
  0x10000d104b80: f8 f8 f8 f8 f8 f8 f8 f8 f8 f8 f8 f8 f8 f8 f8 f8
  0x10000d104b90: f8 f8 f8 f8 f8 f8 f8 f8 f8 f8 f8 f8 f8 f8 f8 f8
  0x10000d104ba0: f8 f8 f8 f8 f8 f2 f2 f2 f2 f2 f2 f2 f2 f2 f8 f8
  0x10000d104bb0: f8 f8 f3 f3 f3 f3 f3 f3 00 00 00 00 00 00 00 00
  0x10000d104bc0: 00 00 00 00 00 00 00 00 00 00 00 00 00 00 00 00
Shadow byte legend (one shadow byte represents 8 application bytes):
  Addressable:           00
  Partially addressable: 01 02 03 04 05 06 07
  Heap left redzone:       fa
  Freed heap region:       fd
  Stack left redzone:      f1
  Stack mid redzone:       f2
  Stack right redzone:     f3
  Stack after return:      f5
  Stack use after scope:   f8
  Global redzone:          f9
  Global init order:       f6
  Poisoned by user:        f7
  Container overflow:      fc
  Array cookie:            ac
  Intra object redzone:    bb
  ASan internal:           fe
  Left alloca redzone:     ca
  Right alloca redzone:    cb
  Shadow gap:              cc
==4691==ABORTING

Thread Sanitizer (スレッドのレースコンディションをチェックする)

Thread Sanitizerを有効化するためには、 LLVMコンパイルオプションに -fsanitize=thread を追加してビルドする。

ビルドしてバイナリを実行しても、特にエラーは発生しなかった。まあ、確かにマルチスレッドは使用していないのでエラーは発生しないだろう。

実行速度

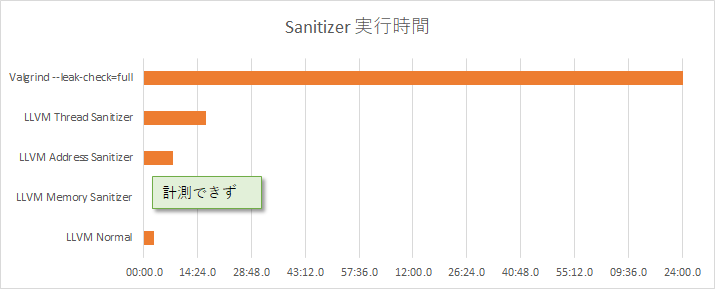
それぞれ実行速度を比較すると以下のようになった。まあValgrindは--leak-check=fullなのでもしかしたら正確な比較ではないかもしれないが、LLVMのSanitizer、結構速いね。

  • Normal : 2m43.460s
  • Thread Sanitizer : 16m37.715s
  • Address Sanitizer : 7m53.666s
  • Valgrind --leak-check=full : 3時間程度...
f:id:msyksphinz:20180708020453p:plain

「ハン・ソロ/スターウォーズ・ストーリー」を見てきた

たとえ2時間映画館に座っているのがおっくうでも、スター・ウォーズは見に行きます。

starwars.disney.co.jp

あまりストーリーのネタバレは書かないけど、なるほど、米国で評価が低い気持ちは、何となくわかる気がする...

「ローグ・ワン」があれだけヒットした理由は、メインの物語に対してしっかりとした繋がりがあったからだと思う。

一方で「ハン・ソロ」は、直接つながるようなストーリーではないし、ミレニアム・ファルコンを手に入れた経緯も「?」ってなるし、 最後の裏切りというかなんというか、「なんでお前がでてくるんだ!!!??」みたいな不思議な終わり方をするし、これも次回のスピンオフ作品に向けての前振りなんでしょうか...

「ローグ・ワン」は、次への前振りも何もなかったのでスッキリと終われたのですが、今回はそうでもないみたいですね...

TensorFlow+Kerasに入門(7. Keras2cppをimage_data_formatに対応させる)

f:id:msyksphinz:20180701195704p:plain

Keras2cppを使ってKerasのモデルをC++のコードに変換したのだが、まだ問題がある。デフォルトの画像データフォーマットである image_data_format = channels_last に対応していないことだ。

バックエンド - Keras Documentation

これにより、画像データをデフォルトの並び(縦方向, 横方向, channel)に一度変換して処理をしないといけない。これは面倒なので、channels_firstに対応させることにした。

github.com

と言っても、画像データを入力するときに、DataChunk構造体にchannel_firstなのかchannel_lastなのかを指定して格納するだけだ。

  • keras2cpp/keras_model.cc
void keras::DataChunk2D::read_from_file(const std::string &fname,
                                        keras::ImageDataFormat_t image_data_format
                                        ) {
...
  if (image_data_format == keras::ImageDataFormat_t::First) {
    fin >> m_depth >> m_rows >> m_cols;  // [Depth, Rows, Cols]
  } else {
    fin >> m_rows >> m_cols >> m_depth;  // [Rows, Cols, Depth]
  }
...
  if (image_data_format == keras::ImageDataFormat_t::First) {

    for(int d = 0; d < m_depth; ++d) {
      for(int r = 0; r < m_rows; ++r) {

        char tmp_char;
        float tmp_float;

        fin >> tmp_char; // for '['
        for(int c = 0; c < m_cols; ++c) {
          fin >> tmp_float;
          data[d][r][c] = tmp_float;
        }
        fin >> tmp_char; // for ']'
      }
    }
  } else {
    for(int r = 0; r < m_rows; ++r) {
      for(int c = 0; c < m_cols; ++c) {
        char tmp_char;
        float tmp_float;

        fin >> tmp_char; // for '['
        for(int d = 0; d < m_depth; ++d) {
          fin >> tmp_float;
          data[d][r][c] = tmp_float;
        }
        fin >> tmp_char; // for ']'
      }
    }
  }
...

ついでに、CIFAR10の入力データを100個用意してそれぞれ推論を実行してみるように変更した。正しく動作しているようだ。 image_data_format = channels_first, image_data_format = channels_last の両方で動かしてみたが、正しく動作しているようだ。

ちゃんと整理してPull-Requestを出してみようかしら。

  • keras2cpp/example_main.cc
int main() {
  cout << "This is simple example with Keras neural network model loading into C++.\n"
           << "Keras model will be used in C++ for prediction only." << endl;

  KerasModel m("./dumped.nnet", ImageDataFormat_t::Last, false);

  for (int idx = 0; idx < 100; idx++) {
    std::stringstream filename;
    filename << "test_data/cifar10_test_data_" << std::setfill('0') << std::setw(2) << idx << ".txt";

    DataChunk *sample = new DataChunk2D();
    sample->read_from_file(filename.str().c_str(), ImageDataFormat_t::Last);
    m.compute_output(sample);

    delete sample;
  }

  return 0;
}

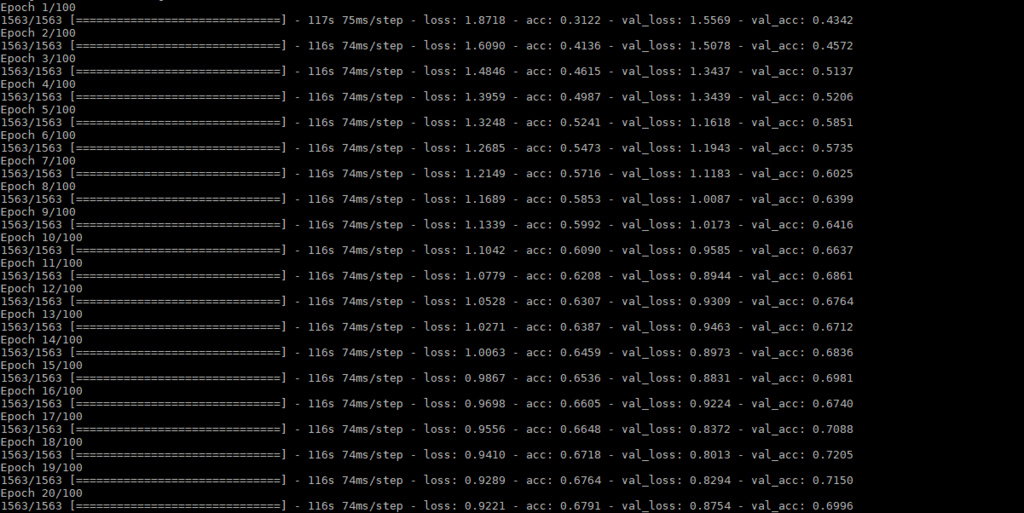
おまけ: 使用したCIFAR-10のCNN。

f:id:msyksphinz:20180707232250p:plain

TensorFlow+Kerasに入門(6. keras2cppによるC++でのCIFAR10推論実行)

f:id:msyksphinz:20180701195704p:plain

keras2cppのコードを解析していき、いくつかkeras2cppのコードがKeras2に合っていない部分を発見した。

前提条件

今回はkeras2cppの実装にある程度合わせるため、input_image_formatをchannel_firstに設定している。 これは${HOME}/.keras/keras.jsonで設定して、全体で適用されるようにしている。

  • ${HOME}/.keras/keras.json
{
    "floatx": "float32",
    "epsilon": 1e-07,
    "backend": "tensorflow",
    "image_data_format": "channels_last"
}

ターゲットにしたのは、KerasのCIFAR10モデルであるcifar10_cnn.pyだ。

github.com

モデルの概要

model.summary()

_________________________________________________________________
Layer (type)                 Output Shape              Param #
=================================================================
conv2d_1 (Conv2D)            (None, 32, 32, 32)        896
_________________________________________________________________
activation_1 (Activation)    (None, 32, 32, 32)        0
_________________________________________________________________
conv2d_2 (Conv2D)            (None, 32, 30, 30)        9248
_________________________________________________________________
activation_2 (Activation)    (None, 32, 30, 30)        0
_________________________________________________________________
max_pooling2d_1 (MaxPooling2 (None, 32, 15, 15)        0
_________________________________________________________________
dropout_1 (Dropout)          (None, 32, 15, 15)        0
_________________________________________________________________
conv2d_3 (Conv2D)            (None, 64, 15, 15)        18496
_________________________________________________________________
activation_3 (Activation)    (None, 64, 15, 15)        0
_________________________________________________________________
conv2d_4 (Conv2D)            (None, 64, 13, 13)        36928
_________________________________________________________________
activation_4 (Activation)    (None, 64, 13, 13)        0
_________________________________________________________________
max_pooling2d_2 (MaxPooling2 (None, 64, 6, 6)          0
_________________________________________________________________
dropout_2 (Dropout)          (None, 64, 6, 6)          0
_________________________________________________________________
flatten_1 (Flatten)          (None, 2304)              0
_________________________________________________________________
dense_1 (Dense)              (None, 512)               1180160
_________________________________________________________________
activation_5 (Activation)    (None, 512)               0
_________________________________________________________________
dropout_3 (Dropout)          (None, 512)               0
_________________________________________________________________
dense_2 (Dense)              (None, 10)                5130
_________________________________________________________________
activation_6 (Activation)    (None, 10)                0
=================================================================
Total params: 1,250,858
Trainable params: 1,250,858
Non-trainable params: 0
_________________________________________________________________

keras2cppの修正

まず、Conv2Dの実装の部分だが、フィルタを実装する際のインデックスの向きがKerasの実装と合っていない。

f:id:msyksphinz:20180705224005p:plain

  • keras2cpp/keras_model.cc
@@ -250,7 +255,8 @@ std::vector< std::vector<float> > keras::conv_single_depth_valid(
         //const float * k_data = k[k1_size-k1-1].data();
         //const float * im_data = im[i-st_x+k1].data();
         for(unsigned int k2 = 0; k2 < k[0].size(); ++k2) {
-          sum += k[k1_size-k1-1][k2_size-k2-1] * im[i-st_x+k1][j-st_y+k2];
+          sum += k[k1][k2] * im[i-st_x+k1][j-st_y+k2];
         }
       }
       y[i-st_x][j-st_y] = sum;
@@ -263,7 +269,8 @@ std::vector< std::vector<float> > keras::conv_single_depth_valid(
 // with border mode = same
 std::vector< std::vector<float> > keras::conv_single_depth_same(
        std::vector< std::vector<float> > const & im,
-       std::vector< std::vector<float> > const & k)
+       std::vector< std::vector<float> > const & k,
+    bool debug)
 {
   size_t k1_size = k.size(), k2_size = k[0].size();
   unsigned int st_x = (k1_size - 1) >> 1;
@@ -285,7 +292,14 @@ std::vector< std::vector<float> > keras::conv_single_depth_same(
           if(j-st_y+k2 < 0) continue;
           if(j-st_y+k2 > max_imr) continue;

-          sum += k[k1_size-k1-1][k2_size-k2-1] * im[i-st_x+k1][j-st_y+k2];
+          sum += k[k1][k2] * im[i-st_x+k1][j-st_y+k2];
         }
       }
       y[i][j] = sum;

さらに、Flattenの実装が合っていない。入力値が3次元に対して、Flattenする順番は(y, x, ch)なので、ループの順番を入れ替える。

  • keras2cpp/keras_model.cc
diff --git a/machine_learning/tensorflow/keras/keras_model/keras_model.cc b/machine_learning/tensorflow/keras/keras_model/keras_model.cc
index 6c65550..8c3707e 100644
--- a/machine_learning/tensorflow/keras/keras_model/keras_model.cc
+++ b/machine_learning/tensorflow/keras/keras_model/keras_model.cc
@@ -125,15 +125,17 @@ keras::DataChunk* keras::LayerFlatten::compute_output(keras::DataChunk* dc) {
   size_t size = im.size() * csize * rsize;
   keras::DataChunkFlat *out = new DataChunkFlat(size);
   float * y_ret = out->get_1d_rw().data();
-  for(size_t i = 0, dst = 0; i < im.size(); ++i) {
-    for(size_t j = 0; j < csize; ++j) {
-      float * row = im[i][j].data();
-      for(size_t k = 0; k < rsize; ++k) {
-        y_ret[dst++] = row[k];
+  size_t dst = 0;
+  for(size_t j = 0; j < csize; ++j) {
+    for(size_t k = 0; k < rsize; ++k) {
+      for(size_t i = 0; i < im.size(); ++i) {
+        y_ret[dst++] = im[i][j][k];
       }
     }
   }

というわけで実行した結果、Kerasで生成したモデルを変換してC++に読み込ませ、生成したバイナリでCIFAR10を実行すると、以下のようになった。

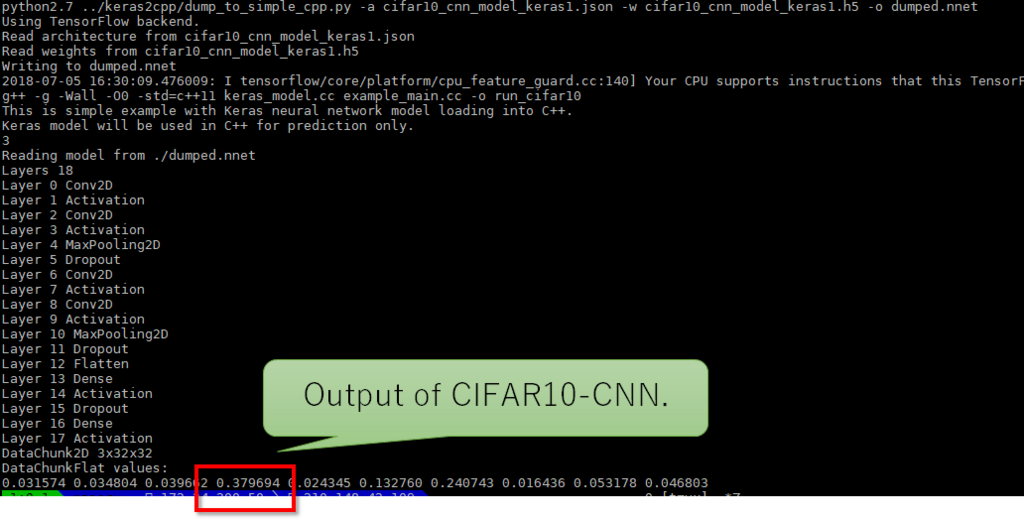
最後の10個の数値が、10種類の分類になっている。最も大きいのは0.379694で、3番目の分類の画像であることを示している。 正しく計算できていることが確認できた。

$ g++ -g -Wall -O0 -std=c++11 keras_model.cc example_main.cc -o run_cifar10
This is simple example with Keras neural network model loading into C++.
Keras model will be used in C++ for prediction only.
3
Reading model from ./dumped.nnet
Layers 18
Layer 0 Conv2D
Layer 1 Activation
Layer 2 Conv2D
Layer 3 Activation
Layer 4 MaxPooling2D
Layer 5 Dropout
Layer 6 Conv2D
Layer 7 Activation
Layer 8 Conv2D
Layer 9 Activation
Layer 10 MaxPooling2D
Layer 11 Dropout
Layer 12 Flatten
Layer 13 Dense
Layer 14 Activation
Layer 15 Dropout
Layer 16 Dense
Layer 17 Activation
DataChunk2D 3x32x32
DataChunkFlat values:
0.031574 0.034804 0.039662 0.379694 0.024345 0.132760 0.240743 0.016436 0.053178 0.046803
f:id:msyksphinz:20180705233234p:plain

モデルデバッグ時のテクニック

このkeras2cppの解析をするにあたり、kerasの動作を解析する必要がある。 いろんなテクニックを調べて実装した。

ある入力データに対して、各レイヤの出力結果をダンプする

Kerasの重み情報付き学習モデルを使って、ある入力値での各レイヤの出力値をダンプしたいときは、Kerasの各レイヤのモデル関数の実行結果をダンプしていく。

下記の例は、学習したKerasのモデルに対して、x_test[0] の画像を入力し、その時の各レイヤの出力情報をダンプする。 ダンプした各レイヤの計算結果は、layerNN_output.txtとして保存される。これを見ながら、keras2cppの計算結果と突き合わせて行った。

  • write_layer_output.py
from keras.models import load_model
from keras.utils import np_utils
from keras.datasets import cifar10
import numpy as np
from keras import backend as K
import StringIO

def dump_mdarray(fp, mdarray):
    if len(mdarray.shape) == 1:
        for elem in mdarray:
            fp.write("%f " % elem)
        fp.write("\n")
    else:
        for sub_array in mdarray:
            dump_mdarray(fp, sub_array)

(x_train, y_train), (x_test, y_test) = cifar10.load_data()
y_test = np_utils.to_categorical(y_test, 10)

x_train = x_train.astype('float32')
x_test  = x_test.astype('float32')
x_train /= 255
x_test  /= 255

model = load_model('saved_models/keras_cifar10_trained_model.h5')

layer_output = [np.expand_dims(x_test[0], axis=0),]

layer_idx = 0
for layer in model.layers:
    get_layer_output = K.function([layer.input],
                                  [layer.output])
    layer_output = get_layer_output(layer_output)

    fp = open("layer" + str(layer_idx) + "_output.txt", "w")
    dump_mdarray(fp, layer_output[0])
    layer_idx = layer_idx + 1
    fp.close()

TensorFlow+Kerasに入門(5. keras2cppによる推論の試行→失敗の解析)

f:id:msyksphinz:20180701195704p:plain

FPGAの部屋のmarseeさんの記事を見て、TensorFlow+Kerasに入門してみた。 というかmarseeさんの記事で掲載されているソースコードをほとんどCopy & Pasteして実行してみているだけだが...

TensorFlow+KerasでCifar10を学習するサンプルプログラムを実行して、そこから得られたモデルを使ってKeras2cppでモデルの変換を行ってみた。

最終的な目標は、Keras2cppを使ってC++のコードを出力し、それをネイティブC++環境で実行することだ。

前回のCIFAR10のConv2DとConvolution2Dについて、違いがあると思っていたのだがそんなことは無いらしい。 Kerasの実装を見てもそうなっていた。

github.com

Convolution1D = Conv1D
Convolution2D = Conv2D
Convolution3D = Conv3D

ということは、keras2cppが正しくモデルをロードできていないことになる。 まず、本当にKerasが正しいモデルを出力できているか確認するために、再度cifar10_cnn.pyを確認し、モデルをロードし直して正しく動作するかを確認してみた。

  • cifar10_cnn.py (一部抜粋)
...
# The data, split between train and test sets:
(x_train, y_train), (x_test, y_test) = cifar10.load_data()
print('x_train shape:', x_train.shape)
print(x_train.shape[0], 'train samples')
print(x_test.shape[0], 'test samples')
...
x_train = x_train.astype('float32')
x_test = x_test.astype('float32')
x_train /= 255
x_test /= 255

なるほど、トレーニングデータとテストデータに関しては、正規化をして最小値0.0、最大値1.0になるように調整が行われている。 Evalutationすることもできるので確認してみる。

  • load_cifar10_and_run.py
from keras.models import load_model
from keras.utils import np_utils
from keras.datasets import cifar10
import numpy as np

model = load_model('saved_models/keras_cifar10_trained_model.h5')

(x_train, y_train), (x_test, y_test) = cifar10.load_data()
y_test = np_utils.to_categorical(y_test, 10)

x_train = x_train.astype('float32')
x_test  = x_test.astype('float32')
x_train /= 255
x_test  /= 255

scores = model.evaluate(x_test, y_test)
print('Test loss:', scores[0])
print('Test accuracy:', scores[1])

model.summary()
print (model.layers[0].get_weights()[0].shape)
print (model.layers[0].get_weights()[1].shape)

実行結果は以下のようになる。なるほど、正しく動作しているように見える。

_________________________________________________________________
1/1 [==============================] - 0s 68ms/step
[[0.0045613  0.00613373 0.01441358 0.70682645 0.00228056 0.18099114
  0.0682691  0.00159967 0.01358497 0.00133945]]
[0. 0. 0. 1. 0. 0. 0. 0. 0. 0.]
1/1 [==============================] - 0s 4ms/step
[[2.8684381e-05 2.5516627e-03 3.8286013e-10 6.8825792e-11 4.9396240e-13
  2.2506797e-14 2.8216110e-11 6.6930409e-14 9.9741900e-01 5.9493942e-07]]
[0. 0. 0. 0. 0. 0. 0. 0. 1. 0.]
1/1 [==============================] - 0s 3ms/step
[[3.6343671e-03 1.3918772e-03 2.3248680e-07 2.6948282e-08 5.4430562e-09
  3.0102656e-10 2.0767525e-09 2.4880802e-09 9.9492198e-01 5.1519131e-05]]
[0. 0. 0. 0. 0. 0. 0. 0. 1. 0.]
1/1 [==============================] - 0s 2ms/step
[[1.4720474e-01 3.0774474e-02 1.9176827e-03 2.3141543e-04 6.2325860e-05
  4.9663004e-06 2.8075752e-05 3.2286775e-05 8.1751990e-01 2.2241862e-03]]
[1. 0. 0. 0. 0. 0. 0. 0. 0. 0.]
1/1 [==============================] - 0s 9ms/step
[[5.8011246e-13 2.9352740e-12 1.1264588e-05 4.1041901e-07 1.9398519e-06
  3.1077538e-10 9.9998653e-01 2.1929313e-13 7.8279492e-12 2.1002187e-13]]
[0. 0. 0. 0. 0. 0. 1. 0. 0. 0.]
1/1 [==============================] - 0s 6ms/step
[[4.3796723e-07 4.0958039e-07 1.4267879e-04 1.9871062e-03 4.9955817e-04
  2.7933982e-04 9.9708611e-01 3.4963859e-06 3.0437428e-07 5.1951002e-07]]
[0. 0. 0. 0. 0. 0. 1. 0. 0. 0.]
1/1 [==============================] - 0s 6ms/step
[[9.5340777e-03 6.8315786e-01 1.0422353e-03 6.7459568e-03 2.3364674e-04
  7.3021576e-03 1.4611247e-02 6.7516724e-03 5.7323242e-04 2.7004796e-01]]
[0. 1. 0. 0. 0. 0. 0. 0. 0. 0.]
1/1 [==============================] - 0s 5ms/step
[[2.0090256e-04 7.4372560e-06 1.6379679e-02 3.8548892e-03 8.8955453e-03
  5.3594634e-04 9.7006273e-01 2.2731041e-05 3.1498908e-05 8.5860156e-06]]
[0. 0. 0. 0. 0. 0. 1. 0. 0. 0.]
1/1 [==============================] - 0s 2ms/step
[[2.5151833e-03 1.5344517e-04 7.6048978e-02 4.9335814e-01 8.1626080e-02
  6.4011998e-02 2.7596030e-01 4.6143876e-03 1.3146200e-03 3.9684062e-04]]
[0. 0. 0. 1. 0. 0. 0. 0. 0. 0.]
1/1 [==============================] - 0s 3ms/step
[[8.5118888e-03 9.6004045e-01 5.3663384e-03 5.3788273e-04 4.1483255e-04
  1.8853426e-04 3.8111003e-03 2.3319628e-04 5.7239388e-03 1.5171825e-02]]
[0. 1. 0. 0. 0. 0. 0. 0. 0. 0.]

このモデルデータを変換してkeras2cppで読み込んでも、どうしても計算が合わずに失敗してしまう。 重みデータの形が違うのかと思い、いろいろ修正してみたが駄目であった。

という試行錯誤を繰り返しているうちに、どうもConv2Dの生成する重みの行列の順番が違うのではないかという結論に達した。

どうもKerasが吐き出す重みは、以下のような順番になっている。

  • (バッチ数, 横幅, 縦幅, チャネル数) ところが、keras2cppは以下のような重みのフォーマットを想定して計算式が書いてあるように見える。
  • (バッチ数, チャネル数, 横幅, 縦幅)

いろいろと調べると、Kerasの設定によっては、下側重みの並びになるようにKerasを調整することができるらしい。keras2cppが公開されたときは、このオプションが存在しなかったのかな。

Convolutionalレイヤー - Keras Documentation

f:id:msyksphinz:20180704020604p:plain

というわけで、${HOME}/.keras/keras.jsonを書き換えて再度学習のやり直しだ...一日損した...

  • ${HOME}/.keras/keras.json
{
    "epsilon": 1e-07,
    "floatx": "float32",
    "image_data_format": "channels_first",
    "backend": "tensorflow"
}

ちなみに、なぜkeras2cppが(バッチ数, チャネル数, 横幅, 縦幅)しか受け入れないと思ったかというと、内部の計算ループがそのような形にしかなっていなかったから。 forループの順番が、カーネルサイズ、チャネルサイズ、横幅、縦幅っておかしいなあ?と思った次第だった。

  • keras_model.cc
keras::DataChunk* keras::LayerConv2D::compute_output(keras::DataChunk* dc) {
...
  for(unsigned int j = 0; j < m_kernels.size(); ++j) { // loop over kernels
    for(unsigned int m = 0; m < im.size(); ++m) { // loope over image depth

      vector<vector<float> > tmp_w = (m_border_mode == "valid")?
                        keras::conv_single_depth_valid(im[m], m_kernels[j][m]) :
                        keras::conv_single_depth_same(im[m], m_kernels[j][m]);

      for(unsigned int x = 0; x < tmp_w.size(); ++x) {
        for(unsigned int y = 0; y < tmp_w[0].size(); ++y) {
          y_ret[j][x][y] += tmp_w[x][y];
        }
      }
    }
f:id:msyksphinz:20180704021141p:plain

Chisel-Templateを使ってオリジナルデザインを作ってみるチュートリアル (2. シミュレーションモデルの作成)

f:id:msyksphinz:20180702001454p:plain

ハードウェア記述言語であるChiselのチュートリアルを試してみている。 ChiselはScalaをベースにしているDSL(ドメイン特化言語)だ。 したがって、Scalaを勉強しながら進めていく必要がある。

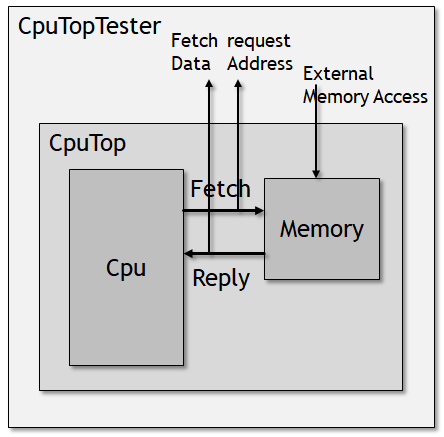
Chiselの理解のために、簡単なCPUを作ってChiselを使いシミュレーションをしてみることにした。 だいたい考えているのはおおよそこんな形だ。CPUとメモリをつなぐインタフェースを持っており、CPUが命令をフェッチして実行する。

f:id:msyksphinz:20180703020306p:plain

まずはCPUから命令をフェッチする部分を考えてみることにしたが、命令をフェッチするためにはメモリにあらかじめ値を書き込んでおかなければならない。 Verilogを使う場合はreadmemhなどを使えば一発なのだが、そうもいかないのでいろいろと調査して、結局テストベンチの外からデータを流し込むことにした。

とりあえずメモリに外部との接続ポートを設けて(本当はCPUのバスと共有すべきなんだけど)、そこからデータを流し込むことにした。 以下のようなChiselのテストパタンを記述した。

  • src/test/scala/cpu/CpuTests.scala
  var mem_init = Array (
    0x041b0010,
    0x141301f4,
    0x2573f140,
    0x05970000,
    0x85930745,
...
    0x00000000,
    0x00000000
  )
...
  for (addr <- 0 to mem_init.length-1) {
    poke (cpu_tb.io.i_memReq, 1)
    poke (cpu_tb.io.i_memAddr, addr)
    poke (cpu_tb.io.i_memData, mem_init(addr) & 0x0000FFFFFFFFL)

    step(1)
  }

最後のpokeを使って、外部からメモリへとデータを書き込んでいる。 ちなみに、mem_init(addr) & 0x0000FFFFFFFFLという「そんなのいらんやろ」みたいな記述は、Scalaは符号なし型が存在しない?という制約から、無理やり符号拡張を防ぐための処理だ。 これがないとChiselでコンパイルエラーになる。

メモリに値を書き込んだら、外部ピンをAssertしてCPUのフェッチを開始する。

  • src/test/scala/cpu/CpuTests.scala
  step(1)
  step(1)
  poke (cpu_tb.io.i_run, 1)
  step(1)

するとフェッチが始まるので、とりあえずその値をキャプチャする。とりあえずまっすぐフェッチしていくだけなので、フェッチアドレスはサイクル毎に+4で上がっていくはずだ。

  for (step_idx <- 0 to 10 by 1) {
    val hexwidth = 8

    expect(cpu_tb.io.o_DebugInstReq,  1)
    expect(cpu_tb.io.o_DebugInstAddr, step_idx * 4)

    printf(s"<Info: Step %02d Instruction %0${hexwidth}x is fetched>\n", step_idx, peek(cpu_tb.io.o_DebugInstData))

    step(1)
  }

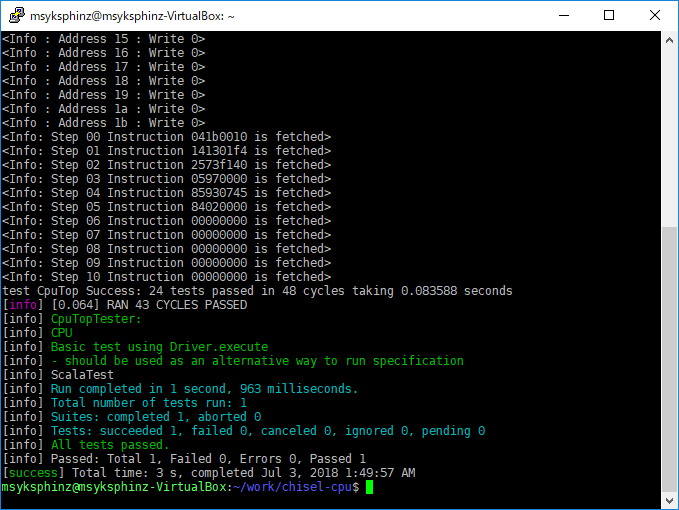
(まあここまで来るのに何回もエラーだらけでやり直したんだけど、)実行した結果、以下のようになった。

$ sbt 'testOnly cpu.CpuTopTester -- -z Basic'
...
[info] [0.001] SEED 1530550195363
<Info : Address 0 : Write 41b0010>
<Info : Address 1 : Write 141301f4>
<Info : Address 2 : Write 2573f140>
<Info : Address 3 : Write 5970000>
<Info : Address 4 : Write 85930745>
<Info : Address 5 : Write 84020000>
<Info : Address 6 : Write 0>
<Info : Address 7 : Write 0>
<Info : Address 8 : Write 0>
<Info : Address 9 : Write 0>
<Info : Address a : Write 0>
<Info : Address b : Write 0>
<Info : Address c : Write 0>
<Info : Address d : Write 0>
<Info : Address e : Write 0>
<Info : Address f : Write 0>
<Info : Address 10 : Write 2573f140>
<Info : Address 11 : Write 5970000>
<Info : Address 12 : Write 859303c5>
<Info : Address 13 : Write 731050>
<Info : Address 14 : Write bff50000>
<Info : Address 15 : Write 0>
<Info : Address 16 : Write 0>
<Info : Address 17 : Write 0>
<Info : Address 18 : Write 0>
<Info : Address 19 : Write 0>
<Info : Address 1a : Write 0>
<Info : Address 1b : Write 0>
<Info: Step 00 Instruction 041b0010 is fetched>
<Info: Step 01 Instruction 141301f4 is fetched>
<Info: Step 02 Instruction 2573f140 is fetched>
<Info: Step 03 Instruction 05970000 is fetched>
<Info: Step 04 Instruction 85930745 is fetched>
<Info: Step 05 Instruction 84020000 is fetched>
<Info: Step 06 Instruction 00000000 is fetched>
<Info: Step 07 Instruction 00000000 is fetched>
<Info: Step 08 Instruction 00000000 is fetched>
<Info: Step 09 Instruction 00000000 is fetched>
<Info: Step 10 Instruction 00000000 is fetched>
test CpuTop Success: 24 tests passed in 48 cycles taking 0.083588 seconds
[info] [0.064] RAN 43 CYCLES PASSED
[info] CpuTopTester:
[info] CPU
[info] Basic test using Driver.execute
[info] - should be used as an alternative way to run specification
[info] ScalaTest
[info] Run completed in 1 second, 963 milliseconds.
[info] Total number of tests run: 1
[info] Suites: completed 1, aborted 0
[info] Tests: succeeded 1, failed 0, canceled 0, ignored 0, pending 0
[info] All tests passed.
[info] Passed: Total 1, Failed 0, Errors 0, Passed 1
[success] Total time: 3 s, completed Jul 3, 2018 1:49:57 AM

アドレスが順調に伸びていって、期待通りのフェッチができていることが分かる。とりあえず成功だ。

f:id:msyksphinz:20180703015121p:plain

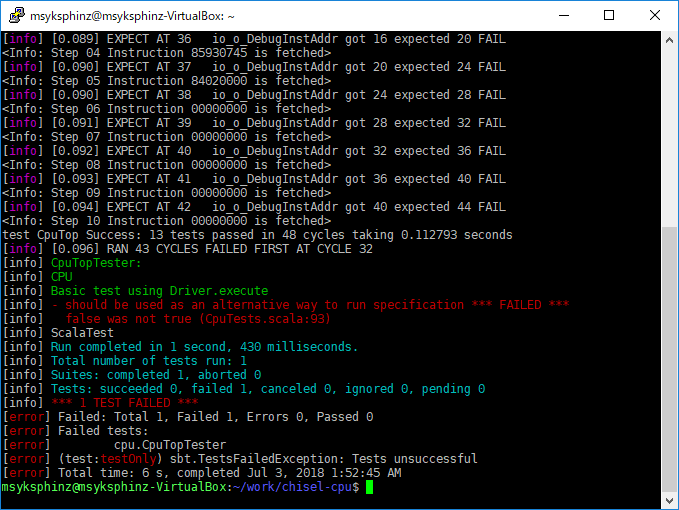
ちなみに失敗すると以下のようになる。デバッグきつい。

f:id:msyksphinz:20180703015320p:plain

こうしてデバッグしていて気がついたのは、外部のテストベンチからテストするとき、デバッグピンは必ず外に出さないといけないらしい?

つまり、今回は内部のCPUのフェッチピントフェッチアドレスを見たわけだけど、これをテストするためにはわざわざDUTの外に波形を持ってこなければならないのかもしれない。 これは面倒くさい。。。

  • src/main/scala/cpu/cpu.scala
class CpuTop extends Module {
  val io = IO (new Bundle {
    val i_run     = Input(Bool())
...  // アサーションを打ちたいときは、必ず外にピンを出してこなければならない?
    val o_DebugInstReq  = Output(Bool())
    val o_DebugInstAddr = Output(UInt(8.W))
    val o_DebugInstData = Output(UInt(32.W))
  })
...

- `src/test/scala/cpu/CpuTests.scala`

// 参照するときも必ずテストベンチの外部ポートに出してく必要がある? expect(cpu_tb.io.o_DebugInstReq, 1) expect(cpu_tb.io.o_DebugInstAddr, 0)

Chisel-Templateを使ってオリジナルデザインを作ってみるチュートリアル (1. デザインの作成)

f:id:msyksphinz:20180702001454p:plain

RISC-Vの実装であるRocket-ChipはChiselと呼ばれるDSLで記述されているのだが、この書き方やテクニックについてはあまり知られていない(まあ知る必要もないが...)

ただし、AWSで動作するFireSimを改良したりだとか、Rocket-Coreを改造する場合にはこの知識は必須になるので、Chiselのチュートリアルを試して、理解してみることにした。

参考にしたのは以下の2つのリポジトリだが、このリポジトリを見ながら考えること以外に、参考になる文献が全くないのでかなりきつい。

github.com

github.com

とりあえず簡単なCPUを作ってみたいと思い、メモリから命令をフェッチするだけの簡単なステートマシンを作ってみたのだが、、、

  • src/main/scala/cpu/cpu.scala
class Cpu extends Module {
  val io = IO (new Bundle {
    val o_instAddr = Output(UInt(8.W))
    val o_instReq  = Output(Bool())

    val i_instAck  = Input(Bool())
    val i_instData = Input(UInt(32.W))
  })

  val r_inst_addr = RegInit(0.U(8.W))
  val r_inst_en   = RegInit(true.B)

  when(io.i_instAck) {
    r_inst_addr := r_inst_addr + 4.U(8.W)
  }

  io.o_instAddr := r_inst_addr
  io.o_instReq  := r_inst_en
}
  • src/main/scala/cpu/memory.scala
class Memory extends Module {
  val io = IO(new Bundle {
    val i_wen    = Input(Bool())
    val i_wrAddr = Input(UInt(8.W))
    val i_wrData = Input(UInt(32.W))

    val i_ren    = Input(Bool())
    val i_rdAddr = Input(UInt(8.W))
    val o_rdData = Output(UInt(32.W))
    val o_rdEn   = Output(Bool())
  })

  val memory = Mem(256, UInt(32.W))
  val r_en   = Reg(Bool())

  when (io.i_wen) {
    memory(io.i_wrAddr) := io.i_wrData
  }

  r_en := io.i_ren

  io.o_rdData := memory(io.i_rdAddr)
  io.o_rdEn  := r_en
}

Topモジュールは以下のようにして定義した。CPUとメモリを接続しただけだ。

  • src/main/scala/cpu/cpu.scala
class CpuTop extends Module {
  val io = IO (new Bundle)

  val memory = Module(new Memory)
  val cpu    = Module(new Cpu)

  // Connect CPU and Memory
  memory.io.i_ren    := cpu.io.o_instReq
  memory.io.i_rdAddr := cpu.io.o_instAddr

  cpu.io.i_instAck   := memory.io.o_rdEn
  cpu.io.i_instData  := memory.io.o_rdData
}

これでコンパイルして実行してみたのだが、"No implicit clock and reset."となりうまく行かない。

[info] CpuTopTester:
[info] Basic test using Driver.execute
[info] - should be used as an alternative way to run specification *** FAILED ***
[info]   chisel3.internal.ChiselException: Error: No implicit clock and reset.
[info]   at chisel3.internal.throwException$.apply(Error.scala:13)
[info]   at chisel3.internal.Builder$.forcedClockAndReset(Builder.scala:209)
[info]   at chisel3.internal.Builder$.forcedReset(Builder.scala:212)
[info]   at chisel3.core.Module$.reset(Module.scala:75)
[info]   at chisel3.core.printf$$anonfun$apply$2.apply(Printf.scala:89)
[info]   at chisel3.core.printf$$anonfun$apply$2.apply(Printf.scala:89)
[info]   at chisel3.core.WhenContext$$anonfun$1.apply(When.scala:72)
[info]   at chisel3.core.WhenContext$$anonfun$1.apply(When.scala:72)
[info]   at scala.Option.foreach(Option.scala:257)
[info]   at chisel3.core.WhenContext.<init>(When.scala:72)

なんとか修正していく。