FPGA開発日記

カテゴリ別記事インデックス https://msyksphinz.github.io/github_pages , English Version https://fpgadevdiary.hatenadiary.com/

AWSで動作するRISC-VデザインFireSimのカスタマイズ : Firechipにオリジナルデバイスを追加する

f:id:msyksphinz:20180617195844p:plain

FireSimについてある程度動かしたので、今度はカスタマイズをしてみたい。

というわけで、FireSimの実際のデザイン部分であるFireChipを使ってみることにした。

オリジナルのデザインを追加してみることにした。

メモリマップのレジスタを作る

参考にしたのは以下のチュートリアル

Memory-mapped Registers — FireSim documentation

ここで作るのは、外部からの情報を取ってきてメモリに書き込むデバイスだ(まどろっこしい書き方をしたが、つまりDMAだ)。 メモリマップされたレジスタを持っており、CPUはこのレジスタを使ってデバイスをコントロールすることができる。

まずはTLRegisterNodeオブジェクトを作って、RTLのレジスタを作成する。

  • src/main/scala/example/InputStream.scala
class InputStream(
    address: BigInt,
    val beatBytes: Int = 8)
    (implicit p: Parameters) extends LazyModule {

  val device = new SimpleDevice("input-stream", Seq("example,input-stream"))
  val regnode = TLRegisterNode(
    address = Seq(AddressSet(address, 0x3f)),
    device = device,
    beatBytes = beatBytes)

  lazy val module = new InputStreamModuleImp(this)
}

ここでTLRegisterNodeに対してパラメータを設定しているのだが、 - address : レジスタのアドレスとアドレスマスク。ここでは0x3fをマスクとして設定することで、64バイトのレジスタを宣言している。 - device : SimpleDevice型として作られたdeviceというオブジェクトを接続しているのだが、これはLinuxカーネルドライバで使用するためのもの。ここでは無視。 - beatBytes : TileLinkで規定されているデータ幅。この長さのレジスタが作られる。

ここではDMAを作るので、以下のレジスタがあれば良さそうだ。

  • addr : アドレス
  • len : 転送長
  • running : デバイスが実行中かどうか
  • complete : 転送が完了したか

実際のモジュールとしては、以下のようなInputStreamModuleImp を作成した。

  • src/main/scala/example/InputStream.scala
class InputStreamModuleImp(outer: InputStream) extends LazyModuleImp(outer) {
    val addrBits = 64
    val w = 64
    val io = IO(new Bundle {
        // Not used yet
        val in = Flipped(Decoupled(UInt(w.W)))
    }
    val addr = Reg(UInt(addrBits.W))
    val len = Reg(UInt(addrBits.W))
    val running = RegInit(false.B)
    val complete = RegInit(false.B)

    outer.regnode.regmap(
        0x00 -> Seq(RegField(addrBits, addr)),
        0x08 -> Seq(RegField(addrBits, len)),
        0x10 -> Seq(RegField(1, running)),
        0x18 -> Seq(RegField(1, complete)))
}

TileLinkのポートを作る

参考にしたのは以下。

DMA and Interrupts — FireSim documentation

つくるのはDMAなので、まずはTileLinkのポートを作らないと始まらない。これは先ほどのInputStreamに追加する。 TLClientNodeをモジュールとして追加した。

  • src/main/scala/example/InputStream.scala
class InputStream(
    address: BigInt,
    val beatBytes: Int = 8,
    val maxInflight: Int = 4)
    (implicit p: Parameters) extends LazyModule {

  val device = new SimpleDevice("input-stream", Seq("example,input-stream"))
  val regnode = TLRegisterNode(
    address = Seq(AddressSet(address, 0x3f)),
    device = device,
    beatBytes = beatBytes)
  val dmanode = TLClientNode(Seq(TLClientPortParameters(
    Seq(TLClientParameters(
      name = "input-stream",
      sourceId = IdRange(0, maxInflight))))))

  lazy val module = new InputStreamModuleImp(this)
}

TLClientNodeのパラメータとしてはとりあえず何となくわかりそうなものだが、ソースIDはTileLinkの識別IDを設定している。 これはどんな自由なモジュールでもこの調子で名前を付けていいのかしら?

次にDMAのステートマシンを作る。これも上記のチュートリアルの写経だが...

  • src/main/scala/example/InputStream.scala
class InputStreamModuleImp(outer: InputStream) extends LazyModuleImp(outer) {
  val (tl, edge) = outer.dmanode.out(0)
  val addrBits = edge.bundle.addressBits
  val w = edge.bundle.dataBits
  val beatBytes = (w / 8)

  val io = IO(new Bundle {
    val in = Flipped(Decoupled(UInt(w.W)))
  })

  val addr = Reg(UInt(addrBits.W))
  val len = Reg(UInt(addrBits.W))
  val running = RegInit(false.B)
...

やっていることとしては、IOポートから入ってくるデータを、tlポート(TileLinkポート)に出力している。

以下のコードが肝になるらしい?TileLinkのAポートでValidを出している。

  • src/main/scala/example/InputStream.scala
...
  io.in.ready := canIssue && tl.a.ready
  tl.a.valid  := canIssue && io.in.valid
  tl.a.bits   := edge.Put(
    fromSource = OHToUInt(xactOnehot),
    toAddress = addr,
    lgSize = log2Ceil(beatBytes).U,
    data = io.in.bits)._2
  tl.d.ready := running && xactBusy.orR
...

SoCへの組み込み

次に、SoC環境へのDMAコントローラの追加を行う。

参考にしたのは以下のチュートリアル

Connecting Devices to Bus — FireSim documentation

以下のようなtraitを作る。BaseSubsystemに対してデバイスを追加する。アドレスは 0x10017000 だ。

BaseSubsystemはシステムバスsbusペリフェラルバスのpbus、さらに割り込み用のバスとしてibusを持っている。 pbusレジスタノードに接続し、sbusをDMAノード、割り込みノードをibusに追加する。

  • src/main/scala/example/InputStream.scala
trait HasPeripheryInputStream { this: BaseSubsystem =>
  private val portName = "input-stream"
  val streamWidth = pbus.beatBytes * 8
  val inputstream = LazyModule(new InputStream(0x10017000, pbus.beatBytes))
  pbus.toVariableWidthSlave(Some(portName)) { inputstream.regnode }
  sbus.fromPort(Some(portName))() := inputstream.dmanode
  ibus.fromSync := inputstream.intnode
}
trait HasPeripheryInputStreamModuleImp extends LazyModuleImp {
  val outer: HasPeripheryInputStream

  val stream_in = IO(Flipped(Decoupled(UInt(outer.streamWidth.W))))
  outer.inputstream.module.io.in <> stream_in

  def connectFixedInput(data: Seq[BigInt]) {
    val fixed = Module(new FixedInputStream(data, outer.streamWidth))
    stream_in <> fixed.io.out
  }
}

そしてTopへの接続だ。さらにシミュレーション環境を接続して完了となる。

  • src/main/scala/example/Top.scala
class ExampleTopWithInputStream(implicit p: Parameters) extends ExampleTop
    with HasPeripheryInputStream {
  override lazy val module = new ExampleTopWithInputStreamModule(this)
}

class ExampleTopWithInputStreamModule(outer: ExampleTopWithInputStream)
  extends ExampleTopModuleImp(outer)
  with HasPeripheryInputStreamModuleImp
  • src/main/scala/example/Configs.scala
class WithFixedInputStream extends Config((site, here, up) => {
  case BuildTop => (clock: Clock, reset: Bool, p: Parameters) => {
    val top = Module(LazyModule(new ExampleTopWithInputStream()(p)).module)
    top.connectFixedInput(Seq(
      BigInt("1002abcd", 16),
      BigInt("34510204", 16),
      BigInt("10329999", 16),
      BigInt("92101222", 16)))
    top
  }
})

class FixedInputStreamConfig extends Config(
  new WithFixedInputStream ++ new BaseExampleConfig)

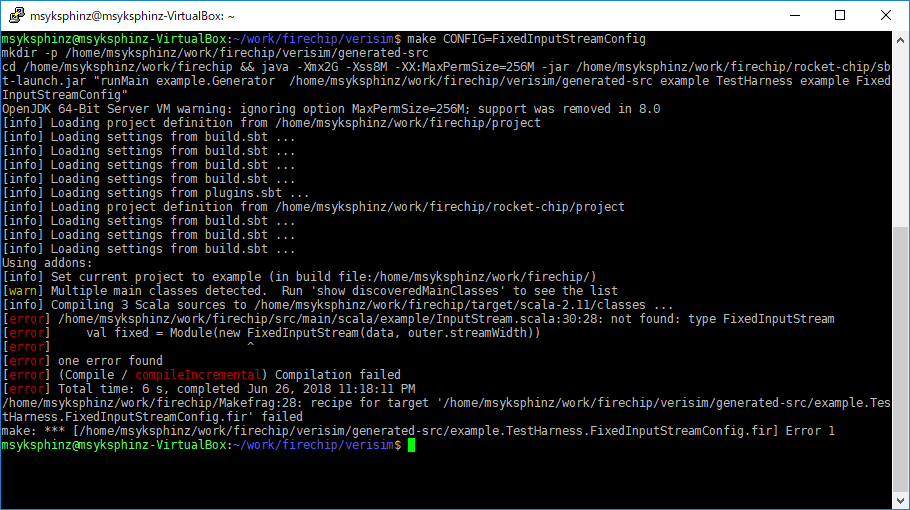
最後にVerilogを出力してみたのだが、FixedInputStreamがないと怒られる。たしかに、資料を探してもFixedInputStreamが見当たらない。自分で作らないといけないのかなあ?

$  make CONFIG=FixedInputStreamConfig
mkdir -p /home/msyksphinz/work/firechip/verisim/generated-src
cd /home/msyksphinz/work/firechip && java -Xmx2G -Xss8M -XX:MaxPermSize=256M -jar /home/msyksphinz/work/firechip/rocket-chip/sbt-launch.jar "runMain example.Generator  /home/msyksphinz/work/firechip/verisim/generated-src example TestHarness example FixedInputStreamConfig"
OpenJDK 64-Bit Server VM warning: ignoring option MaxPermSize=256M; support was removed in 8.0
[info] Loading project definition from /home/msyksphinz/work/firechip/project
[info] Loading settings from build.sbt ...
[info] Loading settings from build.sbt ...
[info] Loading settings from build.sbt ...
[info] Loading settings from build.sbt ...
[info] Loading settings from plugins.sbt ...
[info] Loading project definition from /home/msyksphinz/work/firechip/rocket-chip/project
[info] Loading settings from build.sbt ...
[info] Loading settings from build.sbt ...
[info] Loading settings from build.sbt ...
Using addons:
[info] Set current project to example (in build file:/home/msyksphinz/work/firechip/)
[warn] Multiple main classes detected.  Run 'show discoveredMainClasses' to see the list
[info] Compiling 3 Scala sources to /home/msyksphinz/work/firechip/target/scala-2.11/classes ...
[error] /home/msyksphinz/work/firechip/src/main/scala/example/InputStream.scala:30:28: not found: type FixedInputStream
[error]     val fixed = Module(new FixedInputStream(data, outer.streamWidth))
[error]                            ^
[error] one error found
[error] (Compile / compileIncremental) Compilation failed
[error] Total time: 6 s, completed Jun 26, 2018 11:18:11 PM
/home/msyksphinz/work/firechip/Makefrag:28: recipe for target '/home/msyksphinz/work/firechip/verisim/generated-src/example.TestHarness.FixedInputStreamConfig.fir' failed
make: *** [/home/msyksphinz/work/firechip/verisim/generated-src/example.TestHarness.FixedInputStreamConfig.fir] Error 1
f:id:msyksphinz:20180627003813p:plain

2018/06/28追加。MLで聞いてみるとFixedInputStreamの実装を教えてくれた。以下を追加した。

  • src/main/scala/example/InputStream.scala
class FixedInputStream(data: Seq[BigInt], w: Int) extends Module {
    val io = IO(new Bundle {
        val out = Decoupled(UInt(w.W))
    })

    val s_start :: s_send :: s_done :: Nil = Enum(3)
    val state = RegInit(s_start)

    val dataVec = VecInit(data.map(_.U(w.W)))
    val (sendIdx, sendDone) = Counter(io.out.fire(), data.size)

    io.out.valid := (state === s_send)
    io.out.bits := dataVec(sendIdx)

    when (state === s_start) { state := s_send }
    when (sendDone) { state := s_done }
}

コンパイルが完了すると、チュートリアルの通りにテストプログラムを作成し、コンパイルする。 実行すると、以下のようになった。正しく動いている。

$ ./simulator-example-FixedInputStreamConfig ../tests/input-stream.riscv
000000001002abcd
0000000034510204
0000000010329999
0000000092101222

何だこの出力は?と思うかもしれないが、これは最初にChiselでFixした入力信号なのでそれが出力されているだけだ。

  • src/main/scala/example/Config.scala
class WithFixedInputStream extends Config((site, here, up) => {
  case BuildTop => (clock: Clock, reset: Bool, p: Parameters) => {
    val top = Module(LazyModule(new ExampleTopWithInputStream()(p)).module)
    top.connectFixedInput(Seq(
      BigInt("1002abcd", 16),
      BigInt("34510204", 16),
      BigInt("10329999", 16),
      BigInt("92101222", 16)))
    top
  }
})

これだけでは単純にテストベクタが固まっているので、もっとカスタマイズして実行したい。

AWSで動作するRISC-VデザインFireSimのカスタマイズ : Firechipを試す

f:id:msyksphinz:20180617195844p:plain

FireSimについてある程度動かしたので、今度はカスタマイズをしてみたい。

というわけで、Firesimの実際のデザイン部分であるFireChipを使ってみることにした。

Tutorial: Developing New Devices — FireSim documentation

まずはデザインをForkしてダウンロードしてみる。とりあえずriscv-toolsはインストールしなくても良いらしい。

$ git clone https://github.com/msyksphinz/firechip.git
$ cd firechip/
$ git submodule update --init
$ cd rocket-chip/
$ git submodule update --init
$ cd ..

私はVCSは持っていないので、Veritalorでシミュレーションを行う。

$ cd verisim/
$ make

これで、DefaultExampleConfig という構成でFireSimの構成が作られる。

これで次に進もうとしたのだが、run-regression-testsが動作しなくて途中で止めてしまった。これ、定義されてるのかなあ?

$ make run-regression-tests

その代わり、普通にビルドしたベンチマークプログラムは動作するらしい。試しに何本か流してみた。

msyksphinz@msyksphinz-VirtualBox:~/work/firechip/verisim$ ./simulator-example-DefaultExampleConfig /home/msyksphinz/riscv64/riscv64-unknown-elf/share/riscv-tests/benchmarks/dhrystone.riscv
Microseconds for one run through Dhrystone: 540
Dhrystones per Second:                      1850
mcycle = 270271
minstret = 196530

msyksphinz@msyksphinz-VirtualBox:~/work/firechip/verisim$ ./simulator-example-DefaultExampleConfig /home/msyksphinz/riscv64/riscv64-unknown-elf/share/riscv-tests/benchmarks/rsort.riscv
mcycle = 238440
minstret = 171171

高速C++コンパイラZapccの試行(1. 現プロジェクトのインポート)

https://www.zapcc.com/wp-content/uploads/2018/06/xcopy-zapcc-logo.png.pagespeed.ic.HTEiBd-jW-.webp

興味本位ではあるが、高速C++コンパイラとしてオープンソース化されたZapccが非常に気になっている。

LLVMがベースとなっていることだし、いつも新しいコンパイラプラットフォームが公開されたときはRISC-Vの対応について見てしまうので、アーキテクチャの移行という点でもどのようなものなのか気になっている。現状のC++プロジェクトをZapccに移行して試行してみることにした。

Zapcc – A (Much) Faster C++ Compiler

そもそもZapccは何故高速なのか

以下の記事を見るといろいろと書いてある。

Caching Clang-Based C++ Compiler Zapcc Open-Sourced

Zapccの高速化におけるカギとなるアイデアは、コンパイルサーバ(zapccs)を用意するということだ。 このコンパイルサーバはメモリチュウに常駐し、クライアントからコンパイルコマンドを受け付ける。 zapccsはC+ヘッダファイルを一度だけ解析し、すべてのテンプレートインスタンスと、生成されたコードをメモリ中に保持する。 この点について、zapccは、ステロイド剤としてプリコンパイルされたヘッダの類を使用しているとみることができるが、プリコンパイルされたヘッダよりも多くの情報をメモリ中にキャッシュすることができる。

ははあ、コンパイルアルゴリズムがどうのこうのというより、コンパイルフロー中で生成されるファイル群をより多くメモリ中に保持することで高速化を図っているのか。

既存のプロジェクトをZapccに移行する

ここでは、開発中の自作RISC-Vシミュレータを、

  1. GCC
  2. LLVM/Clang
  3. Zapcc

の順番で移行してみることにした。移行方法としては、CMakeを使っているのでターゲットコンパイラを変えるだけである。

$ cmake . -DCMAKE_CXX_COMPILER=[ターゲットC++コンパイラ] && make -j4

Clangへの移行

GCC→Clangの移行は簡単に終わった。

$ cmake . -DCMAKE_CXX_COMPILER=clang++ && make -j4

一方で、Clang→Zapccでは最後のリンク時に怒られてしまった。これはなんでだろう?

$ cmake . -DCMAKE_CXX_COMPILER=zapcc++ && make -j4
...
/usr/bin/cmake -E cmake_link_script CMakeFiles/riscvforest.dir/link.txt --verbose=1
/home/msyksphinz/work/zapcc/build/bin/zapcc++   -O0 -g -Wall -fstack-protector -g  -rdynamic CMakeFiles/riscvforest.dir/home/msyksphinz/work/forest/riscv_forest_zapcc/src/swimmer_main.cpp.o CMakeFiles/riscvforest.dir/home/msyksphinz/work/forest/riscv_forest_zapcc/src/ris
cv_bfd_env.cpp.o  -o riscvforest  -L/home/msyksphinz/work/forest/riscv_forest_zapcc/build_riscvforest/../vendor/gflags/lib  -L/home/msyksphinz/work/forest/riscv_forest_zapcc/build_riscvforest/../vendor/softfloat/build -Wl,-rpath,/home/msyksphinz/work/forest/riscv_forest_
zapcc/build_riscvforest/../vendor/gflags/lib:/home/msyksphinz/work/forest/riscv_forest_zapcc/build_riscvforest/../vendor/softfloat/build libriscv_cedar.a -lgflags -lpthread -lbfd -lsoftfloat -lgmp -lgmpxx
libriscv_cedar.a(inst_ops_riscv.cpp.o): In function `InstOps::FloatMadd(int, int, int, unsigned int*)':
/home/msyksphinz/work/forest/riscv_forest_zapcc/src/inst_ops_riscv.cpp:693: undefined reference to `f32_mul(float32_t, float32_t)'
/home/msyksphinz/work/forest/riscv_forest_zapcc/src/inst_ops_riscv.cpp:693: undefined reference to `f32_add(float32_t, float32_t)'
libriscv_cedar.a(inst_ops_riscv.cpp.o): In function `InstOps::FloatAdd(int, int, unsigned char, unsigned int*)':

Microsoftのデータフロープロセッサ EDGEの論文を読む

Twitterで知った、MicrosoftFPGA向けのインオーダスカラプロセッサの論文が出ている。ターゲットとしてはデータフロー処理だ。 プロセッサの名前としてはEDGEという。ブラウザのEdgeではなくて、Explicit Data Graph Executionの略称である。 面白そうなので、読んでみることにした。

Now Microsoft ports Windows 10, Linux to homegrown CPU design • The Register

  • Towards an Area-Efficient Implementation of a High ILP EDGE Soft Processor

https://arxiv.org/pdf/1803.06617.pdf

EDGEの考え方

EDGEの考え方は、複雑なアウトオブオーダのプロセッサを設計するのではなく、なるべくシンプルに構成すること。これにより回路量が削減されFPGAにフィットしやすくなる。

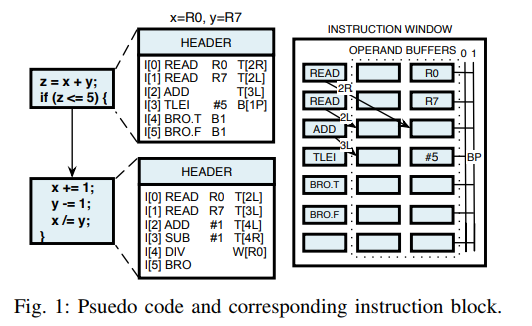
f:id:msyksphinz:20180623230605p:plain
図1. EDGEの考え方を示す疑似コードとそれに相当する命令ブロック

下記の疑似コードとブロックダイアグラムが、EDGEの考え方を示している。下記のようなプログラムを実行する。

z = x + y
if (z <= 5)

疑似コードとして以下のように変換される。

I[0] : READ  R0  T[2R]
I[1] : READ  R7  T[2L]
I[2] : ADD       T[3L]
I[3] : TLEI  #5  B[1P]
I[4] : BRO.T B1
I[5] : BRO.F B1

最初のREAD R0 T[2R]は、グローバルレジスタファイルR0に格納されているxの値をI[2]の命令のRightオペランド(T[2R])に読み込んだデータを格納する。 次にREAD R7 T[2L] でグローバルレジスタファイルR7に格納されているyの値ををI[2]の命令のLeftオペランド(T[2L])に読み込んだデータを格納する。 そしてどちらのデータもオペランドに揃うと、ADD T[3L]を実行し、その結果をI[3]の命令のLeftオペランドに格納する。 さらにTLEI #5 B[1P]では、演算結果と#5を比較して、その比較結果をPredicate情報としてすべての命令にブロードキャストさせる。このときにブロードキャストに使用するチャネルとしては1(B[1P])を使用する。

上記を見てわかるとおり、命令列に対してデータを供給していくことで命令を活性化させていき、プログラムを先に進めていくという構造だ。

EDGEのマイクロアーキテクチャ

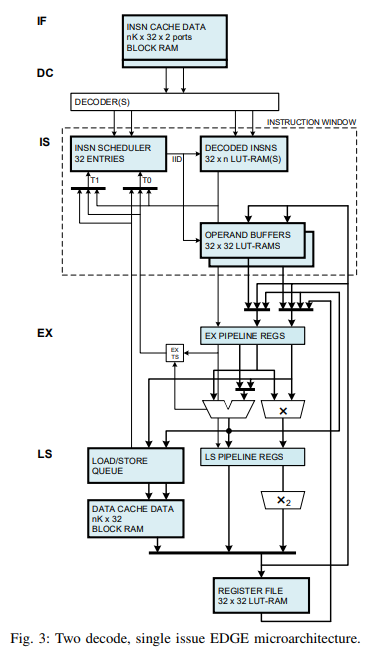
EDGEのマイクロアーキテクチャを図2.に示す。EDGEはシンプルなパイプライン構成をしており、大きくフロントエンドとバックエンドに分かれている。

f:id:msyksphinz:20180623230622p:plain
図2. EDGEのパイプラインアーキテクチャ
  • フロントエンド : Instruction Fetch(IF), Instruction Decode (DC)
  • バックエンド : Instruction Issue(IS), Operand Fetch, Execute(EX), Memory Data Cache Access(LS)

命令が発行できるかどうかは、各命令が必要なオペランドがすべてそろったか、つまり依存関係がすべて解消されたかどうかによって決められる。この命令のスケジューリングはInstruction Schedulerが行っており、発行を待っている命令はInstruction Windowに格納されている。 Instruction Schedulerは32エントリで、32命令を格納することができると思われる。それぞれのエントリはオペランドに対して状態を持っており、すべてのオペランドがReady状態になることで命令発行が可能になる。Instruction SchedulerはReady状態になった命令のうち最もIID(Instruction ID)の低いものを選んで発行する。

並列Instruction Scheduler

Instruction Schedulerは、毎サイクル2命令を発行することができる。2命令をよどみなく発行するためには、データの依存関係をなるべく早く解決してどんどんデータフローに流していくことが重要である。命令の発行を高速化させるために、演算が完了してレジスタで一度叩かれる間に、Instruction Schedulerにフォワーディングがされるようになっている。

命令発行可能かどうかを判定するために、Instruction Schedulerの32エントリにはそれぞれデコーダがおかれている。図3.にInstruction SchedulerのParallel Dataflow Schedulerの構造を示す。

f:id:msyksphinz:20180623230638p:plain
図. 並列Instruction Schedulerのアーキテクチャ
  • RT, RF: True Predicate / False Predicate ビットがReady状態か
  • R0, R1 : オペランド0 / オペランド1がReady状態か
  • INH : 命令が既に発行されているか
  • RDY : 命令が発行可能状態になっているか

RDYが有効になる条件は RT & RF & R0 & R1 & ~INH であり、これにより命令発行が可能になる。

Incremental Instruction Scheduler

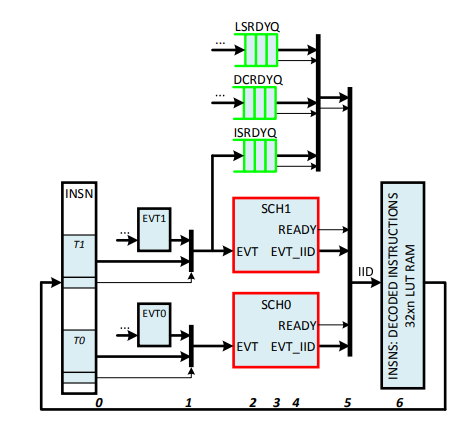
一方で、並列Instruction Schedulerは32エントリ×6ビットのFFを消費してしまいリソースの使用量が大きい。 しかし、各サイクルで発行される命令によりReady状態に変化が現れるのは最大でも別の2つの命令である。そこで、デコードされた命令と現在のReady状態をLUT RAMに残しておき、Ready状態である先頭の2命令をキューに格納しておくという方法がある。 FFの配列による実装と比較して、LUT RAMの実装は高速であるが、1サイクル当たり1Writeしか実行できないという弱点がある。そこで、LUT RAMとFFをハイブリッドで使用する。

f:id:msyksphinz:20180623230655p:plain
図. Incremental Instruction Schedulerのアーキテクチャ

並列SchedulerとIncremental Schedulerの比較

以下に並列SchedulerとIncremental Schedulerの比較を示す。回路面積としてはIncremental Schedulerのほうが優れているが、並列Schedulerの方が命令のストールが発生する確率が少なく、性能的に有利である。

Metric Parallel Incremental Units
Area. 32 entries 288 78 LUTs
Area Total. 32 entries 340 150 LUTs
Period 5.0 4.3 ns
Period, pipelined 2.9 2.5 ns
Area, Total * period 1700 645 LUT*ns
Broadcast flash iterative
Event bank conflicts never sometimes
Area, 4 events/cycle 288 156 LUTs
Area, 64entries 576 130 LUTs

AWS上で動作するRISC-VチップFireSimのチュートリアルを試す 4. Single Core Roctket-Chipの動作

FireSimのチュートリアルを試す続き。前回はなぜかFireSimが起動せずに終わった。

色々調べていくと、FireSimを立ち上げる際のF1インスタンスの設定で、t1.nanoで生成したVPCとサブネットを使用しなければならなかった。

AWSコンソール上でこれを確認してF1インスタンスを作り直すと、正しくFireSimの設定ができるようになった。

前回失敗したところからやり直して、ソフトウェアのビルド、コンフィグレーションの設定を行う。

次に、Farmの立ち上げをやり直す。

$ firesim launchrunfarm
FireSim Manager. Docs: http://docs.fires.im
Running: launchrunfarm

Waiting for instance boots: f1.16xlarges
Waiting for instance boots: m4.16xlarges
Waiting for instance boots: f1.2xlarges
i-09d74249c75ecbc8e booted!
The full log of this run is:
/home/centos/firesim/deploy/logs/2018-06-22--14-16-08-launchrunfarm-BFTH799Z7TMEBRWK.log

これは何をしているのかというと、上記で設定したrunfarmの設定を実行している。これにより、EC2でのRocket-Chipの実行が始まる。上記の設定により、f1_2xlargesが使用されるシングルノードのRocket-Chipが実行される。

  • runfarmの設定(firesim/deploy/config_runtime.iniより抜粋)
[runfarm]
runfarmtag=mainrunfarm

f1_16xlarges=0
m4_16xlarges=0
f1_2xlarges=1

runinstancemarket=ondemand
spotinterruptionbehavior=terminate
spotmaxprice=ondemand

次に、シミュレーションインフラを立ち上げる。Rocket-Chipに必要なソフトウェアインフラやネットワークの設定が行われる。

$ firesim infrasetup
FireSim Manager. Docs: http://docs.fires.im
Running: infrasetup


Building FPGA software driver for FireSimNoNIC-FireSimRocketChipQuadCoreConfig-FireSimDDR3FRFCFSLLC4MBConfig
[192.168.1.98] Executing task 'instance_liveness'
[192.168.1.98] Checking if host instance is up...
[192.168.1.98] Executing task 'infrasetup_node_wrapper'
[192.168.1.98] Copying FPGA simulation infrastructure for slot: 0.
[192.168.1.98] Installing AWS FPGA SDK on remote nodes.
[192.168.1.98] Unloading EDMA Driver Kernel Module.
[192.168.1.98] Copying AWS FPGA EDMA driver to remote node.
[192.168.1.98] Clearing FPGA Slot 0.
[192.168.1.98] Flashing FPGA Slot: 0 with agfi: agfi-0eaa90f6bb893c0f7.
[192.168.1.98] Loading EDMA Driver Kernel Module.
The full log of this run is:
/home/centos/firesim/deploy/logs/2018-06-22--14-18-25-infrasetup-MRHU7BID9CAQJA1E.log

最後に、シミュレーションを実行しよう。

$ firesim runworkload

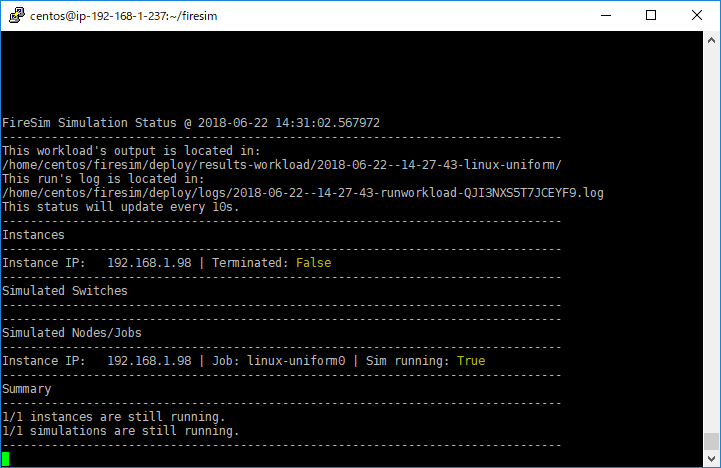
これによりFireSimが立ち上がりシミュレーションが始まるのだが、正常に立ち上がると以下のような画面が表示され、F1インスタンスでRocket-Chipが実行中であるということが示される。 これは常に表示されており、常に自動的に状態が更新されるようになっている。

f:id:msyksphinz:20180622233120p:plain

といわけでコンソールが埋まってしまったので、別のコンソールを立ち上げてc1.4xlargeインスタンスにログインする。 firesimディレクトリに移りsource sourceme-f1-manager.sh で再び環境を呼び込み、F1インスタンス上で実行しているRocket-Chipに対してログインを実行する。

上記の画面では、 192.168.1.98 に対してRocket-Chipが生成されたので、

ssh 192.168.1.98

おっしてscreenを立ち上げてシリアルコンソールを確認する。

screen -r fsim0

とすると、Rocket-Chip上でLinuxが立ち上がっておりログイン画面が表示されている。 ブート成功だ!

f:id:msyksphinz:20180622233054p:plain

さっそくログインする。ログイン名はroot, パスワードはfiresimだ。 ログインできるところまで来ると、シミュレーションは成功だ。

後片付け

シミュレーションを終了するときは、Linux上でpoweroff -fを実行する。

するとRocket-Chipがシャットダウンし、F1インスタンス上で表示されたRocket-Chipの状態を示すコンソールも自動的に閉じられる。

そして、最後に後片付けをして完了だ。

firesim terminaterunfarm

ここまでで、シングルノードのRocket-Chipの実行チュートリアルが完了した。

AWS上で動作するRISC-VチップFireSimのチュートリアルを試す 3. ソフトウェアのビルドと環境設定

f:id:msyksphinz:20180617195844p:plain

AWSで動作するRISC-Vシミュレーション環境FireSimのチュートリアルその3.

F1インスタンスにアクセスするために、生成したキーペアのfiresim.pemをホームディレクトリに配置しておく。 また、sshのキーと同様に、chmod 600 しておく。

$ chmod 600 ~/firesim.pem   # firesim.pemを配置してから実行

リポジトリのダウンロードとビルド

まずはFireSimのリポジトリのダウンロードとビルドを行う。これには少し時間がかかるが、c4インスタンスなので速い。

git clone https://github.com/firesim/firesim
cd firesim
./build-setup.sh fast

次に設定ファイルをsourceする。これはログインするたびに実行しなければならない。

$ source sourceme-f1-manager.sh

次に、FireSimのマネージャを起動する。

$ firesim managerinit

ソフトウェアのビルド

次はソフトウェアのビルドだ。これには約10~15分かかる。

$ cd firesim/sw/firesim-software
$ ./build.sh

次に、FireSimのコンフィグレーションを行う。ここでは、シングルノードで、Rocket-Chip間のネットワークは使用しないため、以下のように設定を書き換える。

  • firesim/deploy/config_runtime.ini
# RUNTIME configuration for the FireSim Simulation Manager
# See docs/Configuration-Details.rst for documentation of all of these params.

[runfarm]
runfarmtag=mainrunfarm

f1_16xlarges=0
m4_16xlarges=0
f1_2xlarges=1

runinstancemarket=ondemand
spotinterruptionbehavior=terminate
spotmaxprice=ondemand

[targetconfig]
topology=no_net_config
no_net_num_nodes=1
linklatency=6405
switchinglatency=10
netbandwidth=200

# This references a section from config_hwconfigs.ini
# In homogeneous configurations, use this to set the hardware config deployed
# for all simulators
defaulthwconfig=firesim-quadcore-no-nic-ddr3-llc4mb

[workload]
workloadname=linux-uniform.json
terminateoncompletion=no

最後に以下を実行してFireSimを立ち上げるのだが、エラーを吐いてしまった。

$ firesim launchrunfarm

Running: launchrunfarm

An error occurred (InvalidKeyPair.NotFound) when calling the RunInstances operation: The key pair 'firesim' does not exist
This probably means there was no more capacity in this availability zone. Try the next one.
An error occurred (InvalidKeyPair.NotFound) when calling the RunInstances operation: The key pair 'firesim' does not exist
This probably means there was no more capacity in this availability zone. Try the next one.
An error occurred (InvalidKeyPair.NotFound) when calling the RunInstances operation: The key pair 'firesim' does not exist
This probably means there was no more capacity in this availability zone. Try the next one.
An error occurred (InvalidKeyPair.NotFound) when calling the RunInstances operation: The key pair 'firesim' does not exist
This probably means there was no more capacity in this availability zone. Try the next one.
An error occurred (InvalidKeyPair.NotFound) when calling the RunInstances operation: The key pair 'firesim' does not exist
This probably means there was no more capacity in this availability zone. Try the next one.
An error occurred (InvalidKeyPair.NotFound) when calling the RunInstances operation: The key pair 'firesim' does not exist
This probably means there was no more capacity in this availability zone. Try the next one.
we tried all subnets, but there was insufficient capacity to launch your instances
only the following 0 instances were launched
[]
Waiting for instance boots: f1.16xlarges
Waiting for instance boots: m4.16xlarges
Waiting for instance boots: f1.2xlarges
Fatal error.
Traceback (most recent call last):
  File "/home/centos/firesim/deploy/firesim", line 300, in <module>
    main(args)
  File "/home/centos/firesim/deploy/firesim", line 249, in main
    globals()[args.task](simconf)
  File "/home/centos/firesim/deploy/firesim", line 137, in launchrunfarm
    runtime_conf.runfarm.launch_run_farm()
  File "/home/centos/firesim/deploy/runtools/run_farm.py", line 198, in launch_run_farm
    wait_on_instance_launches(f1_2s, 'f1.2xlarges')
  File "/home/centos/firesim/deploy/awstools/awstools.py", line 230, in wait_on_instance_launches
    for instance in instances:
TypeError: 'NoneType' object is not iterable
The full log of this run is:
/home/centos/firesim/deploy/logs/2018-06-21--13-18-24-launchrunfarm-WWZ1V5VC1UMFXIY9.log

Ubuntu 18.04でsbtが動かない問題(というか結果的にRocket-Chipが動かない問題)を何とかする

Ubuntuが18.04 LTSになって、さっそくバージョンアップしてRISC-Vの環境を構築しようとしたのだけれども問題にぶち当たった。

RISCV-Toolsは以下のエントリでインストールの試行はしていたし、うまく行くことは確認していたのだけれども、Rocket-Chipの試行はしていなかったので実行してみた。

msyksphinz.hatenablog.com

Ubuntu 18.04 LTSをインストールしたままで実行すると、以下のようなエラーでsbtがダウンロード出来ない。

$ make CONFIG=DefaultConfig
make -C /home/msyksphinz/work/rocket-chip-msyksphinz/firrtl SBT="java -Xmx2G -Xss8M -XX:MaxPermSize=256M -jar /home/msyksphinz/work/rocket-chip-msyksphinz/sbt-launch.jar" root_dir=/home/msyksphinz/work/rocket-chip-msyksphinz/firrtl build-scala
make[1]: Entering directory '/home/msyksphinz/work/rocket-chip-msyksphinz/firrtl'
java -Xmx2G -Xss8M -XX:MaxPermSize=256M -jar /home/msyksphinz/work/rocket-chip-msyksphinz/sbt-launch.jar "assembly"
OpenJDK 64-Bit Server VM warning: Ignoring option MaxPermSize; support was removed in 8.0
Getting org.scala-sbt sbt 1.1.1  (this may take some time)...

:: problems summary ::
:::: WARNINGS
                module not found: org.scala-sbt#sbt;1.1.1

        ==== local: tried

          /home/msyksphinz/.ivy2/local/org.scala-sbt/sbt/1.1.1/ivys/ivy.xml

          -- artifact org.scala-sbt#sbt;1.1.1!sbt.jar:

          /home/msyksphinz/.ivy2/local/org.scala-sbt/sbt/1.1.1/jars/sbt.jar

        ==== local-preloaded-ivy: tried

          file:////home/msyksphinz/.sbt/preloaded/org.scala-sbt/sbt/1.1.1/ivys/ivy.xml

        ==== local-preloaded: tried

          file:////home/msyksphinz/.sbt/preloaded/org/scala-sbt/sbt/1.1.1/sbt-1.1.1.pom

          -- artifact org.scala-sbt#sbt;1.1.1!sbt.jar:

          file:////home/msyksphinz/.sbt/preloaded/org/scala-sbt/sbt/1.1.1/sbt-1.1.1.jar

        ==== Maven Central: tried

          https://repo1.maven.org/maven2/org/scala-sbt/sbt/1.1.1/sbt-1.1.1.pom

          -- artifact org.scala-sbt#sbt;1.1.1!sbt.jar:

          https://repo1.maven.org/maven2/org/scala-sbt/sbt/1.1.1/sbt-1.1.1.jar

        ==== sbt-maven-releases: tried

          https://repo.scala-sbt.org/scalasbt/maven-releases/org/scala-sbt/sbt/1.1.1/sbt-1.1.1.pom

          -- artifact org.scala-sbt#sbt;1.1.1!sbt.jar:

          https://repo.scala-sbt.org/scalasbt/maven-releases/org/scala-sbt/sbt/1.1.1/sbt-1.1.1.jar

        ==== sbt-maven-snapshots: tried

          https://repo.scala-sbt.org/scalasbt/maven-snapshots/org/scala-sbt/sbt/1.1.1/sbt-1.1.1.pom

          -- artifact org.scala-sbt#sbt;1.1.1!sbt.jar:

          https://repo.scala-sbt.org/scalasbt/maven-snapshots/org/scala-sbt/sbt/1.1.1/sbt-1.1.1.jar

        ==== typesafe-ivy-releases: tried

          https://repo.typesafe.com/typesafe/ivy-releases/org.scala-sbt/sbt/1.1.1/ivys/ivy.xml

        ==== sbt-ivy-snapshots: tried

          https://repo.scala-sbt.org/scalasbt/ivy-snapshots/org.scala-sbt/sbt/1.1.1/ivys/ivy.xml

                ::::::::::::::::::::::::::::::::::::::::::::::

                ::          UNRESOLVED DEPENDENCIES         ::

                ::::::::::::::::::::::::::::::::::::::::::::::

                :: org.scala-sbt#sbt;1.1.1: not found

                ::::::::::::::::::::::::::::::::::::::::::::::


:::: ERRORS
        Server access Error: java.lang.RuntimeException: Unexpected error: java.security.InvalidAlgorithmParameterException: the trustAnchors parameter must be non-empty url=https://repo1.maven.org/maven2/org/scala-sbt/sbt/1.1.1/sbt-1.1.1.pom

        Server access Error: java.lang.RuntimeException: Unexpected error: java.security.InvalidAlgorithmParameterException: the trustAnchors parameter must be non-empty url=https://repo1.maven.org/maven2/org/scala-sbt/sbt/1.1.1/sbt-1.1.1.jar

        Server access Error: java.lang.RuntimeException: Unexpected error: java.security.InvalidAlgorithmParameterException: the trustAnchors parameter must be non-empty url=https://repo.scala-sbt.org/scalasbt/maven-releases/org/scala-sbt/sbt/1.1.1/sbt-1.1.1.pom

        Server access Error: java.lang.RuntimeException: Unexpected error: java.security.InvalidAlgorithmParameterException: the trustAnchors parameter must be non-empty url=https://repo.scala-sbt.org/scalasbt/maven-releases/org/scala-sbt/sbt/1.1.1/sbt-1.1.1.jar

        Server access Error: java.lang.RuntimeException: Unexpected error: java.security.InvalidAlgorithmParameterException: the trustAnchors parameter must be non-empty url=https://repo.scala-sbt.org/scalasbt/maven-snapshots/org/scala-sbt/sbt/1.1.1/sbt-1.1.1.pom

        Server access Error: java.lang.RuntimeException: Unexpected error: java.security.InvalidAlgorithmParameterException: the trustAnchors parameter must be non-empty url=https://repo.scala-sbt.org/scalasbt/maven-snapshots/org/scala-sbt/sbt/1.1.1/sbt-1.1.1.jar

        Server access Error: java.lang.RuntimeException: Unexpected error: java.security.InvalidAlgorithmParameterException: the trustAnchors parameter must be non-empty url=https://repo.typesafe.com/typesafe/ivy-releases/org.scala-sbt/sbt/1.1.1/ivys/ivy.xml

        Server access Error: java.lang.RuntimeException: Unexpected error: java.security.InvalidAlgorithmParameterException: the trustAnchors parameter must be non-empty url=https://repo.scala-sbt.org/scalasbt/ivy-snapshots/org.scala-sbt/sbt/1.1.1/ivys/ivy.xml

GitHubのIssueでも聞いてみた。その結果sbtの問題であることが分かり、リンク先をたどっていた結果以下のページに到達。

git.mikael.io

つまり、SuperUserで以下の2行を実行する。

/usr/bin/printf '\xfe\xed\xfe\xed\x00\x00\x00\x02\x00\x00\x00\x00\xe2\x68\x6e\x45\xfb\x43\xdf\xa4\xd9\x92\xdd\x41\xce\xb6\xb2\x1c\x63\x30\xd7\x92' > /etc/ssl/certs/java/cacerts
/var/lib/dpkg/info/ca-certificates-java.postinst configure

これで再びRocket-Chipのビルドを実行する。これでうまく行くことが確認できた。

f:id:msyksphinz:20180428120515p:plain